
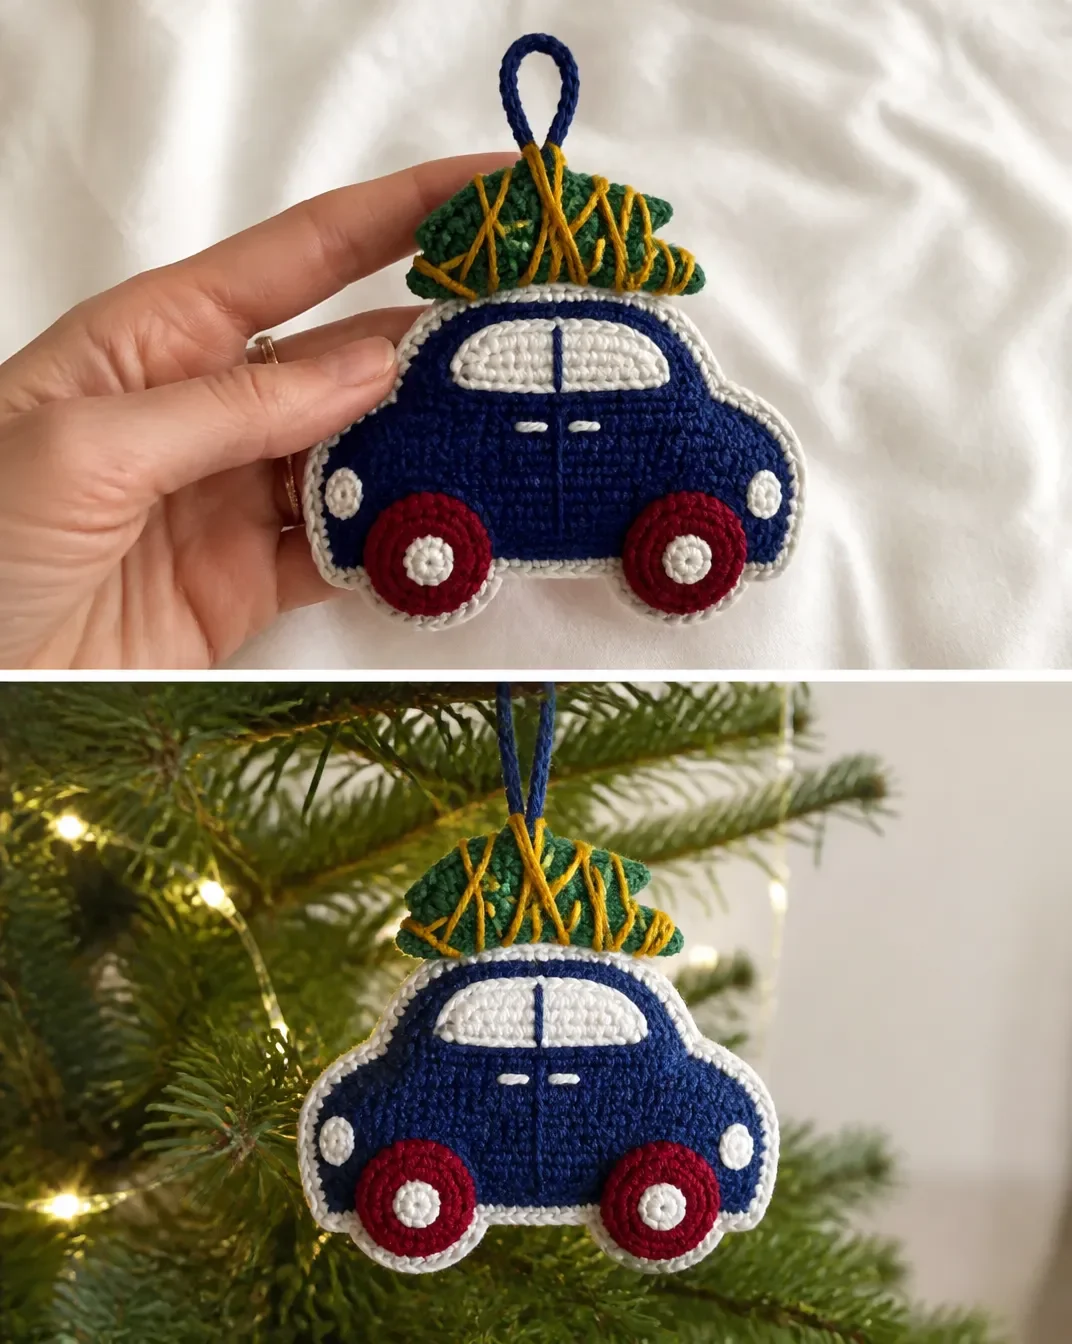
A tiny crocheted car carrying a Christmas tree makes this Crochet Christmas Ornament Pattern: Home for the Holidays especially charming. The finished ornament combines soft navy, white, hunter green, burgundy, and gold details into a festive decoration for a tree, garland, gift package, or seasonal display. It is also a thoughtful handmade gift for anyone who enjoys cozy holiday décor. For another small crochet decoration idea, you might also enjoy this crochet rose ornament-style project.
Why You’ll Love This Crochet Project
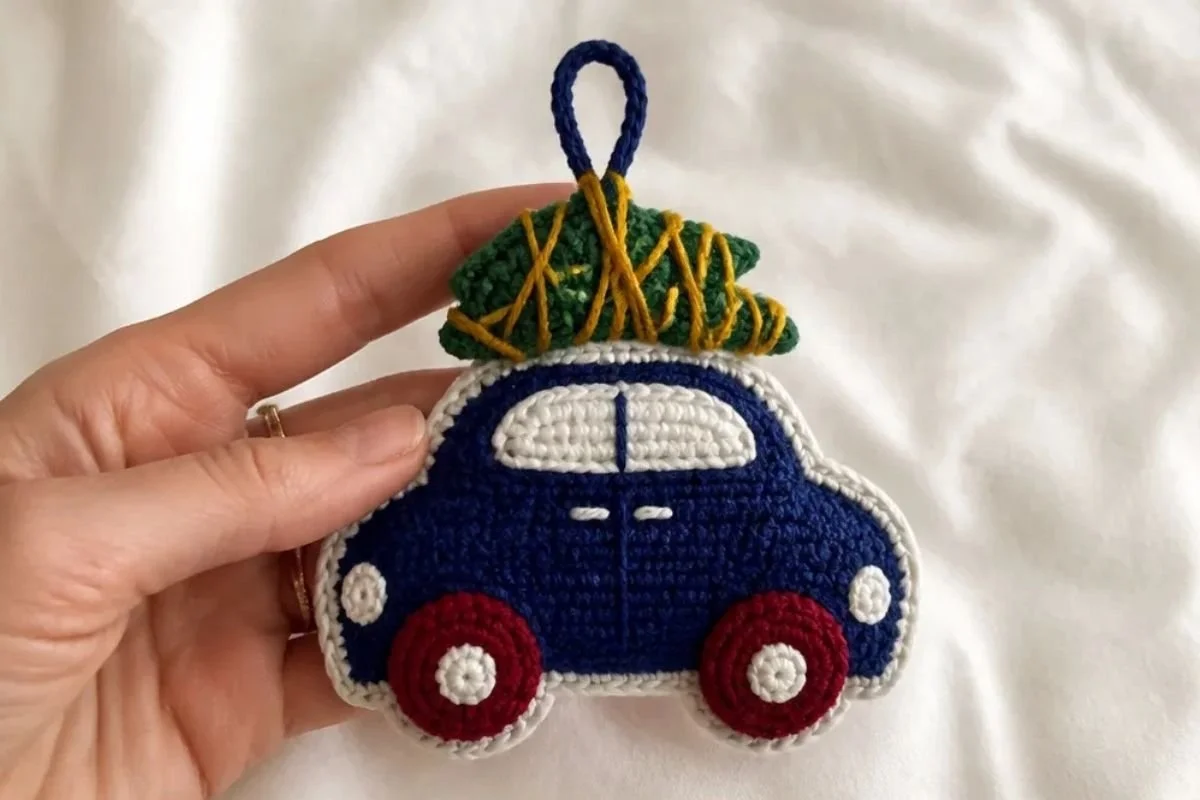
- It creates a nostalgic holiday scene. The car, tree, wheels, lights, and door details tell a simple Christmas story in a small decorative piece.
- It practices shaping. The car body uses single crochet decreases, while the tree is formed with repeated back-loop decreases.
- It includes manageable components. You will make two car-body pieces, a window, two wheels, a tree, embroidered details, and a hanging loop.
- It works well for seasonal decorating. The ornament can hang on a Christmas tree, wreath, garland, or cabinet knob.
- It makes a useful handmade gift. Finished ornaments are lightweight, easy to wrap, and suitable for holiday exchanges or stocking gifts.
My Crochet Flower Tip: Keep the color balls separated and label them A through E before beginning. This makes the color changes and embroidered details easier to follow.
Before You Start Crocheting
This pattern is worked in U.S. crochet terminology with a 5 mm hook. The main car body is made twice in Soft Navy, then the two pieces are held with wrong sides together and edged in Soft White. The window, wheels, tree, embroidery, and hanging loop are added afterward.
The project uses single crochet, single crochet decreases, working in back loops only, slip-stitch joining, embroidery, and basic sewing. Pay close attention to the stitch counts after each shaped row, particularly on the car body and tree.
The approved pattern does not provide a finished measurement or gauge value, so use the recommended hook or adjust hook size only if needed to obtain the intended fabric and proportions.
Helpful Abbreviations
- ch: chain
- sc: single crochet
- sc2tog: single crochet 2 together
- sc3tog: single crochet 3 together
- sl st: slip stitch
- RS: right side
- WS: wrong side
Materials You’ll Need
- Red Heart® Super Saver® (7 oz/198 g; 364 yds/333 m), base yarn:
- Contrast A Soft Navy (0387): 1 ball
- Contrast B Soft White (0316): 1 ball
- Contrast C Hunter Green (0389): 1 ball
- Contrast D Burgundy (0376): 1 ball
- Contrast E Gold (0321): 1 ball
- Size U.S. H/8 (5 mm) crochet hook, or size needed to obtain gauge
- Yarn needle
Use Contrast A for the car body and hanging loop, Contrast B for the edging, window, wheels, and white embroidery, Contrast C for the tree, Contrast D for the wheel centers, and Contrast E for the tree decoration.
Step-by-Step Crochet Instructions
Stitch Key
Satin Stitch:
- Single crochet 2 together (sc2tog)
- Worked in back loop only
Car Body Make 2
With A, ch 17.
- 1st row (RS): 1 sc in 2nd ch from hook. 1 sc in each ch to end of chain. Turn. 16 sc.
- 2nd row: Ch 1. 1 sc in each sc to end of row. Turn. 16 sc.
- 3rd row: Ch 1. Sc2tog. 1 sc in each sc to last 2 sc. Sc2tog. Turn. 14 sc.
- 4th row: As 3rd row. 12 sc.
- 5th row: Ch 1. Sc2tog. 1 sc in each of next 7 sc. Turn. 8 sc.
- 6th row: Ch 1. 1 sc in each sc to end of row. Turn. 8 sc.
- 7th row: Ch 1. Sc2tog. 1 sc in each sc to last 2 sc. Sc2tog. Fasten off.
Edging Join Car Body
Holding WS tog, join B with sl st at any point around Car Body. Working through both thicknesses, proceed as follows:
1st rnd: Ch 1. Work sc evenly around Car Body. Join. Fasten off.
Work slowly around the perimeter so the two car-body pieces stay aligned. The edging joins the layers and creates a clean outline.
Window
With B, ch 8.
- 1st row: 1 sc in 2nd ch from hook. 1 sc in each ch to end of chain. Turn. 7 sc.
- 2nd row: Ch 1. Sc2tog. 1 sc in each sc to last 2 sc. Sc2tog. 5 sc. Fasten off.
Sew Window to Car Body as shown in photo.
Using A, embroider line in middle of Window.
Wheels Make 2
With B, ch 2.
- 1st rnd: 6 sc in 2nd ch from hook. Break B. Join with D. 6 sc.
- 2nd rnd: With D, ch 1. 2 sc in each sc around. Join.
Fasten off.
Sew Wheels to Car Body as shown in photo.
Tree
With C, ch 10.
- 1st row: 1 sc in 2nd ch from hook. 1 sc in each ch to end of chain. Turn. 9 sc.
- 2nd row: Ch 1. Working in back loops only, 1 sc in each of next 3 sc. Sc3tog. 1 sc in each sc to end of row. Turn. 7 sc.
- 3rd and alt rows: Ch 1. Working in back loops only, 1 sc in each st to end of row. Turn.
- 4th row: Ch 1. Working in back loops only, 1 sc in each of next 2 sc. Sc3tog. 1 sc in each sc to end of row. Turn. 5 sc.
- 6th row: Ch 1. Working in back loops only, 1 sc in next sc. Sc3tog. 1 sc in last sc. Turn. 3 sc.
- 8th row: Ch 1. Working in back loops only, Sc3tog. Fasten off.
Sew Tree to top of Car Body as shown in photo.
Using a length of E, wrap and embroider yarn around Tree as shown in photo.
Car Lights and Door Details
Using B, embroider Car Lights with satin st as shown in photo.
Using same length, embroider door details.
Keep the embroidery snug but not tight enough to pull the car body out of shape.
Hanging Loop
With A, ch 12.
Fasten off.
Sew Hanging Loop to Car Body as shown in photo.
Ways to Display Your Finished Crochet

- Hang the ornament near the front of a Christmas tree where the car silhouette and tree detail can be seen clearly.
- Add it to a holiday garland across a mantel, shelf, or stair railing.
- Tie it to a wrapped gift as a reusable decoration instead of a paper bow.
- Group it with other handmade ornaments in a seasonal bowl or basket.
- Give it as a small holiday gift to someone who enjoys handmade Christmas decorations.
- Use several ornaments in coordinating colors for a themed tree display.
Caring for Your Crochet Project
Red Heart® Super Saver® is durable, but the ornament includes embroidered details and sewn-on components that should be handled gently. Dust it with a soft cloth, makeup brush, or cool air from a distance rather than pulling at the stitching.
For small marks, use careful spot cleaning with a barely damp cloth and allow the ornament to air-dry completely. Avoid soaking, wringing, or machine washing because water and agitation may distort the layered car body and loosen attached details.
Store the ornament flat or loosely wrapped in clean tissue paper in a dry container. Avoid heavy objects that could flatten the wheels, window, or tree. Keep it away from excessive heat and direct sunlight for long periods to help preserve the yarn colors.
Tips for Better Results
- Count after every shaped row. The car body changes from 16 sc to 14, 12, and 8 sc, so checking the count prevents the silhouette from drifting.
- Make the two car bodies alike. Use the same tension and keep the decreases positioned consistently on both pieces.
- Hold the layers evenly for the edging. Align the outer edges before joining B with a slip stitch through both thicknesses.
- Watch the back loops on the tree. The tree instructions specifically require working in back loops only, which helps create its ridged texture.
- Change colors cleanly. Break B and join D as directed for the wheels so the wheel center and outer ring remain distinct.
- Use small, secure stitches when sewing. Attach the window, wheels, tree, and hanging loop firmly without bunching the car body.
- Keep embroidery tension moderate. Satin stitching and door details should decorate the surface without tightening the fabric.
- Secure every yarn end carefully. Trim only after the component is firmly attached and the end is woven into the back.
For another project that emphasizes dimensional floral shaping and color placement, this beginner-friendly crochet peony tutorial can provide useful practice with decorative crochet techniques.
Creative Ways to Customize Your Project
The approved pattern uses Soft Navy, Soft White, Hunter Green, Burgundy, and Gold for a classic holiday palette. Optional color changes can give the same design a different mood, but changing yarn weight or hook size may affect the ornament’s dimensions, fabric density, and yarn requirements.
- Substitute a deep forest green or cranberry shade for the car body while keeping the white edging for contrast.
- Use a metallic-looking gold or warm yellow yarn for the tree wrap, provided it can be embroidered and sewn securely.
- Make the window and edging the same color for a quieter, monochromatic look.
- Try a bright red car body with white trim for a traditional Christmas palette.
- Use the ornament as part of a coordinated set, changing only the car-body color while keeping the component colors consistent.
- Add a longer hanging loop for a mantle or wall display, while remembering that this changes the approved loop length.
Frequently Asked Questions
Is this ornament suitable for a beginner?
It uses basic single crochet, decreases, back-loop-only stitches, simple color changes, embroidery, and sewing. Beginners who are comfortable counting stitches and reading row instructions can work through it carefully.
How many car-body pieces are required?
The pattern instructs you to make two Car Body pieces. They are held with wrong sides together and joined with a single-crochet edging worked through both thicknesses.
Which color is used for the tree?
The tree is worked with Contrast C, Hunter Green (0389). Contrast E, Gold (0321), is then wrapped and embroidered around the tree as shown in the photo.
Can I change the colors?
Yes, color changes are an optional customization. Keep the original color assignments if you want the stated contrast arrangement, or choose comparable colors while maintaining enough contrast for the window, wheels, tree, and details to remain visible.
What hook size should I use?
The pattern specifies a U.S. H/8 (5 mm) crochet hook, or the size needed to obtain gauge. If you change yarn or hook size, the finished proportions and yarn requirements may also change.
How are the wheels constructed?
Each wheel begins with B and is made from 6 sc worked into the second chain from the hook. B is then broken, D is joined, and the second round increases with 2 sc in each sc around.
How is the tree shaped?
The tree begins with 9 sc and narrows through sc3tog decreases worked in back loops only at specified rows. Follow the row numbers and stitch counts exactly to preserve the tapered shape.
How should I attach the details?
The window, wheels, and tree are sewn to the Car Body as shown in the photo. The car lights and door details are embroidered with B, and the hanging loop is sewn to the Car Body after it is fastened off.
Conclusion
This Home for the Holidays ornament combines simple crochet shaping with colorful embroidery and layered construction to create a cheerful Christmas keepsake. Make one for your tree, several for gifts, or a coordinated set for a seasonal display. For more festive inspiration, browse these free crochet Christmas ornament patterns and enjoy customizing your handmade holiday décor.