
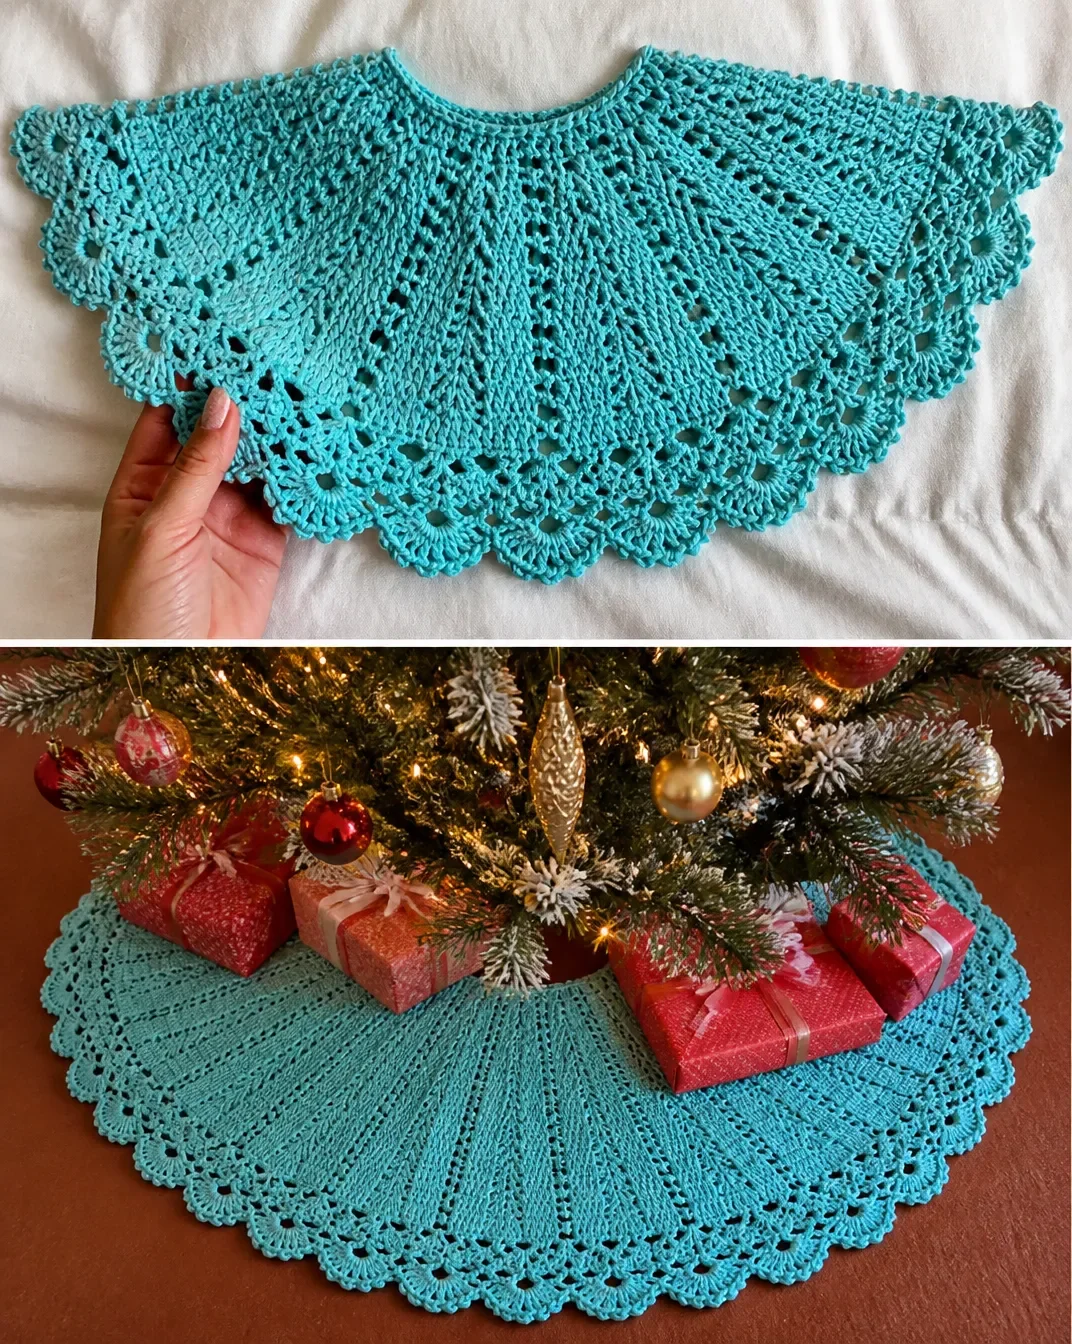
A DIY crochet tree skirt for Christmas decor brings handmade texture and warmth beneath the tree. This design is built from eleven joined motifs, then finished with an openwork border that creates a graceful scalloped edge. Bernat Super Value yarn makes it practical for a seasonal project, while the shell shaping gives the skirt a classic, decorative look. If you enjoy making small floral-inspired crochet accessories too, this crochet rose pattern for wine glasses can complement a handmade holiday setting.
Why You’ll Love This Crochet Project
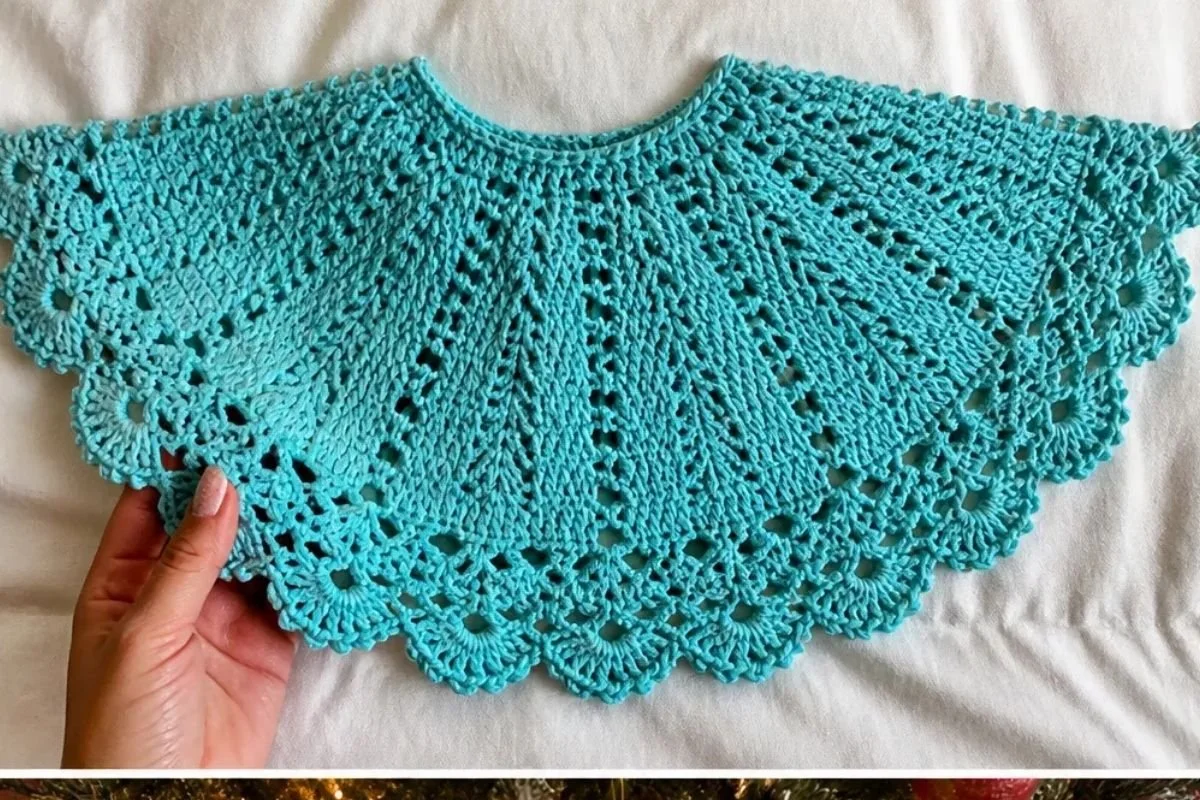
- It creates a substantial seasonal decoration. The joined motifs form a circular tree skirt that frames the base of a Christmas tree beautifully.
- The construction is easy to organize. You make one first motif, add ten more motifs to it, and then work the border.
- It practices shaping. The pattern uses shells, increases, slip stitches, double crochet, and treble crochet to build each motif.
- It works well in a single color. Choose a traditional holiday shade, a neutral tone, or a color that coordinates with your existing decorations.
- It can become a thoughtful handmade gift. A finished skirt is useful for a new homeowner, newly married couple, or anyone who enjoys handmade Christmas decor.
My Crochet Flower Tip: Place each completed motif in order as you work. Since the second through eleventh motifs are joined directly to the previous motif, keeping the growing piece arranged flat will make the construction easier to follow.
Pattern Overview
This project consists of eleven motifs: one First Motif, followed by ten Second to Eleventh Motifs. The additional motifs are joined to the left side of the previous motif as they are crocheted, so there is no separate sewing step between motifs. Once all eleven motifs are complete, work the four-row border across the joined piece.
The pattern uses US crochet terminology. The first motif begins on the wrong side, while the later motifs begin on the right side. Pay close attention to the instructions that leave remaining stitches unworked; those skipped stitches help create the tapered motif shape.
Useful abbreviations include:
- ch: chain
- dc: double crochet
- tr: treble crochet
- sc: single crochet
- sl st: slip stitch
- sp: space
- rem: remaining
- rep: repeat
- tr2tog: treble crochet two together
- RS: right side
- WS: wrong side
Materials You’ll Need
- Bernat® Super Value™ yarn: 7 oz/197g; 440 yds/402 m, color of your choice, 2 balls
- Crochet hook: U.S. H/8 (5 mm), or size needed to obtain gauge
The yarn color determines the overall mood of the finished tree skirt. A deep red or forest green feels traditional, while cream, white, gray, or taupe creates a softer neutral display.
Step-by-Step Crochet Instructions
Construction Overview
Make Eleven Motifs (a “First Motif” plus “Second to Eleventh Motifs”) and join them as directed. Work Border after motifs are complete.
First Motif
1st row (WS)
(3 dc. Ch 3. 4 dc) in 4th ch from hook – counts as beg shell.
Miss next 9 ch. Ch 3. (4 dc. Ch 3. 4 dc) in next ch – shell made. Rep from * to end of chain.
Turn.
2nd row (RS)
Sl st in each of first 4 dc and ch-3 sp.
Ch 3 (counts as dc).
2 dc in same sp as last sl st.
Turn.
Leave rem sts unworked.
3rd row
Ch 4. 2 dc in first dc. 1 dc in next dc.
(2 dc. 1 tr) in last dc.
Turn.
4th row
Ch 4. 2 dc in first tr. 1 dc in each dc to last tr.
(2 dc. 1 tr) in last tr.
Turn.
5th row
Sl st in each of first 6 sts.
Ch 4. 2 dc in same sp as last sl st.
1 dc in each dc to last 6 sts.
(2 dc. 1 tr) in next dc.
Turn.
Leave rem 5 sts unworked.
6th to 8th rows
As 3rd row 3 times.
9th row
As 5th row.
10th to 12th rows
As 3rd row 3 times.
13th row
As 5th row.
14th to 16th rows
As 3rd row 3 times.
17th row
Sl st in each of first 15 sts.
Ch 4. 2 dc in same sp as last sl st.
1 dc in each of next 3 dc.
(2 dc. 1 tr) in next dc.
Fasten off.
Leave rem 14 sts unworked.
Second to Eleventh Motifs
Make the remaining ten motifs one at a time, joining each motif to the previous motif as directed.
1st row (RS)
Join yarn with sl st to ch-3 sp of next shell on left side of previous Motif.
Ch 3. 2 dc in same sp as last sl st.
Turn.
2nd row
Ch 4. 2 dc in first dc. 1 dc in next dc.
(2 dc. 1 tr) in last dc.
Turn.
3rd row
Ch 4. 2 dc in first tr. 1 dc in each dc to last tr.
(2 dc. 1 tr) in last st.
Turn.
4th row
Ch 4. 2 dc in first tr. 1 dc in each dc to last tr.
(2 dc. 1 tr) in last st.
Sl st in top of corresponding ch-4 of previous Motif.
Turn.
5th row
Sl st in each of first 6 sts.
Ch 4. 2 dc in same sp as last sl st.
1 dc in each dc to last 6 sts.
(2 dc. 1 tr) in next dc.
Turn.
Leave rem 5 sts unworked.
6th and 7th rows
As 3rd row twice.
8th and 9th rows
As 4th and 5th rows.
10th and 11th rows
As 3rd row twice.
12th and 13th rows
As 4th and 5th rows.
14th and 15th rows
As 3rd row twice.
16th row
As 4th row.
17th row
Sl st in each of first 15 sts.
Ch 3. 1 dc in same sp as last sl st.
1 dc in each of next 3 dc.
(1 dc. 1 tr) in next dc.
Fasten off.
Leave rem 14 sts unworked.
Border
Work the border after all eleven motifs are complete.
Border: 1st row (RS)
Join yarn with sl st to first dc of 16th row of Eleventh Motif.
Ch 10 (counts as dc and ch 7).
Miss next 6 dc.
1 dc in next dc.
Ch 7. Miss next 6 dc. 1 sc in first tr of 17th row. Ch 3. Miss next 2 dc. 2 dc in next dc. Ch 3. Miss next 2 dc. 1 sc in last tr of 17th row. Ch 7. Miss next 6 dc of 16th row. 1 dc in next dc. Ch 7. Miss next 7 sts.*
- 2 dc in next joining sl st. Ch 7. Miss next 7 sts. 1 dc in next dc of 16th row of next Motif.
Rep from * 10 times more, then from * to once.**
1 dc in last dc of 16th row.
Turn.
Border: 2nd row
Ch 3 (counts as dc).
1 dc in first dc.
Ch 3. 3 dc in next ch-7 sp. Ch 6. 3 dc in next ch-7 sp.*
(Ch 3. 2 dc in next dc) twice.
Rep from * 10 times more, then from * to once.**
Ch 3. 2 dc in 3rd ch of ch 10.
Turn.
Border: 3rd row
Ch 3 (counts as dc).
1 dc in next dc.
Ch 6. 3 dc in next ch-6 sp. Ch 6.*
Miss next (3 dc, ch-3 sp, 2 dc).
(3 dc. ch 3. 3 dc) in next ch-3 sp.
Rep from * 10 times more, then from * to once.**
1 dc in each of last 2 dc.
Turn.
Border: 4th row
Ch 3 (counts as dc).
1 dc in next dc.
Ch 7. Tr2tog. Ch 7.*
Miss next 3 dc.
(3 dc. Ch 3. Sl st to top of last dc – picot made. 3 dc) in next ch-3 sp.
Rep from * 10 times more, then from * to once.**
1 dc in each of last 2 dc.
Fasten off.
Creative Ways to Use Your Finished Crochet

- Place it beneath the Christmas tree. Center the opening around the tree stand and spread the motifs evenly around the base.
- Coordinate it with wrapped gifts. Use matching or complementary wrapping paper for a unified holiday display.
- Use it beneath a tabletop tree. A smaller tabletop tree can sit on a table, sideboard, or entryway cabinet with the skirt arranged beneath it.
- Give it as a seasonal gift. Fold it carefully and package it with other handmade or holiday items.
- Create a neutral winter display. A cream, white, gray, or tan skirt can remain in use throughout the winter season rather than only at Christmas.
Caring for Your Crochet Project
Keep the finished tree skirt away from excessive heat, open flames, and rough surfaces that could catch the openwork border. Before storing it, gently shake away loose dust and inspect the picots and chain spaces for snags.
For light cleaning, use careful spot cleaning rather than aggressive scrubbing. Avoid pulling the motifs out of shape while the piece is damp. Allow any cleaned area to dry completely before folding.
Store the skirt flat or loosely folded in a dry container. Avoid compressing it under heavy decorations, since prolonged pressure can flatten the shells and border. If needed, reshape the motifs gently by hand before placing the skirt beneath the tree.
Helpful Crochet Tips
- Keep the first chain relaxed. A tight foundation chain can make the first row difficult to work and may cause the motif to pull inward.
- Mark the right and wrong sides. The first motif begins on the WS, while the later motifs begin on the RS. A removable stitch marker can help you track the orientation.
- Count the skipped stitches carefully. Instructions such as “Miss next 9 ch,” “Miss next 6 dc,” and “Miss next 7 sts” control the open shape of the design.
- Watch the turning instructions. Several rows end with a turn and leave remaining stitches unworked. Do not continue across those stitches unless the pattern specifically tells you to.
- Join motifs at the exact spaces. For each additional motif, join with a slip stitch to the ch-3 space of the next shell on the left side of the previous motif.
- Check the border before repeating. The border contains several different chain spaces, missed stitches, and repeats. Read each complete repeat once before working it across the joined motifs.
- Secure ends neatly. Fasten off securely after each motif, then weave in ends without pulling the fabric tight.
- Lay the work flat occasionally. This helps you see whether the motifs are joining evenly and whether the border is forming consistently.
For a small crochet project using similar floral inspiration, this DIY crochet flower keychain tutorial offers another way to practice decorative shaping on a smaller scale.
Color and Styling Variations
The approved pattern is worked with one color of Bernat Super Value yarn, but color choice can change the look significantly without changing the construction.
- Traditional holiday palette: Use red, green, or a rich burgundy for a classic Christmas display.
- Snowy winter palette: White, cream, or pale gray gives the openwork border a delicate, frosted appearance.
- Modern neutral palette: Taupe, charcoal, beige, or soft gray can coordinate with minimalist decorations.
- Two-color effect: For an optional variation, alternate colors between motifs. This changes the original single-color appearance and requires planning how each joining color is introduced.
- Accent border: Work the motifs in one color and use a second color for the border only. The border’s picots and chain spaces will stand out clearly.
- Different yarn or hook: A substitute yarn or hook may affect gauge, motif dimensions, drape, texture, and yarn requirements. If you make a substitution, use the hook size needed to obtain the desired gauge and expect the finished size to change if your tension differs.
Frequently Asked Questions
How many motifs are needed?
Make eleven motifs total: one First Motif and ten Second to Eleventh Motifs.
Are the motifs sewn together afterward?
No. The Second to Eleventh Motifs are joined as they are crocheted by slip stitching to the specified ch-3 space or corresponding ch-4 of the previous motif.
What yarn is recommended?
The pattern calls for Bernat® Super Value™, 7 oz/197g; 440 yds/402 m, in the color of your choice, with two balls required.
What hook size should I use?
Use a U.S. H/8 (5 mm) crochet hook, or use the size needed to obtain gauge.
Does the first motif begin on the right side?
No. The 1st row of the First Motif is worked on the wrong side. The Second to Eleventh Motifs begin on the right side.
When is the border worked?
Work the border after all eleven motifs are complete and joined.
Can I use more than one color?
The approved pattern specifies one color, but using multiple colors is an optional modification. Changing colors may alter the visual balance and can add extra yarn ends to secure.
How should I care for the finished tree skirt?
Protect it from excessive heat and snagging. Dust gently, spot clean carefully when needed, reshape by hand, and store it dry and loosely folded or flat.
Conclusion
This DIY crochet tree skirt for Christmas decor combines repeating shell motifs with an airy, picot-edged border for a warm handmade finish beneath the tree. Make it in a traditional holiday color or customize the palette for your home. For another seasonal crochet idea, explore this farmhouse Christmas tree skirt crochet pattern for additional decorating inspiration.