
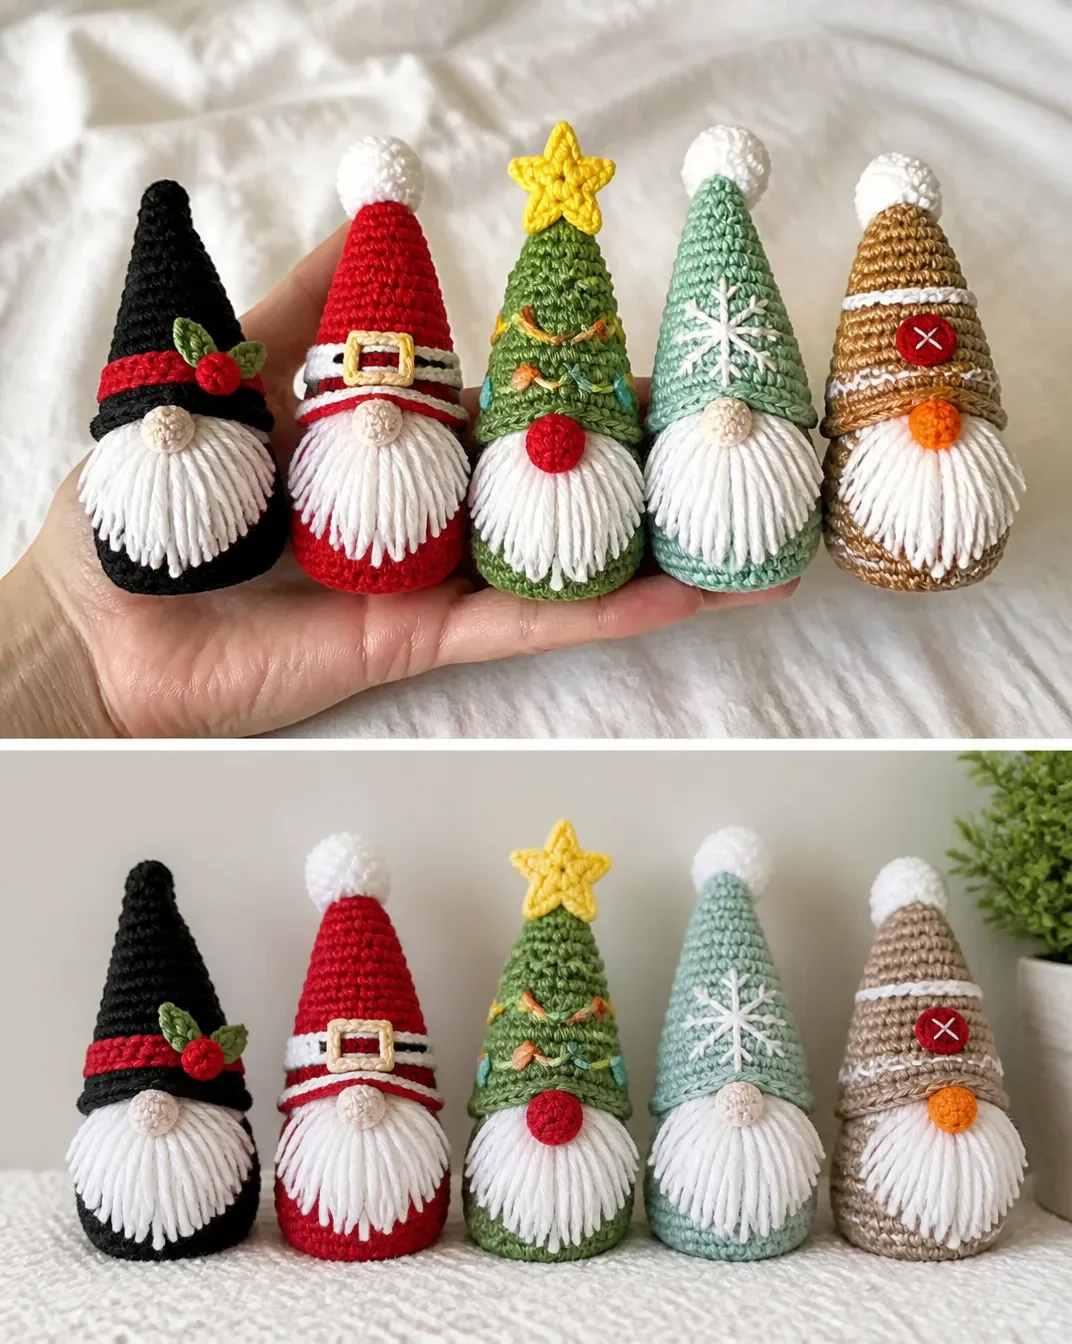
A cheerful set of five seasonal characters, the Crochet Gnomes Pattern: Family of Five includes a Christmas tree gnome, snowflake gnome, gingerbread gnome, snowman gnome, and Santa gnome. Each small figure combines simple single crochet shaping with colorful embroidered details, making the collection ideal for holiday decorating or handmade gifts. Display them together on a mantel, shelf, or tabletop, or arrange them as part of a festive vignette alongside other handmade decorations. For more seasonal crochet inspiration, explore these all-in-one crochet bouquet patterns.
Why You’ll Love This Crochet Project
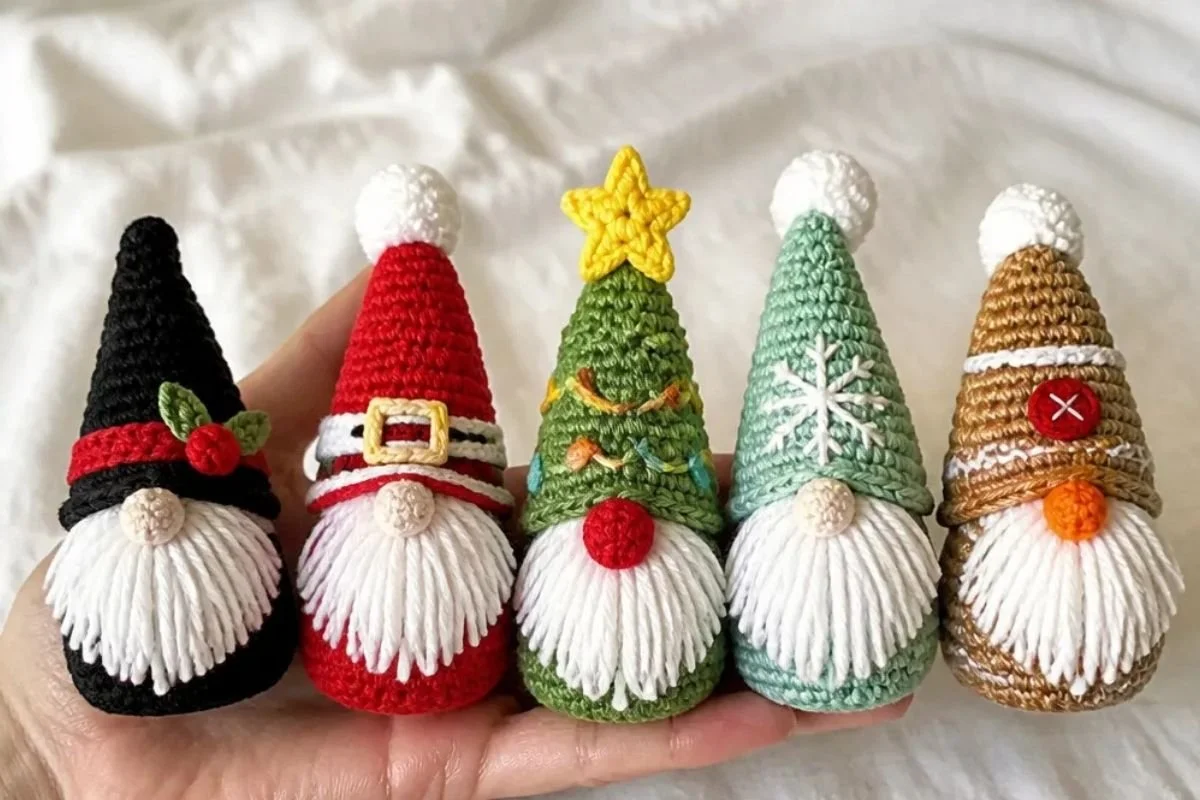
- Make a coordinated collection: The five gnomes share the same basic body, hat, nose, beard, and assembly, so you can build confidence as you move from one character to the next.
- Practice useful shaping: The body and hat use increases and decreases in continuous rounds, giving you practice with stuffed, three-dimensional crochet forms.
- Enjoy creative finishing: Each seasonal design has its own trim, embroidery, or small accessory, from the Christmas tree star to the snowman’s holly.
- Create handmade holiday décor: The finished family can brighten a mantel, shelf, entry table, or holiday centerpiece.
- Give personalized gifts: Crochet one character or the full family for a thoughtful seasonal present.
My Crochet Flower Tip: Keep each gnome’s yarn and small embellishments together in a labeled bag. This makes it easier to switch between designs without mixing contrast colors.
Before You Start Crocheting
This pattern makes five individual stuffed gnomes. Although every character uses the same basic construction, the yarn-color assignments differ:
- Christmas Tree Gnome: Make the body and hat with MC and the nose with B.
- Snowflake Gnome: Make the body and hat with MC and the nose with A.
- Gingerbread Gnome: Make the hat with MC, body with A, and nose with B.
- Snowman Gnome: Make the hat with MC, body and nose with A.
- Santa Gnome: Make the body, nose, and hat with MC.
Each gnome is assembled from one body, one hat, one nose, and one beard. The decorative finishing is then added according to the character. Work the body, hat, and nose in continuous rounds unless otherwise stated, and use a stitch marker to identify the beginning of rounds where instructed.
Stitch and Construction Notes
A magic loop begins the body and hat. The pattern uses US crochet terminology, including sc for single crochet, dc for double crochet, sl st for slip stitch, ch for chain, RS for right side, PM for place marker, and sc2tog for single crochet two together. “Yoh” means yarn over hook. Embroidery uses Straight Stitch, Running Stitch, Satin Stitch, and Cross Stitch.
Materials and Tools
Christmas Tree Gnome
- Main Color (MC): Mod Green (01223) 1 ball or 120 yds/109 m
- Contrast A: Red (00095) 1 ball or 6 yds/5 m
- Contrast B: Jute (00082) 1 ball or 6 yds/5 m
- Contrast C: White (00001) 1 ball or 17 yds/15 m
- Contrast D: Yellow (00010) 1 ball or 17 yds/15 m
- Contrast E: Beach Glass (01132) 1 ball or 6 yds/5 m
- Contrast F: Hot Orange (01628) 1 ball or 6 yds/5 m
Snowflake Gnome
- Main Color (MC): Beach Glass (01132) 1 ball or 60 yds/55 m
- Contrast A: Jute (00082) 1 ball or 60 yds/55 m
- Contrast C: White (00001) 1 ball or 17 yds/15 m
Gingerbread Gnome
- Main Color (MC): Jute (00082) 1 ball or 120 yds/109 m
- Contrast A: White (00001) 1 ball or 17 yds/15 m
- Contrast B: Red (00095) 1 ball or 11 yds/10 m
- Contrast C: Hot Orange (01628) 1 ball or 6 yds/5 m
Snowman Gnome
- Main Color (MC): Black (00002) 1 ball or 60 yds/55 m
- Contrast A: White (00001) 1 ball or 60 yds/55 m
- Contrast B: Orange (01628) 1 ball or 6 yds/5 m
- Contrast C: Red (00095) 1 ball or 11 yds/10 m
- Contrast D: Mod Green (01223) 1 ball or 6 yds/5 m
Santa Gnome
- Main Color (MC): Red (00095) 1 ball or 120 yds/109 m
- Contrast A: Jute (00082) 1 ball or 6 yds/5 m
- Contrast B: White (00001) 1 ball or 22 yds/20 m
- Contrast C: Black (00002) 1 ball or 17 yds/15 m
- Contrast D: Yellow (00010) 1 ball or 6 yds/5 m
General Tools and Notions
- Size U.S. F/5 [3.75 mm] Susan Bates® Silvalume® crochet hook or size needed to obtain gauge
- Susan Bates® stitch markers
- Polyfil Fiber Stuffing
- Susan Bates® yarn needle
Complete Crochet Instructions
Stitch and Construction Concepts
Magic loop: “Make a magic loop, demonstrated here.”
Work in continuous rnds unless otherwise stated. Use PM for beg of rnd where instructed.
Body Make 1
Make a magic loop, demonstrated here.
- 1st rnd (RS): Ch 1. 6 sc in magic loop. Do not join, work in continuous rnds. 6 sc. PM for beg of rnd.
- 2nd rnd: 2 sc in each sc around. 12 sc.
- 3rd rnd: *1 sc in next sc. 2 sc in next sc. Rep from * around. 18 sc.
- 4th rnd: *1 sc in each of next 2 sc. 2 sc in next sc. Rep from * around. 24 sc.
- 5th rnd: *1 sc in each of next 3 sc. 2 sc in next sc. Rep from * around. 30 sc.
- 6th rnd: *1 sc in each of next 4 sc. 2 sc in next sc. Rep from * around. 36 sc.
- 7th rnd: *1 sc in each of next 5 sc. 2 sc in next sc. Rep from * around. 42 sc.
- 8th rnd: *1 sc in each of next 6 sc. 2 sc in next sc. Rep from * around. 48 sc.
- 9th rnd: *1 sc in each of next 7 sc. 2 sc in next sc. Rep from * around. 54 sc.
- 10th to 14th rnds: 1 sc in each sc around.
- 15th rnd: *Sc2tog. 1 sc in each of next 7 sc. Rep from * around. 48 sts.
- 16th and 17th rnds: 1 sc in each st around.
- 18th rnd: *Sc2tog. 1 sc in each of next 6 sc. Rep from * around. 42 sts.
- 19th rnd: As 16th rnd.
- 20th rnd: *Sc2tog. 1 sc in each of next 5 sc. Rep from * around. 36 sts.
- 21st rnd: As 16th rnd.
- 22nd rnd: *Sc2tog. 1 sc in each of next 4 sc. Rep from * around. 30 sts.
- 23rd rnd: *Sc2tog. 1 sc in each of next 3 sc. Rep from * around. 24 sts.
- Fasten off. Stuff Body.
Hat Make 1
Make a magic loop.
- 1st rnd (RS): 4 sc in magic loop. Do not join, work in continuous rnds. 4 sc. PM for beg of rnd.
- 2nd rnd: *1 sc in next sc. 2 sc in next sc. Rep from * around. 6 sc.
- 3rd rnd: *1 sc in each of next 2 sc. 2 sc in next sc. Rep from * around. 8 sc.
- 4th rnd: 1 sc in each sc around.
- 5th rnd: *1 sc in each of next 3 sc. 2 sc in next sc. Rep from * around. 10 sc.
- 6th rnd: As 4th rnd.
- 7th rnd: 2 sc in next st. 1 sc in each sc to end of rnd. 11 sc.
- 8th to 14th rnds: As 7th rnd. 18 sc.
- 15th rnd: *2 sc in next sc. 1 sc in each of next 8 sc. Rep from * around. 20 sc.
- 16th rnd: *2 sc in next sc. 1 sc in each of next 9 sc. Rep from * around. 22 sc.
- 17th rnd: *2 sc in next sc. 1 sc in each of next 10 sc. Rep from * around. 24 sc.
- 18th rnd: *2 sc in next sc. 1 sc in each of next 11 sc. Rep from * around. 26 sc.
- 19th rnd: *2 sc in next sc. 1 sc in each of next 12 sc. Rep from * around. 28 sc.
- 20th rnd: *2 sc in next sc. 1 sc in each of next 13 sc. Rep from * around. 30 sc.
- 21st rnd: *2 sc in next sc. 1 sc in each of next 4 sc. Rep from * around. 36 sc.
- 22nd rnd: As 4th rnd.
- 23rd rnd: *2 sc in next sc. 1 sc in next 5 sc. Rep from * around. 42 sc.
- 24th rnd: As 4th rnd.
- 25th rnd: *2 sc in next sc. 1 sc in each of next 6 sc. Rep from * around. 48 sc.
- 26th rnd: *2 sc in next sc. 1 sc in each of next 7 sc. Rep from * around. 54 sc.
- 27th rnd: *2 sc in next sc. 1 sc in each of next 8 sc. Rep from * around. 60 sc.
- Fasten off at end of last rnd. Stuff Hat.
Nose Make 1
Ch 2.
- 1st rnd: 4 sc in 2nd ch from hook. Do not join, work in continuous rnds. 4 sc. PM for beg of rnd.
- 2nd rnd: 2 sc in each sc around. 8 sc.
- 3rd and 4th rnds: 1 sc in each sc around.
- 5th rnd: (Sc2tog) 4 times. 4 sts.
- Fasten off. Stuff Nose.
Beard Make 1
Cut one 6” [15 cm] length of White and tie end in a knot to form a circle.
Cut 20 5” [12.5 cm] lengths of White and add as fringe to the circle at the opposite end of knot.
Main Assembly
- Pin Hat on Body to find placement for Nose.
- Stitch Nose in place.
- Pull the Beard “ring” under the nose and stitch knot in place to hold beard in place under Nose.
- Trim Beard.
- Sew Hat to Body over top of Nose.
Christmas Tree Gnome
Hat Trim
With RS facing, join A with sl st to any back sc of Hat.
- 1st rnd: *Ch 3. Skip next sc. Sl st in next sc. Rep from * around. Join with sl st in same sl as first sl st.
Fasten off.
Star
With D, ch 4.
- 1st rnd: Ch 3 (counts as dc). 9 dc in 4th ch from hook. Join with sl st to top of ch-3. 10 dc.
- 2nd rnd: Ch 1. 1 sc in same sp as sl st. *(2 dc. Ch 2. Sl st to top of last dc. 2 dc) in next dc. 1 sc in next dc. Rep from * around, ending at . Join with sl st to first sc. Fasten off.
Light Bulb Embroidery
With A, D, E and F using Satin St, embroider “light bulbs” as shown in picture.
Santa Gnome
Hat Trim
With RS facing, join B with sl st to any back sc.
- 1st rnd: Ch 1. 2 sc in same sp as sl st. *1 sc in each of next 9 sc. 2 sc in next sc. Rep from * around, ending at . Join with sl st to first sc. 66 sc.
Hat Belt
With C, ch 56. Join with sl st to first ch to form a ring.
- 1st rnd: Ch 1. 1 sc in same sp as sl st. 1 sc in each ch around. Join with sl st to first sc. 56 sc.
- 2nd to 4th rnds: Ch 1. 1 sc in each sc around. Join with sl st to first sc.
Fasten off leaving a long end for sewing. Sew Hat Belt on Hat.
Buckle Embroidery
With D and Straight St, embroider a “buckle” over Hat Belt as shown in picture.
Snowman Gnome
Hat Stripe
With C, ch 56. Join with sl st to first ch to form a ring.
- 1st rnd: Ch 1. 1 sc in same sp as sl st. 1 sc in each ch around. Join with sl st to first sc. 56 sc.
Fasten off leaving a long end for sewing.
Holly Make 2
With D, ch 7.
- 1st rnd: Sl st in 2nd ch from hook. (Sl st in next ch. Ch 2. Sl st in next st) twice. Sl st in next ch. (Sl st. Ch 3. Sl st) in last ch. Working on opposite side of ch, (Sl st in next ch. Ch 2. Sl st in next ch) twice. Sl st in last ch. Join with sl st to first sl st. Fasten off, leaving a long end for sewing.
Berry
With C, ch 4. Join with sl st to first ch to make a ring.
- 1st rnd: Ch 2. (Yoh and draw up a loop. Yoh and draw through 2 loops on hook) twice. Yoh and draw through all 3 loops on hook beg cluster made. Ch 1. [(Yoh and draw up a loop. Yoh and draw through 2 loops on hook) 3 times. Yoh and draw through all 4 loops on hook cluster made. Ch 1] twice. Join with sl st to first cluster. Fasten off leaving a long end for sewing.
Scarf
With C, ch 111.
- 1st row: 1 dc in 5th ch from hook (counts as dc and ch 1). *Ch 1. Skip next ch. 1 dc in next ch. Rep from * to end of chain.
Fasten off.
Sew Hat Stripe on Hat. Sew Holly over Hat Stripe. Sew Berry over ends of Holly. Tie Scarf behind Beard.
Snowflake Gnome
Tassel
With C, using Straight St:
Wrap C around a 3” [7.5 cm] piece of cardboard 20 times.
Tie securely at one end.
Cut across other end.
Wrap yarn twice around tassel ¼” [1 cm] from tied end, and fasten securely.
Attach Tassel to tip of Hat.
Snowflake Embroidery
With C, using Straight St, embroider snowflake as shown in picture.
Gingerbread Gnome
Button
With B, ch 2.
- 1st rnd: 6 sc in 2nd ch from hook. Join with sl st to first sc. 6 sc.
- 2nd rnd: Ch 1. 2 sc in each sc around. Join with sl st to first sc. 12 sc.
- 3rd rnd: Ch 1. *1 sc in next st. 2 sc in next sc. Rep from * around. Join with sl st to first sc. 18 sc.
- 4th rnd: Ch 1. *1 sc in each of next 2 sc. 2 sc in next sc. Rep from * around. Join with sl st to first sc. 24 sc.
Fasten off leaving a long end for sewing.
Icing
With A, work 1st to 11th rnds as given for Hat.
- 12th rnd: *Sl st in next sc. 3 dc in next sc. Skip next sc. Rep from * around. Join with sl st to first sl st.
Fasten off.
Gingerbread Embroidery and Finishing
With A, using Running St embroider details on Body along 8th and 9th rnds of Body as shown in picture.
With A, using Running St, embroider button details along last rnd as shown in picture.
With A, sew Button to Hat using Cross stitch.
With C, using Running St, embroider details on Icing as shown in picture.
Sew Icing on Top of Hat.
With C, using Straight St, embroider zig-zags over 24th and 25th rnds of Hat as shown in picture.
Stitch Reference
- Straight St
- Running St
- Satin St
- Cross stitch, used for sewing Button to Hat
Handmade Gift and Decoration Ideas
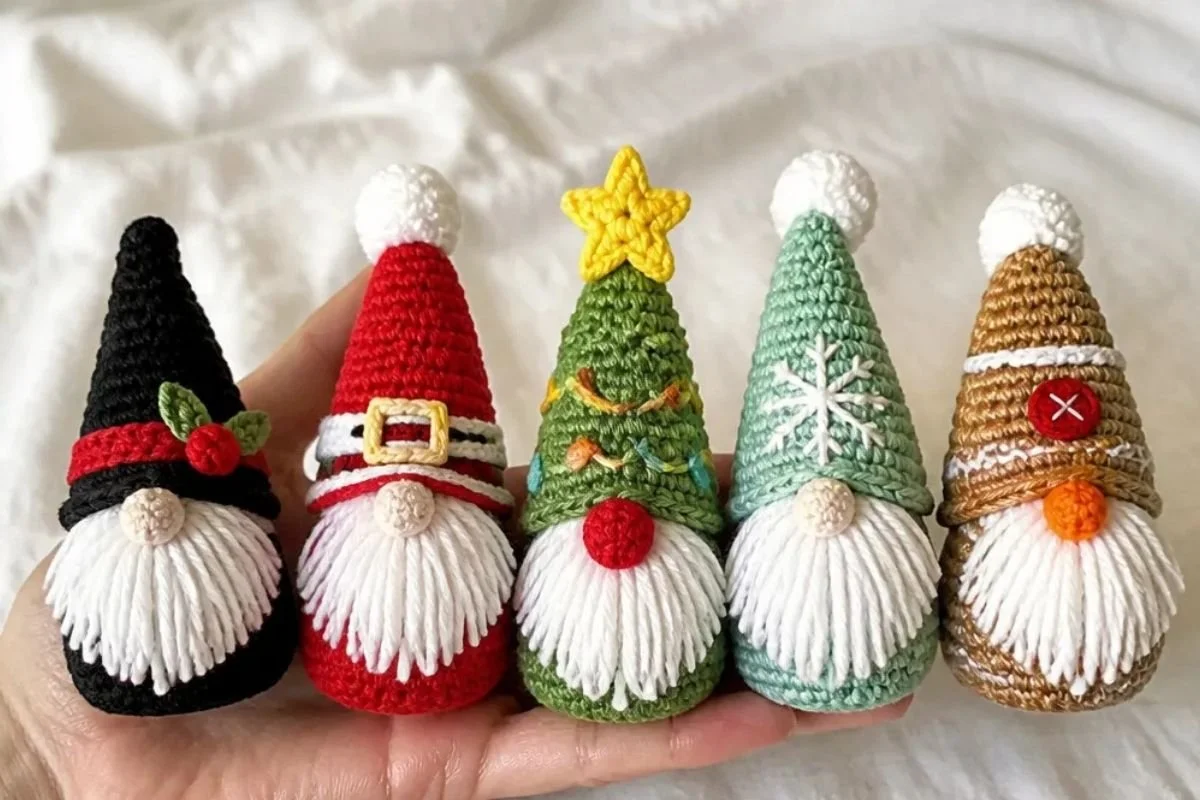
- Arrange all five gnomes together on a mantel or shelf for a complete seasonal display.
- Place the Christmas tree and Santa gnomes near a holiday centerpiece.
- Use the snowflake and snowman gnomes in a winter-themed entryway arrangement.
- Pair the gingerbread gnome with kitchen or dining-room holiday décor.
- Give individual gnomes as small handmade gifts, or present the family as a coordinated set.
- Display the group in a shallow basket, wooden tray, or on a fabric runner to create a layered vignette.
Caring for Your Crochet Project
- Dust the gnomes gently with a soft brush or use a low-airflow handheld vacuum without pressing on the embroidery or accessories.
- Spot-clean carefully with a lightly damp cloth when needed, avoiding saturation of the stuffing.
- Allow any cleaned area to dry completely before storing.
- Keep the gnomes away from excessive heat, which can affect the yarn, stuffing, and embroidered details.
- Store them in a clean, dry container with enough room to prevent the hats from being crushed.
- Protect the tassel, beard fringe, holly, berry, star, and belt details from snagging.
- Follow the yarn manufacturer’s care instructions when available, and avoid soaking unless the yarn’s instructions specifically support it.
Tips for Better Results
- Mark every continuous round: Place the stitch marker at the beginning of the round as instructed so the increases and decreases stay aligned.
- Count after shaping rounds: The body should reach 54 sc after the 9th round, then decrease through the stated stitch counts. The hat finishes at 60 sc.
- Stuff gradually: Add Polyfil Fiber Stuffing after fastening off the body, hat, and nose. Use small amounts at a time to distribute the filling evenly.
- Keep the hat shaping consistent: The hat uses a combination of regular rounds and repeated increases. Read the stitch count at the end of each shaping round before continuing.
- Place the nose before sewing the hat: Pin the hat on the body first, then use its position to determine where the nose belongs.
- Trim the beard after attaching it: Secure the beard ring under the nose before trimming so the fringe remains positioned correctly.
- Leave long sewing ends where directed: The Santa belt, snowman holly and berry, and gingerbread button need enough yarn for secure attachment.
- Use the picture for embroidery placement: The pattern specifies the stitch type and placement area, while the picture guides the decorative arrangement.
For another small, decorative crochet idea to place alongside seasonal projects, consider this crochet rose for wine glasses.
Creative Ways to Customize Your Project
These are optional styling ideas and do not change the approved instructions:
- Use the stated color assignments for a traditional holiday palette, or exchange contrast colors between characters while keeping the same stitch counts.
- Choose coordinated shades for a softer winter display, such as cool blue-green, white, and warm neutrals.
- Make the family visually consistent by using one color for all beard fringe while retaining each character’s original hat decoration.
- Arrange the five figures in height order or group them by color for a more deliberate display.
- Add a seasonal tray, fabric runner, or basket beneath the gnomes without altering the crocheted pieces.
- If substituting yarn, remember that a different yarn weight or fiber can change gauge, finished size, stuffing density, texture, and yarn requirements. Use the hook size needed to obtain the pattern’s gauge rather than assuming the same hook will work.
Frequently Asked Questions
Is this crochet gnome pattern suitable for beginners?
The pattern uses single crochet shaping, continuous rounds, stuffing, sewing, and basic embroidery. Beginners who are comfortable with a magic loop and counting increases may enjoy starting with one character before making the full family.
How many gnomes are included?
The collection includes five designs: Christmas Tree, Snowflake, Gingerbread, Snowman, and Santa.
What hook size should I use?
Use a size U.S. F/5 [3.75 mm] Susan Bates® Silvalume® crochet hook, or the size needed to obtain gauge.
Do all five gnomes use the same construction?
Yes. Each gnome is built from one body, one hat, one nose, and one beard. The decorative finishing and color assignments vary by character.
Can I change the yarn colors?
Yes, color changes are an optional modification. Keep track of each contrast color’s function, especially for the beard, trims, embroidery, and small accessories.
How is the nose positioned?
Pin the hat on the body first to find the nose placement. Stitch the nose in place, then position the beard ring underneath it before sewing the hat over the top of the nose.
How should I stuff the pieces?
The approved pattern directs you to stuff the body, hat, and nose after fastening off. Add Polyfil gradually so the shapes remain firm without stretching the stitches.
Can I wash the finished gnomes?
Use gentle dusting and careful spot cleaning unless the yarn manufacturer’s care instructions specifically support a different method. Avoid soaking the stuffed pieces and protect the embroidered and attached decorations.
Conclusion
This crochet gnome family combines repeatable shaping with five distinct holiday personalities. Make one character as a small seasonal accent or complete the set for a coordinated display, then personalize the arrangement with trays, baskets, or other handmade décor. For another family-themed crochet project, see the Free Easy Lily Gnomes Family of Five Crochet Pattern.