
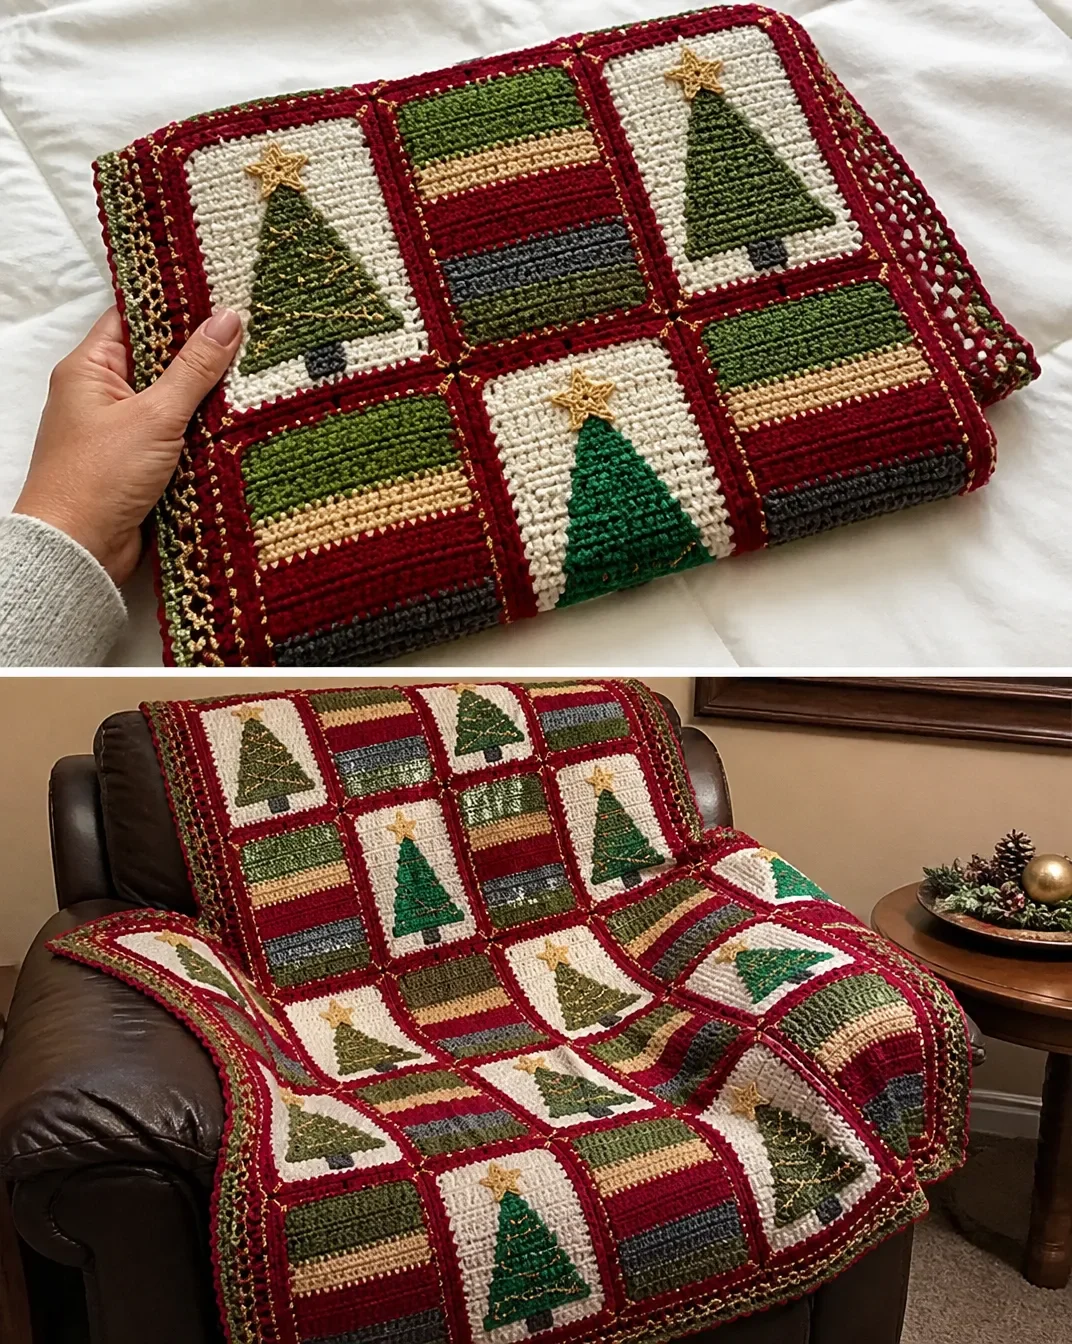
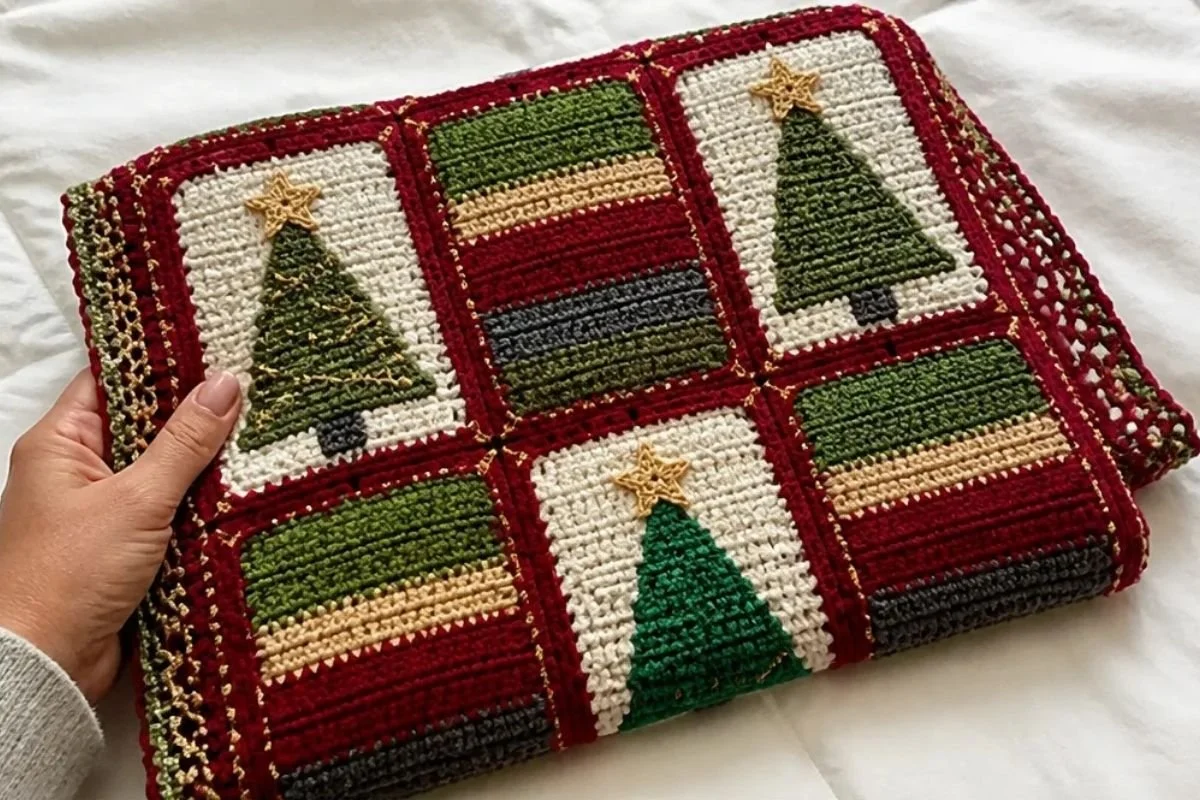
This DIY Crochet Christmas Tree Throw Pattern combines textured crochet blocks, appliquéd trees, stars, trunks, and striped accent blocks into a cheerful seasonal blanket. The design uses traditional holiday colors with gold details for extra sparkle, making it suitable for decorating a sofa, guest room, reading nook, or holiday display. Crocheters who enjoy assembling motifs will appreciate the clear component-based construction. For more festive handmade inspiration, explore these all-in-one crochet bouquet patterns alongside this winter throw.
Why You’ll Love This Crochet Project
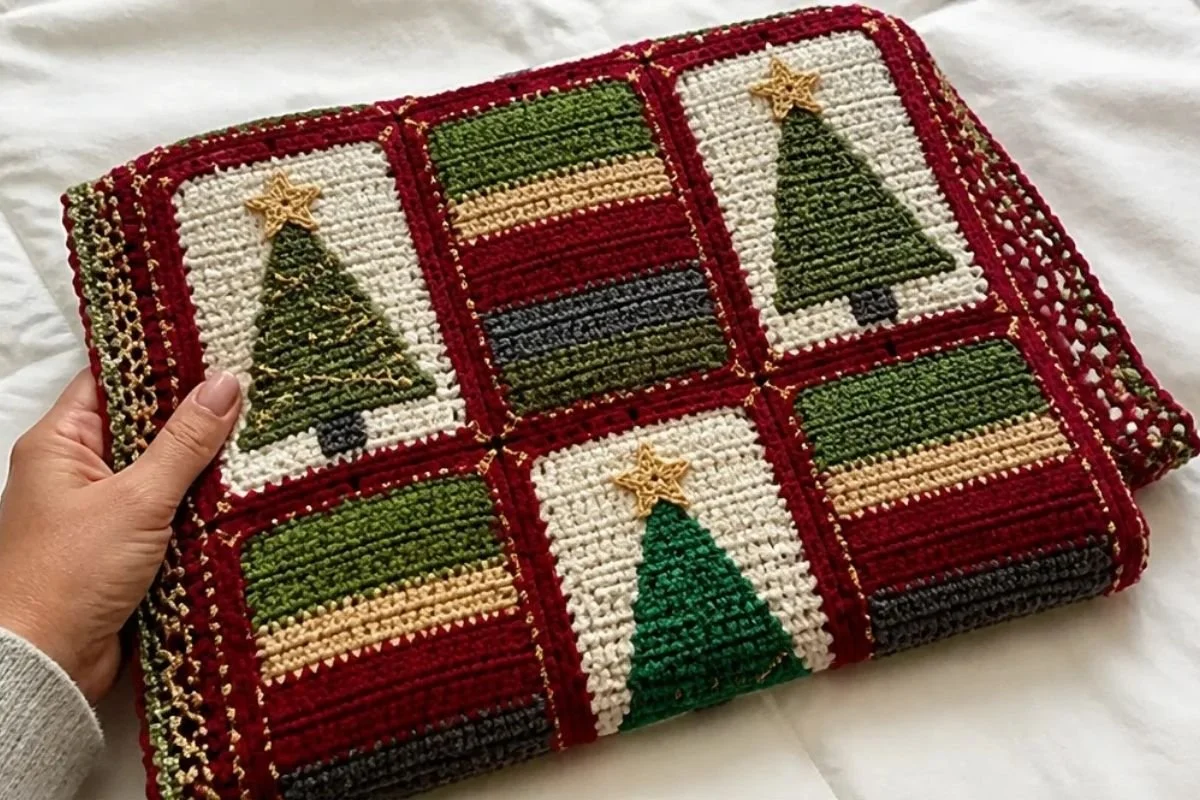
- Classic holiday styling: Off white, red, greens, burgundy, charcoal, and gold create a timeless Christmas palette.
- Interesting construction: You will practice textured stitch, appliqué sewing, shaping, whip stitching, and decorative edging.
- Portable component work: The individual tree blocks, trees, trunks, stars, and striped blocks can be crocheted separately before assembly.
- Gift-worthy finish: A handmade throw makes a thoughtful seasonal gift and can be displayed year after year.
- Decorative versatility: Use it across the back of a sofa, folded at the foot of a bed, or layered over a holiday chair.
My Crochet Flower Tip: Keep completed components in labeled bags by color and type. This makes twelve tree blocks and their matching appliqués much easier to organize. You may also find Crochet Rose For Wine Glasses Easy Flower Pattern useful.
Before You Start Crocheting
The throw is built from 12 tree blocks, 12 crocheted trees, 12 trunks, 12 stars, and 4 striped blocks. Each tree block is made in Contrast A and receives a five-round decorative border in Contrast B. The trees are made in two colors, with six trees in Contrast C and six in Contrast E.
The construction sequence is:
- Make the textured tree blocks.
- Add the borders to all 12 tree blocks.
- Crochet the trees, trunks, and stars.
- Add gold cross-stitch to four of the Contrast C trees.
- Crochet and border the four striped blocks.
- Sew the appliqués to the tree blocks.
- Arrange and whip stitch the blocks together.
- Work the sixteen-round edging.
The pattern uses US crochet terminology. Useful abbreviations include:
- ch: chain
- sc: single crochet
- dc: double crochet
- slip st: slip stitch
- RS: right side
- WS: wrong side
- Lsc: long single crochet
- dc2tog: double crochet two together
Crochet Supplies and Tools
Caron® Simply Soft®
6 oz / 170.1 g; 315 yds / 288 m per ball
- Contrast A Off White (9702): 2 balls
- Contrast B Autumn Red (9730): 4 balls
- Contrast C Dark Sage (9707): 1 ball
- Contrast D Bone (9703): 1 ball
- Contrast E Kelly Green (9769): 1 ball
- Contrast F Burgundy (9762): 3 balls
Caron® Simply Soft® Heathers
5 oz / 141.7 g; 250 yds / 228 m per ball
- Contrast G Charcoal Heather (9508): 1 ball
- Contrast H Woodland Heather (9503): 1 ball
Other supplies
- Size U.S. H/8 (5 mm) crochet hook, or size to obtain gauge
- Gold thread for cross-stitch embellishment, stars, and edging
- Yarn needle for sewing appliqués and weaving in ends
Complete Crochet Tutorial
Pattern Stitch: Textured Stitch
The textured stitch is worked over a multiple of 2 stitches plus 1.
Row 1 (RS): *(sc, dc) in second ch from hook, skip next ch, (sc, dc) in next ch, skip next ch; repeat from * to last ch, sc in last ch, turn.
Row 2: Ch 1, (sc, dc) in next st, skip next st; repeat from * to last st, sc in last st, turn.
Repeat Row 2 for the textured stitch pattern.
Tree Block Make 12
With A, chain 16.
Work 27 rows in textured stitch pattern.
Fasten off.
Tree Block Border
For each tree block, with RS facing, join B with slip st in lower corner of block to work along the long edge.
Round 1: Ch 1, *3 sc in corner, work 25 sc evenly along long edge, 3 sc in next corner, work 13 sc evenly across short edge; repeat from * once more; join with slip st in first sc.
Round 2: Slip st in next sc, ch 3, 4 dc in same sc, skip next sc, dc in next sc, skip next sc, [3 dc in next sc, skip next sc, dc in next sc, skip next sc] to next corner sc, *5 dc in next corner sc, skip next sc, dc in next sc, skip next sc, [3 dc in next sc, skip next sc, dc in next sc, skip next sc] to next corner sc; repeat from * around; join with slip st in top of beginning ch.
Round 3: Slip st in next dc, ch 3, *5 dc in corner dc, dc in next dc, [skip next dc, 3 dc in next dc, skip next dc, dc in next dc, skip next dc?] to next corner dc; repeat from * around; join with slip st in top of beginning ch.
Round 4: Ch 3, 2 dc in same st as join, skip next dc, dc in next dc, *5 dc in corner dc, dc in next dc, [skip next dc, 3 dc in next dc, skip next dc, dc in next dc] to next corner dc; repeat from * around; join with slip st in top of beginning ch.
Round 5: Slip st in next st, ch 3, skip next st, 3 dc in next st, skip next st, dc in next st, *5 dc in next corner dc, dc in next st, [skip next st, 3 dc in next st, skip next st, dc in next st] to next corner dc; repeat from * around, join with slip st in top of beginning ch.
Rounds 6 and 7: Ch 1, [sc in each st to corner, 3 sc in corner st] 4 times, sc in each remaining st; join with slip st in first sc 160 sts consisting of 45 sts along each long side, 33 sts along each short side, and 4 corner sts.
Fasten off.
Tree Make 12
Make six trees with C and six with E.
Chain 4.
Row 1 (RS): 4 dc in 4th ch from hook, turn.
Row 2: Ch 1, sc in each st across, turn.
Row 3 (increase row): Ch 3, counts as first dc, dc in first sc, increase made, dc in each sc to last sc, 2 dc in last sc, turn 6 sts.
Rows 4–21: Repeat Rows 2 and 3 nine more times 24 sts.
Row 22: Repeat Row 2.
Fasten off.
Using gold thread and a yarn needle, work cross-stitch across the 6th, 10th, 14th, and 18th rows of four of the color C trees.
Trunk Make 12
With G, chain 6.
Row 1 (RS): Sc in second ch from hook and in each remaining ch across, turn 5 sc.
Row 2: Ch 1, sc in each sc across, turn.
Row 3: Ch 1, sc in first sc, [Lsc in next sc 2 rows below, sc in next sc] twice, turn.
Row 4: Ch 1, sc in first 2 sts, Lsc in next sc 2 rows below, sc in last 2 sts, turn.
Row 5: Repeat Row 3.
Fasten off.
Star Make 12
With one strand each of D and gold thread held together, chain 2.
Round 1: Work 10 sc in second ch from hook; join with slip st in first sc.
Round 2: *3 sc in next sc, skip next sc; repeat from * around five 3-sc groups.
Round 3: *Slip st in next sc, ch 3, dc2tog, ch 3, slip st in back loop of third ch from hook, ch 3, slip st in same st as last dc worked; repeat from * 4 more times 5 points.
Fasten off.
Striped Block Make 4
With E, chain 24.
Work 25 rows in textured stitch pattern in this color sequence:
- 5 rows with E
- 5 rows with D
- 5 rows with B
- 5 rows with G
- 5 rows with H
Fasten off.
Striped Block Border
For each striped block, with RS facing, join B with slip st in lower corner of block to work along the long edge.
Round 1: Ch 1, *3 sc in corner, work 33 sc evenly along long edge, 3 sc in next corner, work 23 sc evenly across short edge; repeat from * once more; join with slip st in first sc 124 sts consisting of 35 sts along each long side, 25 sts along each short side, and 4 corner sts.
Fasten off.
Sewing the Appliqués
Using the photograph and assembly diagram as a guide to placement, sew the trees, stars, and trunks to the tree blocks.
Take care to center each tree and keep the appliqué edges flat while sewing.
Joining the Blocks
Arrange the blocks according to the assembly diagram.
Join the blocks by holding RS together and whip stitching the edges together.
Edging
With RS facing and holding one strand each of gold thread and C together, join yarn with slip st in any corner st.
Round 1 (RS): Ch 3, which counts as the first dc here and throughout, 4 dc in same st, [dc in each st to next corner st, 5 dc in corner st] 3 times, dc in each remaining st around; join with slip st in top of beginning ch 612 sts consisting of 140 sts along each short edge, 164 sts along each long edge, and 4 corner sts.
Fasten off.
Join F with slip st in any corner st.
Round 2 (RS): Ch 3, 4 dc in same st, *skip next st, [3 dc in next st, skip next 2 sts] to next corner st, 5 dc in corner st; repeat from * around; join with slip st in top of beginning ch, turn.
Round 3 (WS): Slip st in next 2 sts, ch 1, (sc, ch 3, sc) in same st, corner st, ch 2, [sc in next space between 3-dc groups, ch 2] to corner st, *(sc, ch 3, sc) in corner st, ch 2, [sc in next space between 3-dc groups, ch 2] to next corner st; repeat from * around; join with slip st in first sc, turn.
Round 4 (RS): (Slip st, ch 3, 4 dc) in corner ch-3 space, 3 dc in each ch-2 space to corner, *5 dc in corner ch-3 space, 3 dc in each ch-2 space to next corner ch-3 space; repeat from * around; join with slip st in top of beginning ch.
Rounds 5–16: Repeat Rounds 3 and 4 six times.
Fasten off.
Using a yarn needle, weave in ends.
Finished Project Inspiration
- Drape the throw over a sofa or armchair during the Christmas season.
- Fold it across the foot of a guest bed for a coordinated holiday accent.
- Place it over a reading chair with a small basket of seasonal crochet projects nearby.
- Give it as a handmade Christmas gift to someone who enjoys traditional holiday décor.
- Display the appliquéd side prominently so the trees, stars, and gold cross-stitch remain visible.
- Pair it with red, cream, woodland green, and burgundy accessories for a layered seasonal arrangement.
Cleaning and Storing Your Crochet
Follow the yarn manufacturer’s care instructions for the Caron® Simply Soft® and Caron® Simply Soft® Heathers yarns. Because the throw includes sewn appliqués, gold thread, and multiple joined blocks, handle it gently during cleaning.
- Dust the surface lightly with a soft brush or use gentle air from a distance.
- Spot-clean small marks carefully rather than rubbing the appliquéd trees and stars.
- Avoid excessive heat, which can affect the yarn’s shape and the gold thread.
- Lay the throw flat when reshaping it after cleaning.
- Store it completely dry in a cool, dry place.
- Fold it loosely with the appliqué side protected from rough or snagging surfaces.
- Avoid placing heavy objects on the raised edging or appliquéd components.
Tips for Better Results
- Count the foundation chains carefully. The tree blocks begin with chain 16, while the striped blocks begin with chain 24; keeping these separate prevents sizing errors.
- Mark the right side. Several sections identify RS and WS, especially the borders and edging. A removable stitch marker can help you orient each piece.
- Work border stitches evenly. The tree block border depends on the stated 25 and 13 stitches along the two edge lengths, while the striped block uses 33 and 23.
- Track tree increases. Row 3 increases at both ends, and Rows 4–21 repeat the specified sequence nine more times to reach 24 stitches.
- Keep appliqués flat while sewing. Pin or lightly baste each tree, trunk, and star before stitching it permanently.
- Check corner stitches during edging. The five-dc corner groups create the blanket’s shape; make sure each corner is worked into the designated corner stitch or space.
- Secure gold thread ends carefully. Gold thread is used for cross-stitch, stars, and edging, so weave its ends securely without pulling the fabric tight.
- Weave in ends as you finish sections. Completing this step before final assembly reduces bulk and makes the joined blanket neater.
Color and Styling Variations
The approved color sequence creates the intended Christmas appearance, but the following changes are optional:
- Replace the red and burgundy combination with cranberry and deep green for a richer woodland palette.
- Use ivory in place of Off White for a warmer background effect.
- Make all trees in one green shade for a more uniform design, or retain the two-color arrangement for contrast.
- Use a metallic thread color other than gold for the stars and edging, understanding that the decorative effect will change.
- Arrange the completed throw with neutral cream furnishings so the appliquéd trees become the focal point.
- For a less traditional look, choose cool greens and soft gray accents while maintaining the same component quantities.
Changing yarn type, yarn weight, or hook size can affect gauge, dimensions, texture, stitch definition, and yarn requirements. If substituting materials, make a test swatch and confirm that the block proportions remain compatible before making all components.
Frequently Asked Questions
Is this Christmas tree throw suitable for a beginner?
It is best for a crocheter comfortable with basic stitches, color changes, shaping, appliqué sewing, and joining. Beginners can approach it section by section, beginning with the textured stitch practice.
How many tree blocks are required?
The pattern requires 12 tree blocks. Each block is made with Contrast A and receives a border in Contrast B.
How many trees, trunks, and stars are included?
Make 12 trees, 12 trunks, and 12 stars. Six trees use Contrast C and six use Contrast E.
Which trees receive gold cross-stitch?
Work the gold cross-stitch across the 6th, 10th, 14th, and 18th rows of four of the color C trees.
Can the colors be changed?
Yes. Color changes are optional, but preserve the component quantities and consider how substitutions may affect contrast, stitch definition, and the amount of yarn needed.
How are the blocks joined?
Arrange the blocks according to the assembly diagram, then hold the RS together and whip stitch the edges together.
What hook size does the pattern use?
Use a size U.S. H/8, 5 mm crochet hook, or the size needed to obtain gauge.
How is the final edging constructed?
The edging begins with one strand each of gold thread and C for Round 1. Join F for Round 2, then repeat Rounds 3 and 4 six times through Round 16.
How should the completed throw be stored?
Store it clean and completely dry in a cool, dry place. Fold it loosely and protect the appliquéd surface from rough materials and excessive pressure.
Conclusion
This DIY Crochet Christmas Tree Throw Pattern brings together textured blocks, colorful tree appliqués, tiny stars, striped accents, and a decorative gold-edged finish. Its component-based construction makes it easy to organize over multiple sessions, while the finished blanket adds a warm handmade touch to seasonal decorating. For another vintage-inspired holiday project, see this Christmas tree afghan crochet pattern.