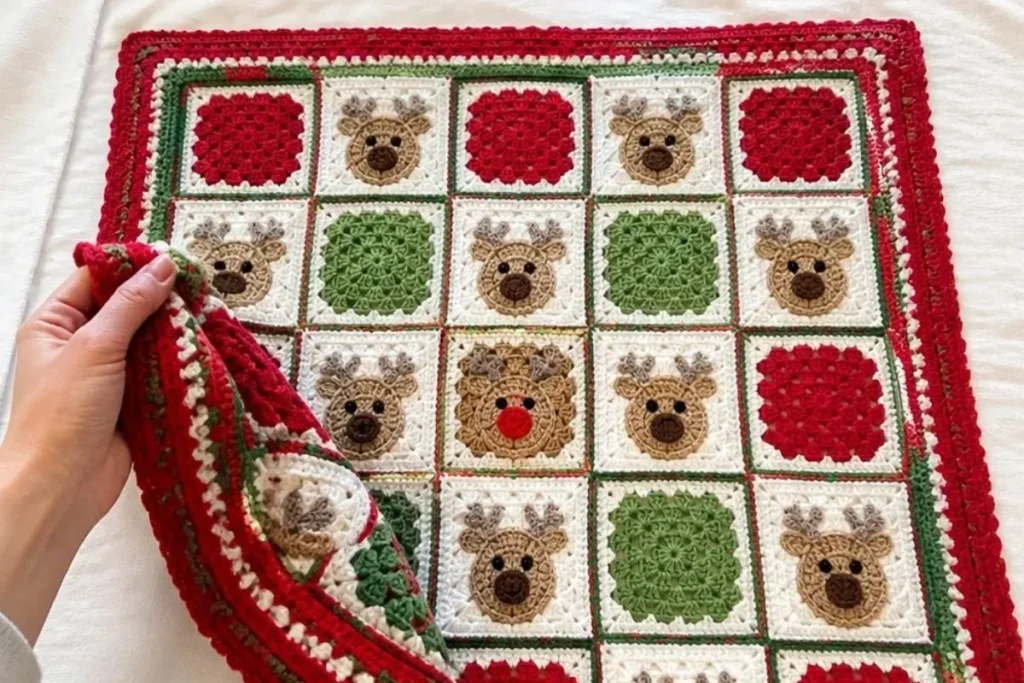
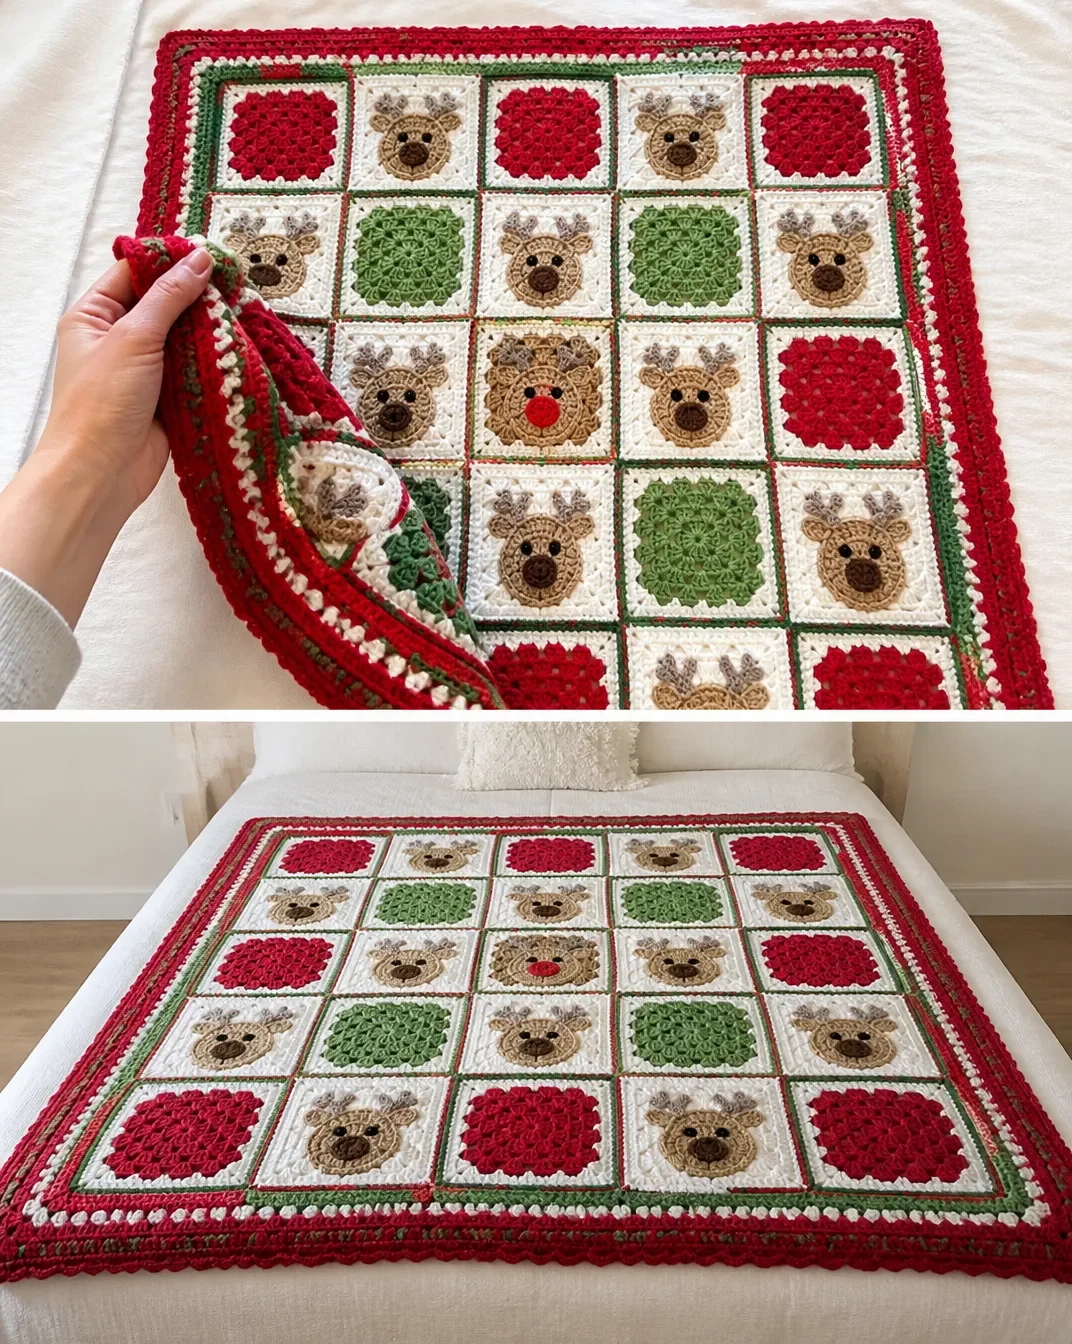
A cozy Christmas blanket brings together the charm of classic granny squares and a cheerful reindeer motif. This Cozy Crochet Reindeer Blanket Pattern for Christmas uses nine reindeer squares, coordinating solid granny motifs, and a striped border to create a festive throw for a bed, sofa, reading chair, or holiday display. The design is also a satisfying way to practice color changes, joined motifs, corner spaces, and reverse single crochet. For another small seasonal crochet accent, you may also enjoy this crochet flower pattern for wine glasses.
Why You’ll Love This Crochet Project
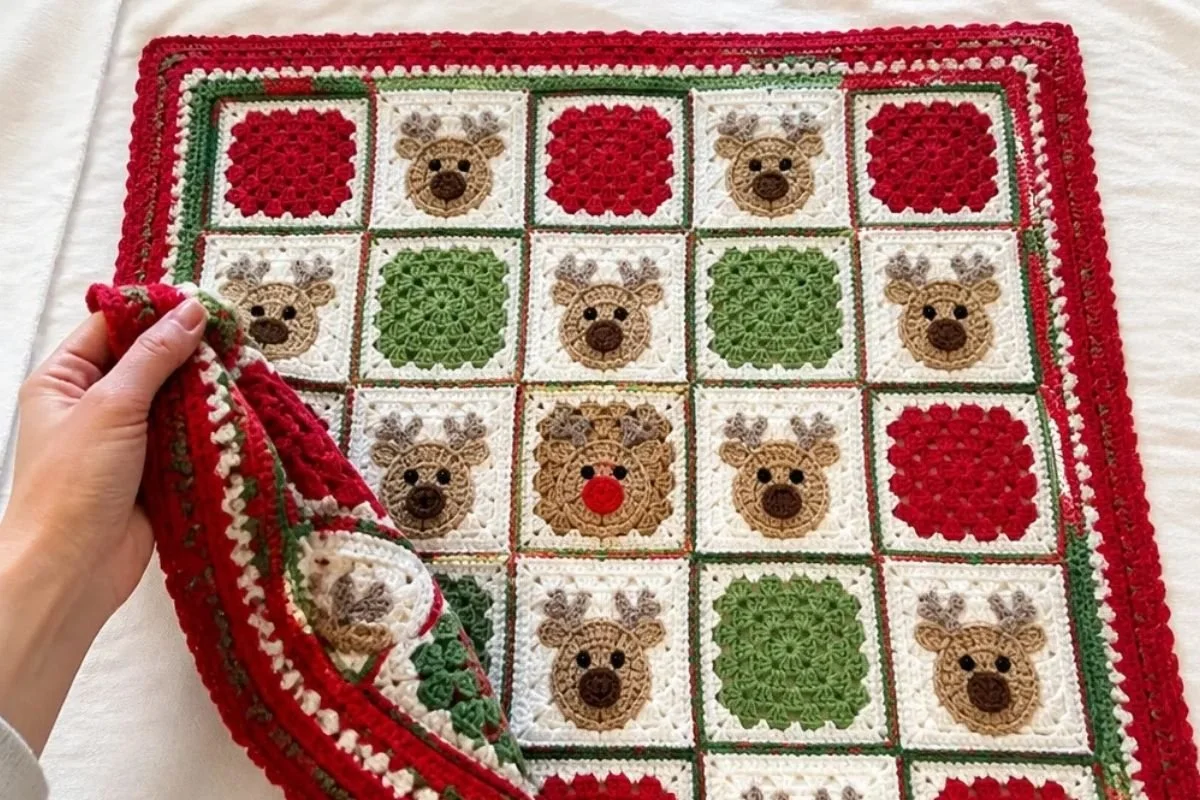
- A recognizable seasonal centerpiece: Nine reindeer motifs form a playful 3-by-3 arrangement, with Rudolf placed in the center.
- Excellent motif practice: The pattern combines shaped reindeer centers with traditional solid granny squares.
- Useful construction skills: You will practice joining motifs through both thicknesses, working in back loops only, and creating a reverse single crochet border.
- Giftable and decorative: The finished blanket can become a Christmas gift, a holiday throw, or a festive layer for a guest room.
- Customizable color placement: The supplied Berry, Lush, White, Taupe, and Topaz palette creates a warm woodland look while leaving room for personal color choices.
My Crochet Flower Tip: Before joining, lay every motif on a flat surface and photograph the arrangement. This makes it easier to restore the intended layout if squares are moved while you work.
Before You Start Crocheting
The blanket includes 9 Reindeer Granny Motifs, 9 reindeer noses 8 made with Contrast C and 1 made with Main Color and 16 Solid Granny Motifs. Of the solid motifs, 8 use MC as Color 1 and 8 use Contrast A as Color 1.
The construction sequence is:
- Crochet the nine reindeer motifs.
- Make the noses and embroider the eyes.
- Crochet the solid granny motifs.
- Arrange the reindeer motifs in a 3-by-3 layout with Rudolf in the center.
- Alternate MC and A solid granny motifs around the reindeer motifs.
- Join motifs into strips, then join the strips into the blanket.
- Add the seven-round border.
- Add the optional fleece lining if desired.
The pattern calls for a U.S. H/8 (5 mm) crochet hook, or the size needed to obtain gauge. The optional fleece lining is approximately 33½” x 36½” (85 x 92.5 cm).
Abbreviations Used
- ch: chain
- sc: single crochet
- hdc: half double crochet
- dc: double crochet
- sl st: slip stitch
- rnd: round
- WS: wrong side
- MC: Main Color
Materials You’ll Need
- Bernat® Super Value™ (7 oz/197g; 440 yds/402 m):
- Main Color (MC) Berry (00607): 2 balls
- Contrast A Lush (53246): 2 balls
- Contrast B White (07391): 2 balls
- Contrast C Taupe (53012): 1 ball
- Contrast D Topaz (53514): 1 ball
- Small amount of Black (07421) as E for eyes
- Crochet hook: Size U.S. H/8 (5 mm) or size needed to obtain gauge
- Tapestry needle
- Optional: Red fleece fabric for lining, approximately 33½” x 36½” (85 x 92.5 cm)
- Optional tools: Rotary cutter and skip stitch blade
Contrast D forms the reindeer motif centers, while B, C, MC, and A create the antlers, borders, noses, and surrounding granny-square colors. The tapestry needle is used to sew the noses to the reindeer heads and finish yarn ends.
Step-by-Step Crochet Instructions
Reindeer Granny Motif Make 9
With D, ch 2. See chart on page 3.
- 1st rnd: 8 sc in 2nd ch from hook. Join with sl st to first sc.
- 2nd rnd: Ch 1. 2 sc in each of next 3 sc. (1 hdc. 1 dc) in next sc. (1 dc. 1 hdc) in next sc. 2 sc in each of last 3 sc. Join with sl st to first sc.
- 3rd rnd: Ch 1. 1 sc in each of first 7 sts. (1 hdc. 1 dc) in next sc. (1 dc. 1 hdc) in next dc. 1 sc in each of last 7 sts. Join with sl st to first sc.
- 4th rnd: Ch 1. 2 sc in first sc. 1 sc in each of next 6 sc. (1 hdc. 1 dc) in next st. (2 dc in next st) twice. (1 dc. 1 hdc) in next st. 1 sc in each of next 6 sc. 2 sc in last sc. Join B with sl st to first sc.
- 5th rnd: With B, ch 1. 1 sc in each of first 2 sc. (With B, 1 dc. With C, 1 dc. Ch 2. 1 dc. With B, 1 dc) in next sc – Antler corner made. With B, 1 hdc in next sc. 1 sc in each of next 4 sc. 1 hdc in next st. (2 dc. Ch 2. 2 dc) in next st – corner made. 1 sc in each of next 4 sts. (2 dc. Ch 2. 2 dc) in next st. 1 hdc in next st. 1 sc in each of next 4 sc. 1 hdc in next sc. Antler corner in next sc. 1 sc in each of last 2 sc. Join with sl st to first sc.
- 6th rnd: Ch 3 (counts as dc). Working in back loops only, 1 dc in each st around, working (2 dc. Ch 2. 2 dc) in ch-2 sps. Join MC with sl st to top of ch 3.
- 7th rnd: With MC, ch 3 (counts as dc). Working in both loops, 1 dc in each st around, working (2 dc. Ch 2. 2 dc) in ch-2 sps. Join A with sl st to top of ch 3.
- 8th rnd: With A, ch 1. 1 sc in each dc around, working (2 sc. Ch 2. 2 sc) in ch-2 sps. Join with sl st to first sc. Fasten off.
Reindeer Nose
With C, make 8. With MC, make 1.
Ch 2.
- 1st rnd: 10 sc in 2nd ch from hook. Join with sl st to first sc. Fasten off, leaving a long end to sew to reindeer head.
- Eyes: With E, make 2 eyes using French knot stitch.
Sew one nose to each reindeer head, using the long yarn end. Place the MC nose on the designated Rudolf motif.
Solid Granny Motif Make 16
Make 8 motifs having MC as Color 1. Make 8 motifs having A as Color 1.
With Color 1, ch 4. Join with sl st to first ch to form a ring. See chart on page 3.
- 1st rnd: Ch 3 (counts as dc). 11 dc in ring. Join with sl st to top of ch 3. 12 dc.
- 2nd rnd: Ch 3. 1 dc in same sp as last sl st (counts as 2 dc). 2 dc in each dc around. Join with sl st to top of ch 3. 24 dc.
- 3rd rnd: Ch 5. 1 dc in first dc (counts as dc, ch 2, dc). *1 dc in each of next 4 dc. (1 dc. Ch 2. 1 dc) in next dc. 1 dc in each of next 6 dc. (1 dc. Ch 2. 1 dc) in next dc. Rep from * once more. Join with sl st to 3rd ch of ch 5.
- 4th rnd: Ch 3 (counts as dc). (2 dc. Ch 2. 2 dc) in same sp as sl st. *1 dc in each dc to next ch-2 sp. (2 dc. Ch 2. 2 dc) in corner ch-2 sp. Rep from * twice more. 1 dc in each dc to end of rnd. Join B with sl st to top of ch 3. Break Color 1.
- 5th rnd: With B, ch 3 (counts as dc). *1 dc in each dc to next ch-2 sp. (2 dc. Ch 2. 2 dc) in corner ch-2 sp. Rep from * 3 times more. 1 dc in each dc to end of rnd. Join A with sl st to top of ch 3.
- 6th rnd: With A, ch 1. 1 sc in same sp as sl st. *1 sc in each dc to next ch-2 sp. (2 sc. Ch 2. 2 sc) in corner ch-2 sp. Rep from * 3 times more. 1 sc in each dc to end of rnd. Join with sl st to first sc. Fasten off.
Motif Layout and Strip Assembly
Arrange 9 Reindeer Motifs 3 x 3, having Rudolf Motif in the center. Alternate MC and A Solid Granny Motifs around Reindeer Motifs.
Join Motifs into Strips
With WS of motifs tog, join A with sl st to corner ch-2 sp.
Ch 1.
Working through both thicknesses, 1 sc in each sc to next corner ch-2 sp.
Fasten off.
Join Strips into Blanket
With WS of strips tog, join A with sl st to corner ch-2 sp.
Ch 1.
Working through both thicknesses, 1 sc in each sc to end of strips.
Fasten off.
Border
Join A with sl st to corner ch-2 sp.
- 1st rnd: Ch 1. Work 1 sc in each sc, having (2 sc. Ch 2. 2 sc) in corner ch-2 sps. Join with sl st to first sc.
- 2nd rnd: As 1st rnd. Join B. Fasten off A.
- 3rd and 4th rnds: With B, as 1st rnd. Join MC at end of 3rd rnd.
- 5th and 6th rnds: With MC, as 1st rnd.
- 7th rnd: Ch 1. Working from left to right instead of right to left as usual, work 1 reverse sc in each sc around, having 3 reverse sc in corners. Join with sl st to first sc. Fasten off.
Optional Fleece Lining
With Skip Stitch Blade and Rotary Cutter, create holes along fleece edging approx ¼” (1 cm) away from edge of fleece.
Place crochet Blanket over fleece lining.
Working through both thicknesses, join A with sl st at corner ch-2 sp and corner of fleece.
Ch 1.
Work sc around edge of Blanket and fleece tog, having 3 sc in corners.
Tip: Work 2 sc for every hole in the fleece.
Join with sl st to first sc. Fasten off.
Ways to Display Your Finished Crochet
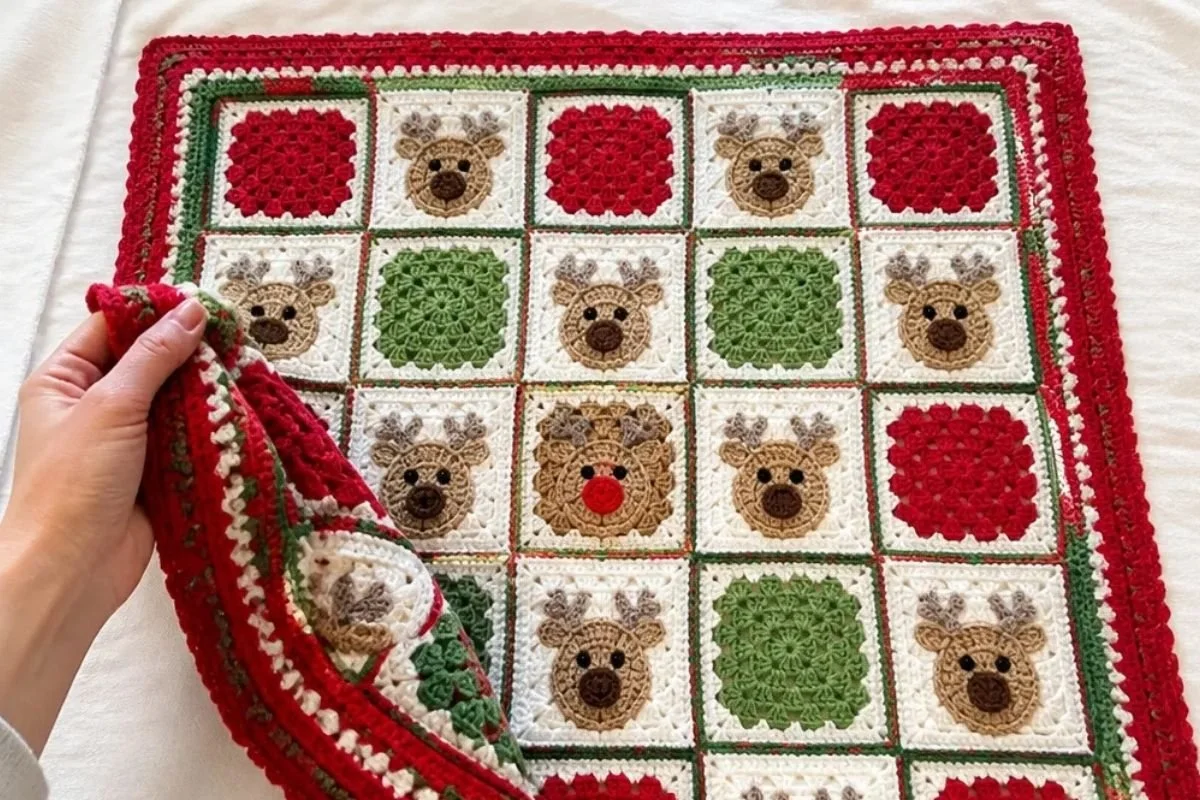
- Fold the blanket over the arm of a sofa so the reindeer grid and striped border remain visible.
- Use it as a festive layer at the foot of a bed or on a guest-room chair.
- Give it as a handmade Christmas gift for someone who enjoys woodland or traditional holiday décor.
- Place it over a reading chair during the holiday season, especially with the Rudolf motif facing outward.
- Use the optional fleece lining to add a smooth, cozy backing before displaying it as a seasonal throw.
- Pair it with coordinated handmade decorations; a collection of crochet bouquet patterns can help create a broader handmade holiday display.
Caring for Your Crochet Project
- Follow the care instructions for the yarn whenever laundering is necessary.
- Because the blanket contains many joined motifs and sewn details, handle it gently rather than pulling on individual squares.
- Dust the surface with a soft brush or use a vacuum on a low setting with a clean fabric attachment.
- Spot-clean small marks carefully and avoid excessive rubbing around the French-knot eyes and sewn noses.
- Keep the blanket away from excessive heat, which can affect the yarn and optional fleece lining.
- Store it completely dry in a breathable container or folded on a shelf.
- Avoid hanging it for long periods if the weight causes the motifs or joins to stretch.
- If the blanket becomes misshapen, lay it flat and gently adjust the squares and border before allowing it to dry naturally.
Tips for Better Results
- Check your tension early. Use the recommended U.S. H/8 (5 mm) hook or change hook size as needed to obtain gauge.
- Track color changes carefully. The reindeer motif changes from D to B, then MC and A, while the solid motif uses a different Color 1 arrangement.
- Watch the loop placement. The 6th round of the reindeer motif is worked in back loops only; the 7th round is worked in both loops.
- Keep corner spaces open. The ch-2 spaces are used for later rounds, joining, and border shaping, so avoid crocheting into them incorrectly.
- Count the motif groups. You need 9 reindeer motifs, 8 C noses, 1 MC nose, and 16 solid granny motifs.
- Lay out the squares before joining. Confirm that Rudolf is centered and that MC and A solid motifs alternate around the reindeer motifs.
- Join through both thicknesses. When assembling strips and joining strips into the blanket, work through both layers as instructed.
- Secure finishing details well. Leave the long tail on each nose for sewing, and weave in ends after confirming the motif placement.
- Take care with the reverse single crochet. The final border round is worked from left to right instead of right to left and has 3 reverse sc in the corners.
- Test the fleece tool first. If adding the lining, practice using the skip stitch blade on a small fleece edge before preparing the full piece.
Creative Ways to Customize Your Project
The approved pattern uses Berry, Lush, White, Taupe, and Topaz for a warm Christmas palette. Optional color changes can give the same layout a different mood, but changing yarn or hook size may affect gauge, dimensions, texture, and yarn requirements.
- Use deep green in place of Lush for a more traditional evergreen effect.
- Substitute a soft cream for White if you prefer a warmer neutral border.
- Choose a brighter red for the reindeer nose accents while keeping the central Rudolf nose in MC.
- Try icy blue and silver-toned neutrals for a winter, rather than classic Christmas, palette.
- Use the optional red fleece lining as a strong color statement, or select a coordinating fleece shade if available.
- Keep the reindeer motifs unchanged while experimenting only with the solid granny motif colors for a lower-risk variation.
- Make a smaller decorative piece by adapting the motif arrangement only if you are prepared to recalculate the border and final dimensions.
Frequently Asked Questions
Is this reindeer blanket suitable for a beginner?
It is approachable for a crocheter who knows basic rounds, color changes, granny-square construction, and joining. The shaped reindeer center and multicolor antler corner require careful attention to the written instructions.
How many reindeer motifs are needed?
Make 9 Reindeer Granny Motifs and arrange them in a 3-by-3 layout, with the Rudolf Motif in the center.
How many solid granny motifs are required?
Make 16 total: 8 motifs with MC as Color 1 and 8 motifs with A as Color 1.
Which hook size does the pattern use?
Use a U.S. H/8 (5 mm) crochet hook, or the size needed to obtain gauge.
Can the colors be changed?
Yes, color substitutions are possible as an optional variation. Keep track of each color role, and remember that a different yarn or hook may change gauge, dimensions, texture, and yarn requirements.
How are the motifs joined?
Join motifs into strips with WS of motifs together, using A and working through both thicknesses. Then join the strips into the blanket in the same manner.
Is the fleece lining required?
No. The fleece lining is optional. If used, prepare holes along the fleece edge with a skip stitch blade and rotary cutter, then crochet the blanket and fleece together.
What is the final border stitch?
The seventh and final border round uses reverse single crochet, worked from left to right instead of right to left, with 3 reverse sc in each corner.
How should the finished blanket be stored?
Store it clean and dry, folded in a breathable container or on a shelf. Avoid excessive heat and long-term hanging that could stretch the joined motifs.
Conclusion
This Christmas reindeer blanket combines cheerful character motifs, classic granny-square structure, and a polished multicolor border in one useful handmade project. Make it as a seasonal throw, a thoughtful gift, or a cozy holiday display, and adjust the optional colors or lining to suit your décor. For more seasonal inspiration, browse these Christmas crochet ideas.