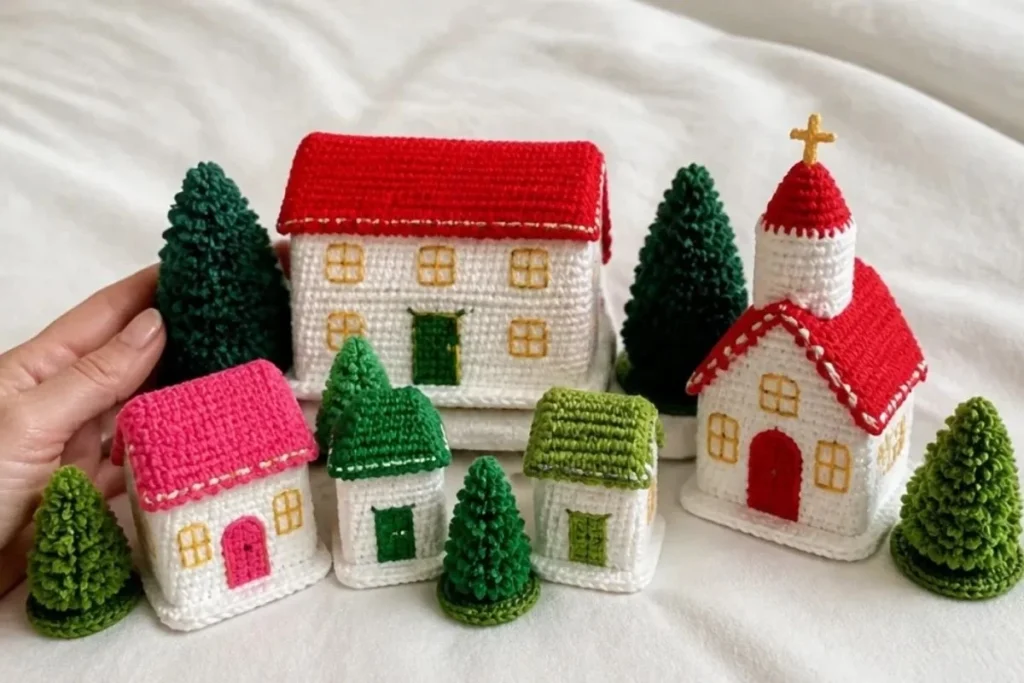
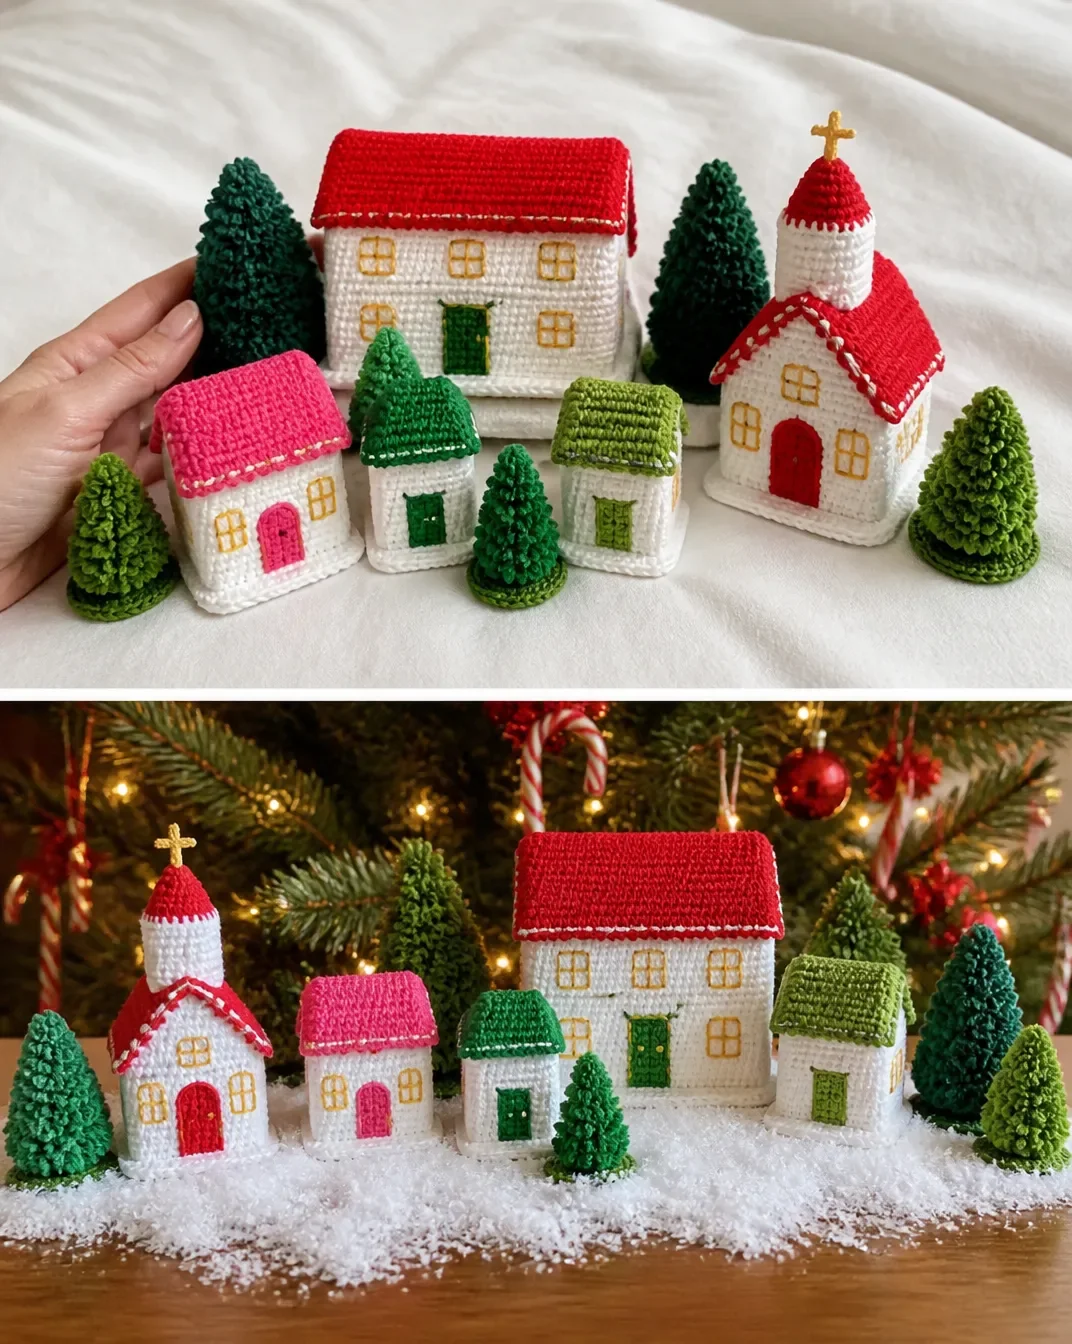
This Festive Crochet Village Pattern for Christmas Decor creates a cheerful holiday display with three small buildings, one larger building, a church with steeple, and five little trees. Soft white walls, colorful roofs, bright doors, windows, and greenery give the village a playful handmade look. It is an easy-level project for crocheters who enjoy small assembled pieces and seasonal decorations. Display the finished village on a mantel, shelf, or holiday table, or pair it with other handmade décor such as a crocheted floral accent for a festive arrangement.
Why You’ll Love This Crochet Project
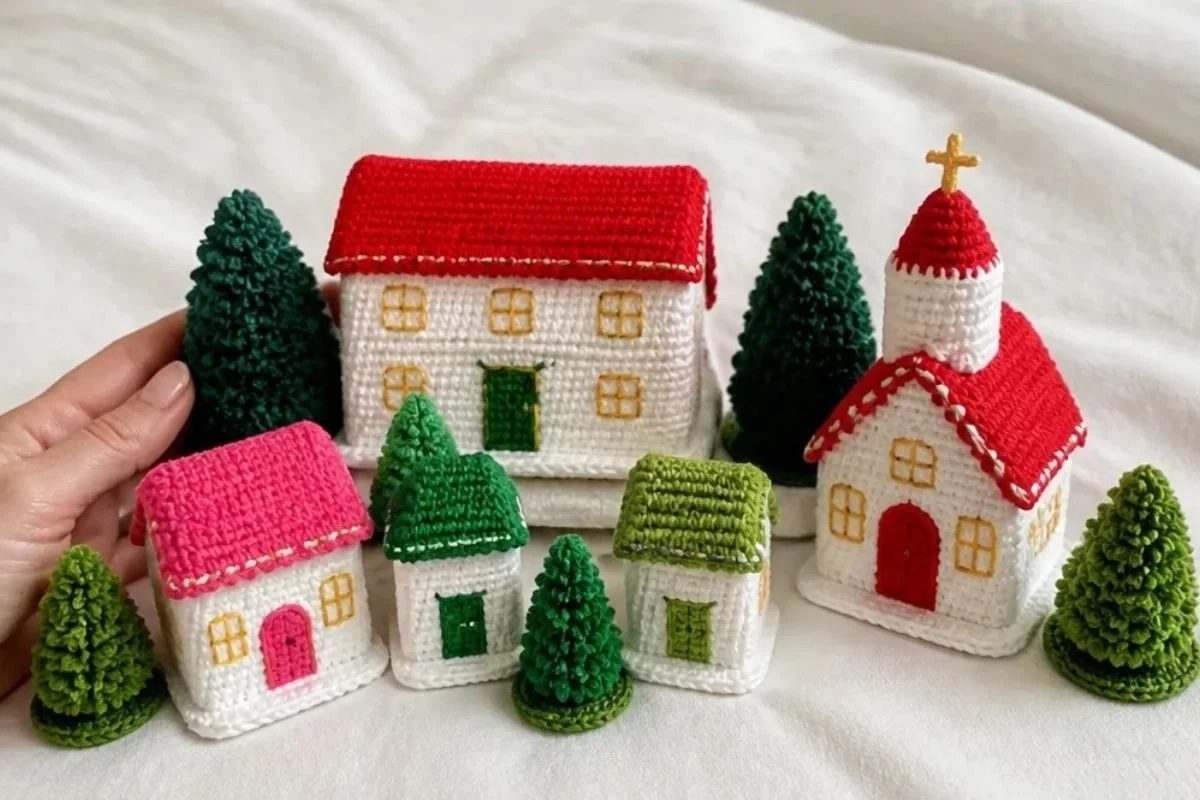
- It makes a complete village display. The pattern includes buildings, a church, and trees, so the finished set looks coordinated without requiring you to design individual pieces.
- It practices shaping. The tapered side walls and steeple introduce decreases and increases in a manageable way.
- It uses simple stitches. Most pieces are made with single crochet, while the church steeple adds half double crochet and double crochet.
- It is easy to personalize. The roofs and doors use several bright colors, making it simple to create a traditional or playful holiday palette.
- It makes a useful handmade gift. A finished village can become a seasonal gift for a crochet lover, new homeowner, or collector of handmade Christmas décor.
My Crochet Flower Tip: Make and label the windows, doors, roofs, and building pieces as you go. Keeping each group together will make assembly much easier later.
Before You Start Crocheting
This project is rated EASY and is made from separate crocheted pieces that are joined, lightly stuffed, and decorated. You will make three small buildings, one large building, one church, and five trees.
The finished sizes are approximately:
- Small building: about 3½ inches (9 cm) tall
- Large building: about 5 inches (12.5 cm) tall
- Church with steeple: about 7 inches (18 cm) tall
- Tree: about 3½ inches (9 cm) tall
The construction sequence is straightforward: crochet the walls, floors, roofs, windows, doors, and church details; assemble each building; then make and attach the trees.
Abbreviations
- ch: chain
- sc: single crochet
- sl st: slip stitch
- hdc: half double crochet
- dc: double crochet
Special Stitch
sc2tog: [Draw up a loop in next st] twice, yarn over and draw through all 3 loops on hook.
Materials You’ll Need
Yarn
RED HEART® Super Saver®:
- 1 skein, 316 Soft White A
- 1 skein, 320 Cornmeal B
- 1 skein, 319 Cherry Red C
- 1 skein, 718 Shocking Pink D
- 1 skein, 368 Paddy Green E
- 1 skein, 672 Spring Green F
Tools and Supplies
- Susan Bates® Crochet Hook: 3.75 mm [US F-5]
- Stitch marker
- Hot glue gun and glue sticks, for trees only
- Pompom maker, optional, for trees only
- Polyester fiberfill
- Yarn needle
The white yarn forms the building pieces, while the contrasting shades are used for roofs, doors, windows, trees, and the church cross. Fiberfill gives the buildings and steeple shape without making them overly firm.
Complete Crochet Instructions
Follow the component quantities carefully. The pattern uses several repeated pieces, so checking them off as they are completed helps prevent omissions.
Small Building Make 3
Side Wall Make 6, 2 for Each Building
With A, ch 9.
Row 1: Sc in 2nd ch from hook and in each ch across, turn 8 sc.
Rows 2–6: Ch 1, turn, sc in each st across, turn.
Row 7: Ch 1, sc2tog, sc in next 4 sts, sc2tog, turn 6 sc.
Row 8: Ch 1, sc2tog, sc in next 2 sts, sc2tog, turn 4 sc.
Row 9: Ch 1, [sc2tog] twice, turn 2 sc.
Row 10: Ch 1, sc2tog, turn 1 sc.
Border Round: Ch 1, skip the sc2tog, sc in end of first 4 rows across side edge, ch 2, sc in end of last 6 rows, ch 2; sc in each ch across opposite side of foundation ch, ch 2; sc in end of first 6 rows across next side edge, ch 2, sc in end of last 4 rows, ch 2; join with slip st in first sc 28 sc and 5 ch-2 spaces.
Fasten off.
Front Wall Make 3, 1 for Each Building
With A, ch 15.
Row 1: Sc in 2nd ch from hook and in each ch across, turn 14 sc.
Rows 2–6: Ch 1, sc in each st across, turn.
Border Round: Ch 1, sc in each st across, ch 2; sc in end of each row across side edge, ch 2; sc in each ch across opposite side of foundation ch, ch 2; sc in end of each row across next side edge, ch 2; join with slip st in first sc 40 sc and 4 ch-2 spaces.
Fasten off.
Back Wall Make 3, 1 for Each Building
Work same as Front Wall.
Floor Make 3, 1 for Each Building
With A, ch 15.
Row 1: Sc in 2nd ch from hook and in each ch across, turn 14 sc.
Rows 2–8: Ch 1, sc in each st across, turn.
Border Round: Ch 1, sc in each st across, ch 2; sc in end of each row across side edge, ch 2; sc in each ch across opposite side of foundation ch, ch 2; sc in end of each row across next side edge, ch 2; join with slip st in first sc 44 sc and 4 ch-2 spaces.
Fasten off.
Roof Pieces Make 6, 2 Each With D, E, and F
Three roofs are made, each from two roof pieces of the same color.
Ch 15.
Row 1: Sc in 2nd ch from hook and in each ch across, turn 14 sc.
Rows 2–4: Ch 1, sc in each st across, turn.
Border Round: Ch 1, sc in each st across, ch 2; sc in end of each row across side edge, ch 2; sc in each ch across opposite side of foundation ch, ch 2; sc in end of each row across next side edge, ch 2; join with slip st in first sc 36 sc and 4 ch-2 spaces.
Fasten off.
Join Two Roof Pieces Make 3 Roofs
Hold two roof pieces of the same color together with rows and stitches matching. Working through both thicknesses and working into the 14 sts across the top edge of the pieces, join matching yarn with sc in first st of top edge, sc in next 13 sts.
Fasten off.
Large Building Make 1
Side Wall Make 2
With A, ch 9.
Row 1: Sc in 2nd ch from hook and in each ch across, turn 8 sc.
Rows 2–12: Ch 1, turn, sc in each st across, turn.
Row 13: Ch 1, sc2tog, sc in next 4 sts, sc2tog, turn 6 sc.
Row 14: Ch 1, sc2tog, sc in next 2 sts, sc2tog, turn 4 sc.
Row 15: Ch 1, [sc2tog] twice, turn 2 sc.
Row 16: Ch 1, sc2tog, turn 1 sc.
Border Round: Ch 1, skip the sc2tog, sc in end of first 4 rows across side edge, ch 2, sc in end of last 12 rows, ch 2; sc in each ch across opposite side of foundation ch, ch 2; sc in end of first 12 rows across next side edge, ch 2, sc in end of last 4 rows, ch 2; join with slip st in first sc 40 sc and 5 ch-2 spaces.
Fasten off.
Front Wall Make 1
With A, ch 15.
Row 1: Sc in 2nd ch from hook and in each ch across, turn 14 sc.
Rows 2–12: Ch 1, sc in each st across, turn.
Border Round: Ch 1, sc in each st across, ch 2; sc in end of each row across side edge, ch 2; sc in each ch across opposite side of foundation ch, ch 2; sc in end of each row across next side edge, ch 2; join with slip st in first sc 52 sc and 4 ch-2 spaces.
Fasten off.
Back Wall Make 1
Work same as Front Wall.
Floor Make 1
Work same as Floor for Small Building.
Roof Pieces Make 2
With C, work and join same as Roof Pieces for Small Building.
Church
Side Walls Make 2
Work same as Front Wall for Small Building.
Front Wall Make 1
Work same as Side Wall for Small Building.
Back Wall Make 1
Work same as Side Wall for Small Building.
Floor Make 1
Work same as Floor for Small Building.
Roof Pieces Make 2
With C, work and join same as Roof Pieces for Small Building.
Steeple Make 1
With A, ch 2.
Round 1: Work 6 sc in 2nd ch from hook; join with slip st in first sc 6 sc.
Rounds 2 and 3: Ch 1, sc in each st around; join with slip st in first sc.
Round 4: Ch 1, [2 sc in next sc, sc in next 2 sc] twice; join with slip st in first sc 8 sc.
Rounds 5 and 6: Ch 1, sc in each st around; join with slip st in first sc.
Round 7: Ch 1, sc in next st, (hdc, dc) in next st, (dc, hdc) in next st, sc in next 2 sts, (hdc, dc) in next st, (dc, hdc) in next st, sc in next st; join with slip st in first sc 12 sts.
Round 8: Ch 1, sc in next st, hdc in next st, 2 dc in each of next 2 sts, hdc in next st, sc in next 2 sts, hdc in next st, 2 dc in each of next 2 sts, hdc in next st, sc in next st; join with slip st in first sc 16 sts.
Fasten off.
Cross Make 1
With B, ch 6, place a marker in the 3rd ch from hook, slip st in 2nd ch from hook, slip st in marked ch, ch 3, slip st in 2nd ch from hook, slip st in next ch, slip st in marked ch, ch 2, slip st in 2nd ch from hook, slip st in marked ch, slip st in remaining 3 ch.
Fasten off.
Windows Make 42
Make 7 for each small building, 15 for the large building, and 6 for the church.
With B, ch 4.
Row 1: Sc in 2nd ch from hook and in each ch across, turn 3 sc.
Row 2: Ch 1, sc in each st across.
Fasten off.
Doors Make 5
Make 2 with C and 1 each with D, E, and F. The C-colored doors are for one small building and the church, the D-colored door is for one small building, the E-colored door is for the large building, and the F-colored door is for one small building.
Ch 4.
Row 1: Sc in 2nd ch from hook and in each ch across, turn 3 sc.
Rows 2–5: Ch 1, sc in each st across.
Fasten off.
Trees Make 5
Make 3 with E and 2 with F.
Bases Make 5
Make 3 with E and 2 with F.
Ch 2.
Round 1: Work 6 sc in 2nd ch from hook; join with slip st in first sc 6 sc.
Round 2: Ch 1, 2 sc in each st around; join with slip st in first sc 12 sc.
Round 3: Ch 1, [sc in next st, 2 sc in next st] 6 times; join with slip st in first sc 18 sc.
Round 4: Ch 1, [sc in next 2 sts, 2 sc in next st] 6 times 24 sc.
Fasten off.
Pompoms Make 25
Make 15 with E and 10 with F. Five pompoms are used to make each of five trees.
Use a pompom maker to make small pompoms, or make them by hand:
- Cut a length of yarn about 6 inches (15 cm) long and set aside.
- Wrap yarn around two fingers 30 times.
- Carefully slip the wraps from your fingers and tie the 6-inch (15 cm) length tightly around the center of the wraps.
- Cut the ends of the wraps and shake to fluff the pompom.
- Do not trim the pompom until after the tree is assembled.
Assembly
Small Building Assembly
- Hold Floor and Front Wall together with stitches of lower long edge matching. Working through both thicknesses, join A with slip st in first st of long edge, slip st in each st across to join.
- Join Side Walls and Back Wall to Floor in the same manner as Front Wall was joined to Floor.
- Join the four corners of the Walls in the same manner.
- Whipstitch Door close to one end of Front Wall.
- Whipstitch two Windows to remaining part of Front Wall. Whipstitch three Windows evenly spaced across Back Wall. Whipstitch one Window to each of the two Side Walls.
- With same color as Door, embroider an outline around each Window.
- Stuff piece lightly. It is better to under stuff than over stuff.
- Place Roof on top of Building with stitches matching. Working through both thicknesses, inserting hook through Wall st first then into corresponding Roof st, join same color yarn as Roof with sc in any st, sc in each st all the way around, working (2 sc, ch 1, 2 sc) at each of the four corners.
Large Building Assembly
1–3. Work same as steps 1–3 of Small Building Assembly. 4. Whipstitch Door to center of Front Wall. 5. Whipstitch one Window on each side of Door of Front Wall. Whipstitch three Windows evenly spaced above the Door and other two Windows of Front Wall. Whipstitch six Windows, in two rows of three Windows each, evenly spaced across Back Wall. Whipstitch two Windows, one above the other, to each of the two Side Walls. 6–8. Work same as steps 6–8 of Small Building.
Church Assembly
1–3. Work same as steps 1–3 of Small Building Assembly. 4. Whipstitch Door to center of Front Wall. 5. Whipstitch three Windows evenly spaced across each of the two Side Walls. 6–8. Work same as steps 6–8 of Small Building. 9. Lightly stuff Steeple. Whipstitch Steeple to Roof near front of Church. 10. Whipstitch Cross to top of Steeple.
Tree Assembly
- Hot glue three Pompoms onto Base. Let glue set and cool.
- Hot glue one Pompom on top and at center of the first three Pompoms. Let glue set and cool.
- Hot glue one more Pompom on top of the last Pompom that was glued in place. Let glue set and cool.
- Trim Pompoms to shape Tree.
- Weave in any remaining ends.
Ways to Display Your Finished Crochet

- Arrange the three small buildings, large building, and church together on a mantel or console table.
- Place the church slightly behind the smaller buildings so its steeple becomes a focal point.
- Scatter the five trees between the buildings to create a village street or woodland scene.
- Use a shallow tray beneath the pieces so the complete display can be moved safely.
- Add the village to a holiday table centerpiece, keeping it away from candles, heaters, and other sources of heat.
- Give the completed set as a handmade seasonal gift. For more coordinated handmade décor ideas, browse these all-in-one crochet bouquet patterns for inspiration.
Caring for Your Crochet Project
Dust the village gently with a soft brush, microfiber cloth, or cool air from a distance. Avoid pulling on the windows, doors, cross, steeple, or pompom trees because these pieces are attached separately.
For small marks, spot clean carefully with a barely damp cloth and allow the piece to dry completely before returning it to display. Do not soak the buildings or trees, especially because the trees use hot glue and the village contains stuffed, assembled components.
Store the pieces in a clean, dry container between seasons. Keep them away from excessive heat, direct moisture, and anything that could crush the steeple or flatten the pompoms. If a building becomes slightly misshapen, reshape it gently by hand rather than applying heat.
Tips for Better Results
- Count every row and round. The tapered side walls depend on the specified sc2tog decreases, so missing one decrease can affect how the roof fits.
- Mark the beginning of small circular pieces. A stitch marker is especially useful for the steeple and tree bases.
- Match pieces before joining. Place corresponding rows and stitches together before stitching or crocheting through both thicknesses.
- Stuff lightly. The pattern specifically recommends understuffing rather than overstuffing. Too much fiberfill can distort the walls and roof.
- Keep color groups organized. Separate the D, E, and F roof pieces, and label the doors according to their assigned buildings.
- Attach details before closing the roof. Windows, doors, and embroidered outlines are easier to position while the building walls are still accessible.
- Let glue cool fully. When assembling the trees, allow each glued layer to set and cool before adding the next pompom.
- Trim trees gradually. Shape the pompoms a little at a time so you do not remove too much yarn.
Color and Styling Variations
The approved pattern uses Soft White walls with Cornmeal windows and a bright combination of Cherry Red, Shocking Pink, Paddy Green, and Spring Green. Optional color changes can give the village a different seasonal mood.
- Use only red, green, and white for a traditional Christmas palette.
- Replace the bright roof combination with muted green, burgundy, and cream if those shades are available in a comparable yarn.
- Make all five roofs one color for a more unified village.
- Use contrasting doors so each building has its own character.
- Arrange the trees with the church in the center for a symmetrical display, or place them around the outside as a border.
If you substitute yarn, choose a similar yarn construction and remember that a different yarn weight or hook can change the finished dimensions, stitch density, stuffing requirements, and roof fit. Changing colors does not alter the pattern structure, but changing yarn or hook size may.
Frequently Asked Questions
Is this crochet village beginner-friendly?
Yes. The pattern is rated EASY and relies mainly on single crochet, basic shaping, slip-stitch joins, whipstitching, and simple assembly. The number of separate pieces makes organization important.
What hook size does the pattern use?
Use a Susan Bates® Crochet Hook measuring 3.75 mm [US F-5].
How many buildings are included?
The finished village includes three small buildings, one large building, and one church with a steeple. It also includes five trees.
How many windows and doors do I need?
Make 42 windows: 7 for each small building, 15 for the large building, and 6 for the church. Make 5 doors: 2 with C and 1 each with D, E, and F.
Can I change the colors?
Yes. Color changes are an optional styling choice. Keep track of the assigned pieces so you still make the correct number of roofs, doors, windows, and tree components.
How are the trees assembled?
Each tree uses one crocheted base and five pompoms. Hot glue three pompoms onto the base, then add one pompom on top and at the center of the first three, followed by one more on top. Let each layer set before continuing.
How should I keep the buildings in shape?
Stuff each building lightly and avoid overstuffing. During assembly, match the stitches carefully and allow the roof joins to form evenly around the corners.
Can I wash the finished village?
Because the village is stuffed and assembled and the trees use hot glue, avoid soaking or machine washing. Dust gently and spot clean only when necessary, following the yarn manufacturer’s care guidance where applicable.
Conclusion
This festive crochet village combines simple stitches, colorful details, shaped walls, and charming little trees into a displayable Christmas scene. Make the buildings as written, personalize the palette, or create a larger seasonal arrangement with additional handmade pieces. For another source of seasonal inspiration, explore this Christmas village crochet pattern collection.