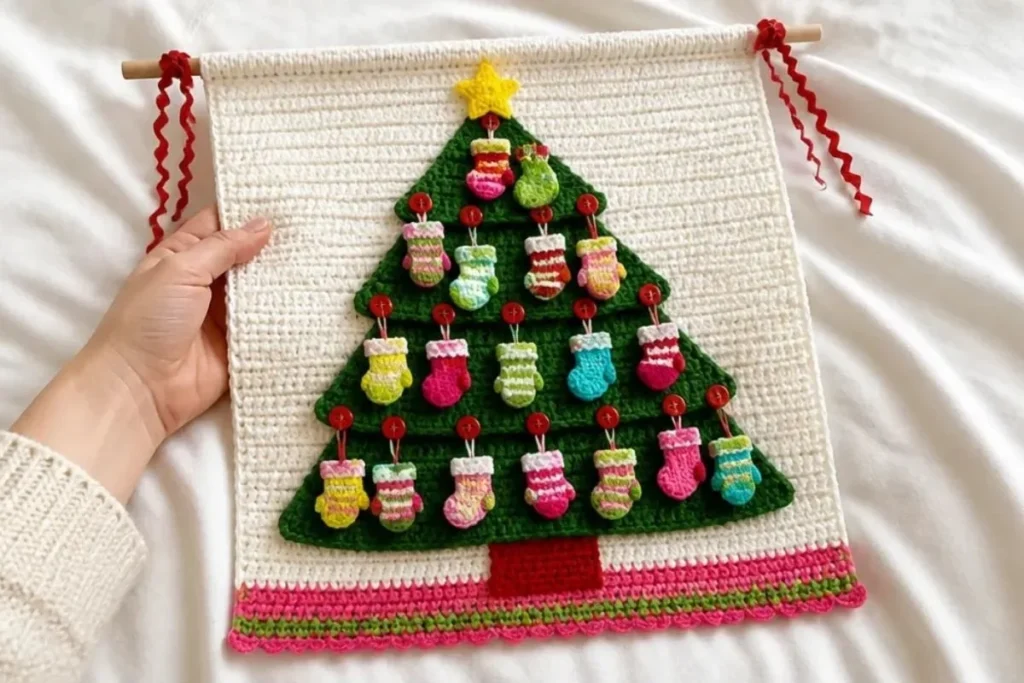
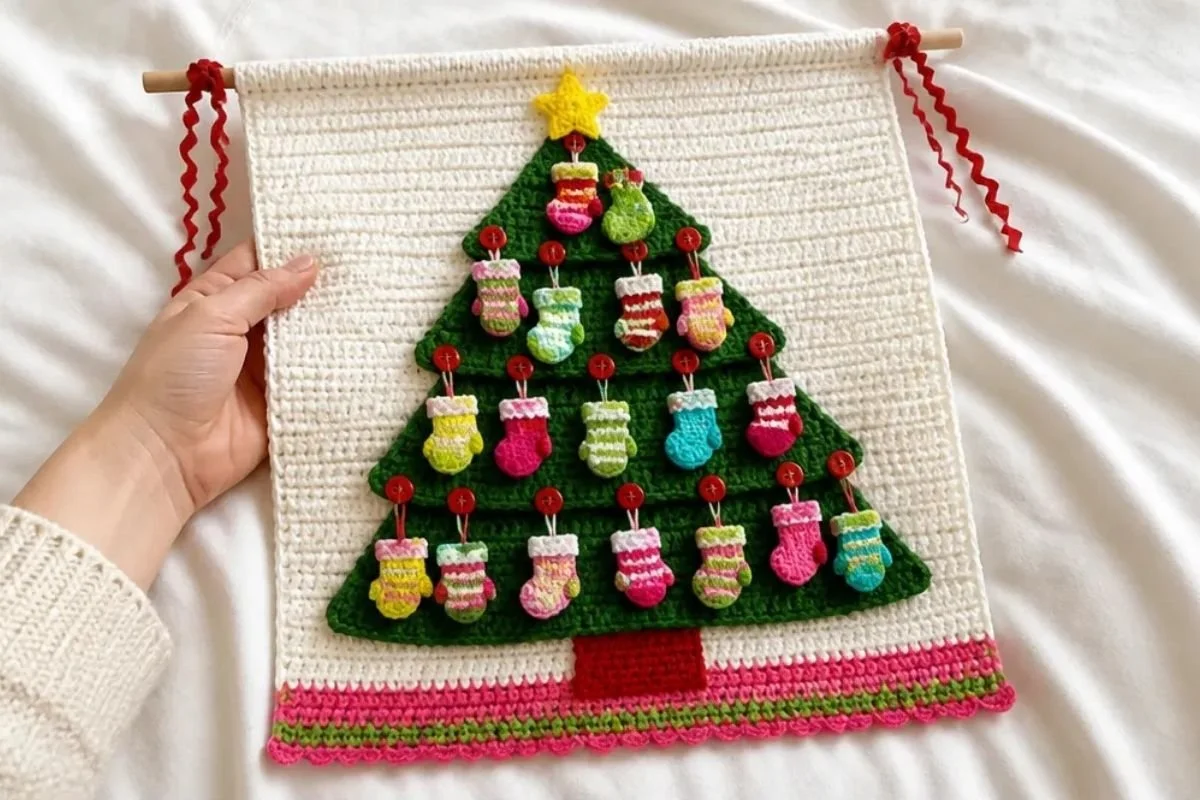
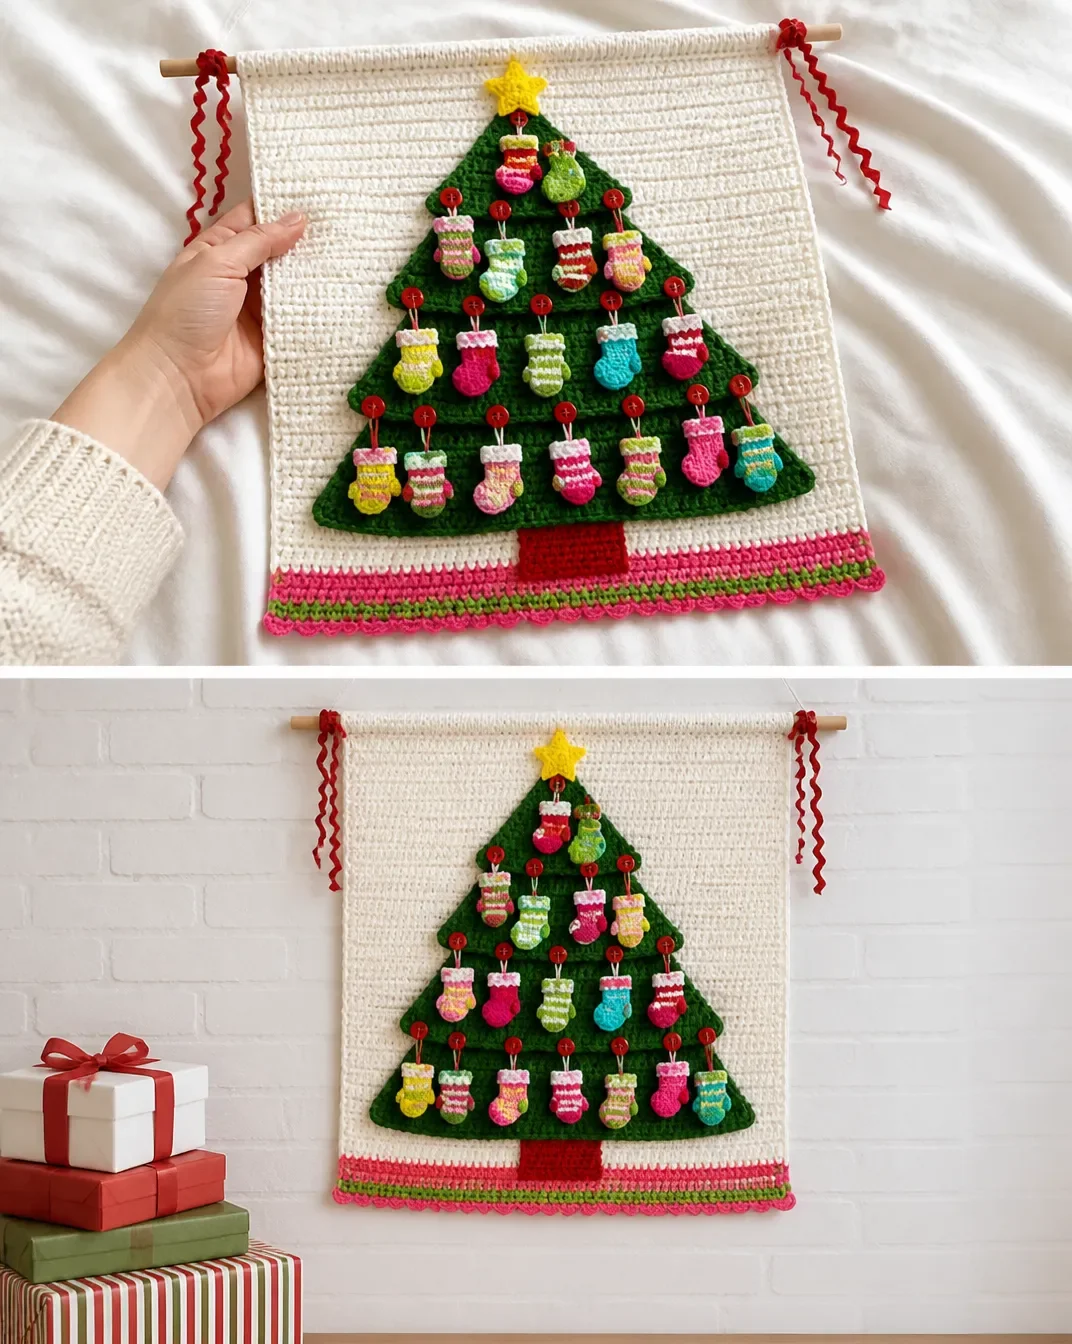
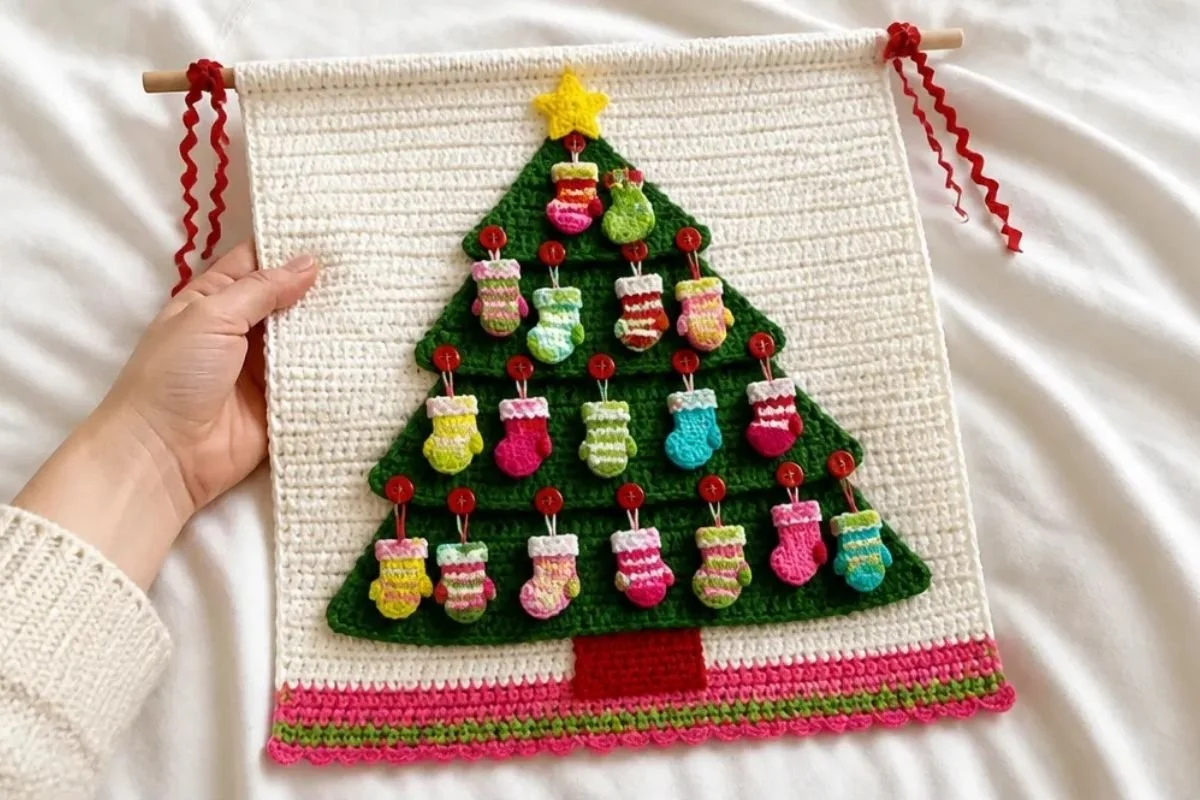
A DIY crochet Christmas tree wall hanging brings together a soft textured backdrop, a layered evergreen tree, a bright star, and 24 tiny stockings and mittens. It makes a cheerful seasonal decoration for a hallway, living room, classroom, or gift display, and the button-hung ornaments can be rearranged from year to year. The project is especially enjoyable for crocheters who like colorwork, appliqué, and detailed assembly. For another small handmade gift idea, try this crochet flower keychain tutorial alongside your holiday projects.
Why You’ll Love This Crochet Project
This crochet Christmas tree wall hanging offers several satisfying techniques in one seasonal project:
- It creates a complete holiday display. The crocheted tree, star, stockings, and mittens form a coordinated decoration rather than a single small motif.
- It builds shaping skills. The three tree sections use increases to create a tapered silhouette, while the stockings and mittens introduce small three-dimensional details.
- It provides color-planning practice. The specified color sequences make 12 stockings and 12 mittens in a bright, playful palette.
- It can become a reusable tradition. The ornaments hang from sewn buttons, so they can be removed, rearranged, or packed separately for storage.
- It makes a thoughtful handmade gift. A finished wall hanging is useful for anyone who enjoys seasonal home décor.
My Crochet Flower Tip: Keep the color-coded yarns in separate bags while working. Small pieces are easier to identify when each color has a labeled section.
Before You Start Crocheting
The project is assembled from a crocheted backdrop, a lower edging, three green tree sections, a brown tree base, a yellow star, 12 stockings, and 12 mittens. The backdrop is worked with two strands of Soft White held together, while the tree sections are worked with two strands of Green/Green held together.
The larger 6 mm [US J-10] hook is used for the backdrop and tree sections. The smaller 4.25 mm [US G-6] hook is used for the tree base, star, stockings, and mittens. Construction happens in this order:
- Crochet the backdrop and lower edging.
- Make the three tree sections, tree base, and star.
- Make 12 stockings and 12 mittens in the stated color sequences.
- Sew the rod pocket, tree pieces, buttons, and star.
- Hang the small pieces from the buttons and insert the rod.
The pattern uses US crochet terminology. Common abbreviations include ch for chain, sc for single crochet, hdc for half double crochet, dc for double crochet, tr for treble crochet, sl st for slip stitch, and st for stitch. The special joining technique is:
Join with sc: Place a slip knot on hook, insert hook in indicated stitch, yarn over and draw up a loop, yarn over and draw through both loops on hook.
Materials You’ll Need
Yarn
- RED HEART® Super Saver® (Art. E300), 4 skeins, color 316 Soft White A
- RED HEART® Super Saver® (Art. E300), 1 skein color 718 Shocking Pink B
- RED HEART® Super Saver® (Art. E300), 1 skein color 672 Spring Green C
- RED HEART® Super Saver® (Art. E300), 1 skein color 319 Cherry Red E
- RED HEART® Super Saver® (Art. E300), 1 skein color 324 Bright Yellow F
- RED HEART® Super Saver® (Art. E300), 1 skein color 512 Turqua G
- RED HEART® Super Saver® (Art. E300), 1 skein color 979 Mistletoe H
- RED HEART® Holiday® (Art. E759), 2 balls color 6060 Green/Green D
Tools and Notions
- Susan Bates® Crochet Hook, 4.25 mm [US G-6]
- Susan Bates® Crochet Hook, 6 mm [US J-10]
- Yarn needle
- Stitch marker
- 24 red ½” (12 mm) buttons
- 30” wooden rod
- 36” (94 cm) of rick rack
Complete Crochet Tutorial
Wall Hanging: Backdrop
With larger hook and 2 strands of A held together, ch 62.
Row 1 (wrong side): Sc in 2nd ch from hook and each ch across, turn 61 sc.
Row 2 (right side): Ch 3 (counts as first dc here and throughout), dc in each st, turn 62 dc.
Row 3: Ch 1, skip first st, *dc in next st, slip st in next st; repeat from * across working last slip st in top of beginning ch, turn.
Row 4: Ch 3, dc in each st across, turn.
Rows 5–58: Repeat last 2 rows 27 times.
Row 59: Repeat Row 3. Fasten off, leaving a long tail for sewing.
Lower Edging
Row 1 (right side): With right side of Row 1 facing and working in opposite side of foundation ch, join 2 strands of B with sc in first ch, sc in each ch across, turn 61 sts.
Row 2: Ch 3, dc in each st across; change to C, turn.
Row 3: Ch 1, sc in each st across; change to B, turn.
Row 4: Repeat Row 2.
Row 5: Ch 1, sc in first st, *skip next 2 sts, fan in next st, skip next 2 sts, sc in next st; repeat from * across. Fasten off.
Tree: Bottom Section
With larger hook and 2 strands of D held together, ch 25.
Row 1 (wrong side): Sc in 2nd ch from hook and each ch across, turn 24 sc.
Row 2: Ch 3, 2 dc in next st, *dc in next st, 2 dc in next st; repeat from * across, turn 36 dc.
Rows 3–7: Ch 3, dc in each st across, turn.
Rows 8–11: Ch 3, dc in first st (base of ch 3), dc in each st to beginning ch, 2 dc in top of beginning ch, turn 44 dc.
Row 12: Ch 1, sc in first st, *skip next 2 sts, fan in next st, skip next 2 sts, sc in next st; repeat from * across. Fasten off, leaving a long tail for sewing.
Tree: Middle Section
With larger hook and 2 strands of D held together, ch 19.
Rows 1–4: Repeat Rows 1–4 of bottom section 27 dc.
Rows 5–12: Repeat Row 8 of bottom section 43 dc.
Row 13: Repeat Row 12 of bottom section. Fasten off, leaving a long tail for sewing.
Tree: Top Section
With larger hook and 2 strands of D held together, ch 4.
Row 1 (right side): Work 5 dc in 4th ch from hook (beginning ch count as first dc), turn 6 dc.
Row 2: Ch 3, dc in each st across, turn.
Row 3: Ch 3, dc in next st, 2 dc in next 2 sts, dc in last 2 sts, turn 8 dc.
Row 4: Ch 3, dc in each st across, turn.
Row 5: Ch 3, dc in next 2 sts, 2 dc in next 2 sts, dc in last 3 sts, turn 10 dc.
Row 6: Ch 3, dc in next 3 sts, 2 dc in next 2 sts, dc in last 4 sts, turn 12 dc.
Row 7: Ch 3, dc in next 4 sts, 2 dc in next 2 sts, dc in last 5 sts, turn 14 dc.
Row 8: Ch 3, dc in each st across, turn.
Rows 9–15: Repeat Row 8 of bottom section 28 dc.
Row 16: Repeat Row 12 of bottom section. Fasten off, leaving a long tail for sewing.
Tree Base
With smaller hook and E, ch 17.
Row 1 (right side): Sc in 2nd ch from hook and in each ch across, turn 16 sc.
Rows 2–22: Ch 1, working in back loops only, sc in each st, turn.
Fasten off, leaving a long tail for sewing.
Star
With smaller hook and F, ch 2.
Round 1 (right side): Work 5 sc in 2nd ch from hook 5 sc. Do not join.
Round 2: Work 2 sc in each st; join with slip st in first sc 10 sc.
Round 3: Ch 3, dc in same st as join, 2 dc in each remaining st around; join with slip st in first sc 20 sc.
Round 4: *Ch 6, slip st in 2nd ch from hook, sc in next ch, hdc in next ch, dc in next ch, tr in last ch, skip next 3 sts, slip st in next st; repeat from * 4 times; join with slip st in first ch of beginning ch. Fasten off, leaving a long tail for sewing.
Stockings
Make 12 stockings. Make 2 stockings in each of the following color sequences:
- Stocking 1: 8 rounds with B, 4 rounds with G
- Stocking 2: 8 rounds with G, 4 rounds with B
- Stocking 3: All rounds with H
- Stocking 4: 9 rounds with C, 3 rounds with A
- Stocking 5: 5 rounds with E, 3 rounds with C, 4 rounds with A
- Stocking 6: [2 rounds with C, 1 round with E] 3 times, 3 rounds with E
With smaller hook, ch 6.
Round 1 (right side): Sc in 2nd ch from hook and in next 3 ch, 3 sc in last ch; working in opposite side of foundation ch, skip first ch, sc in next 3 ch, 2 sc in last ch 12 sc. Do not join. Place marker for beginning of round and move marker up as each round is completed.
Round 2: Work 2 sc in first st, sc in next 3 sts, 2 sc in next 3 sts, sc in next 3 sts, 2 sc in last 2 sts 18 sc.
Rounds 3 and 4: Sc in each st around.
Round 5: Sc in first 3 sts, [sc2tog] 6 times, sc in last 3 sts 12 sc.
Rounds 6–11: Sc in each st around.
Round 12: Working in front loops only, loosely slip st in each st around, (slip st, ch 6, slip st) in first slip st (hanging loop made). Fasten off tightly.
Mittens
Make 12 mittens. Make 2 mittens in each of the following color sequences:
- Mitten 1: All rounds with H
- Mitten 2: [2 rounds with E, 2 rounds with A] 3 times
- Mitten 3: 4 rounds with C, 1 round with B, 1 round with C, 1 round with B, 5 rounds with C
- Mitten 4: 4 rounds with G, 3 rounds with C, 5 rounds with G
- Mitten 5: 5 rounds with E, 3 rounds with C, 4 rounds with A
- Mitten 6: 4 rounds with B, 1 round with A, 1 round with [next 2 sts with B, next st with A] around, 1 round with [next st with B, next 2 sts with A] around, 5 rounds with B
With smaller hook, ch 2.
Round 1 (right side): Work 6 sc in 2nd ch from hook 6 sc. Do not join. Place marker for beginning of round and move marker up as each round is completed.
Round 2: Work 2 sc in each st around 12 sc.
Round 3: Sc in each st around.
Round 4: *Sc in next 3 sts, 2 sc in next st; repeat from * twice 15 sc.
Rounds 5–7: Sc in each st around.
Round 8: Sc in next 7 sts, 5 dc in front loop of next st, sc in next 7 sts 14 sc and 5 dc.
Round 9: Sc in next 7 sts; working in back loops only, sc5tog (thumb made), sc in next 7 sts 15 sc.
Round 10: Sc in each st around.
Round 11: *Sc in next 3 sts, sc2tog; repeat from * twice 12 sc.
Round 12: Repeat Round 12 of stocking.
Finishing
- Fold last 3 rows of backdrop to wrong side and sew across long edge to form a rod pocket.
- Use photograph as a guide for placement of all pieces. Weave in ends.
- Arrange stockings and mittens on tree sections as follows: 9 pieces on each of bottom and middle sections and 6 pieces on top section.
- Pin a safety pin or marker where each button will be sewn. Sew all buttons in place.
- With rows positioned vertically, center lower edge of tree base on Row 2 of backdrop and sew in place. Slightly overlap bottom section of tree on top edge of tree base, pin in place and sew. Repeat to attach middle and top sections, overlapping previously sewn section.
- Sew star on top section. Hang stockings and mittens on buttons. Weave in any remaining ends.
- Insert wooded rod and tie on rick rack for hanging.
Ways to Display Your Finished Crochet
- Hang the wall hanging above a mantel, entryway table, or seasonal decorating station.
- Use it as a reusable advent-style display by placing small notes or lightweight surprises near the stockings and mittens.
- Give it as a handmade housewarming or holiday gift.
- Display it in a classroom, craft room, or children’s reading area where the bright colors can stand out.
- Coordinate the backdrop and ornaments with existing holiday décor by choosing a matching rod or hanging ribbon.
- Pair it with other handmade seasonal motifs; textured floral techniques such as those shown in this bobble flower crochet tutorial can inspire additional decorative accents for future projects.
Caring for Your Crochet Project
- Dust the wall hanging gently with a soft brush or use a vacuum on its lowest setting with a protective layer between the nozzle and crochet.
- Spot-clean carefully with a slightly damp cloth, avoiding excessive moisture around the buttons, rod pocket, and sewn joins.
- Do not pull the stockings or mittens sharply from their buttons; lift them off by supporting the crocheted fabric.
- Store the wall hanging flat or loosely rolled with the tree sections protected from crushing.
- Keep it dry and away from excessive heat, which can distort the yarn or affect the shape of the components.
- Before storing, ensure the piece is completely dry and secure any loose ends or buttons.
Tips for Better Results
- Use two strands consistently. The backdrop and tree sections require two strands held together. Keep both strands feeding smoothly so the fabric does not become uneven.
- Track the right and wrong sides. The backdrop and tree sections alternate between wrong-side and right-side rows, so mark the first row if you find the orientation difficult to identify.
- Count after increases. The tree sections have specific stitch counts 36 dc in Row 2 of the bottom section, 44 dc in Rows 8–11, 27 dc in the middle section repeat, and 28 dc in the top section repeat.
- Watch the working loop. The stockings and mittens are worked in continuous rounds. Move the stitch marker after every completed round.
- Respect loop placement. The tree base is worked in back loops only, the stocking’s final round is worked in front loops only, and the mitten thumb uses back loops only.
- Leave long sewing tails. The tree sections, tree base, star, and backdrop need tails for assembly, so do not cut them close to the fabric.
- Lay out the pieces before sewing. Arrange the 24 small ornaments first, using 9 pieces on each of the bottom and middle sections and 6 pieces on the top section.
- Sew buttons securely. Each button needs to withstand repeated hanging and removal of a stocking or mitten.
Creative Ways to Customize Your Project
The approved color sequences create a bright traditional holiday palette, but optional styling changes can make the wall hanging coordinate with your home.
- Use a restrained palette of cream, forest green, and cranberry while keeping the same construction and component quantities.
- Choose metallic or jewel-toned yarn for the star if the selected yarn produces a comparable fabric.
- Replace the red buttons with green, white, or wood-toned buttons, provided they remain compatible with the hanging loops.
- Use a painted wooden rod that matches the room’s trim or holiday decorations.
- Arrange the stockings and mittens symmetrically for a formal look, or alternate them in a playful pattern.
- If substituting yarn, remember that a different yarn weight or fiber can change stitch size, drape, texture, and yarn requirements. Changing hook size can also affect the finished proportions, so make a test section before altering the approved pattern.
Frequently Asked Questions
Is this crochet Christmas tree wall hanging suitable for a beginner?
It includes beginner-friendly single crochet, double crochet, increases, decreases, continuous rounds, and sewing, but the complete project requires patience because it contains many components and a detailed assembly stage.
Which hook size is used for the tree and backdrop?
Use the larger 6 mm [US J-10] hook for the backdrop and all three tree sections. Use the smaller 4.25 mm [US G-6] hook for the tree base, star, stockings, and mittens.
How many stockings and mittens are made?
Make 12 stockings and 12 mittens. The finishing instructions place 9 pieces on each of the bottom and middle tree sections and 6 pieces on the top section.
Why are some pieces worked with two strands held together?
The backdrop and tree sections are worked with two strands held together to create their required fabric weight and structure. Keep both strands under consistent tension.
Can the colors be changed?
Yes. The listed color sequences are part of the approved design, but they can be treated as an optional color-planning guide. Changing yarn or colors may affect contrast, texture, and the amount of yarn required.
How are the stockings and mittens attached?
Sew the 24 red buttons to the tree sections after arranging the small pieces. The stockings and mittens each have a hanging loop made in Round 12, allowing them to hang from the buttons.
How is the wall hanging mounted?
Fold the last 3 rows of the backdrop to the wrong side and sew across the long edge to form a rod pocket. Insert the 30” wooden rod and tie on the 36” (94 cm) of rick rack for hanging.
How should the tree sections be assembled?
Center the lower edge of the tree base on Row 2 of the backdrop and sew it in place. Slightly overlap the bottom tree section over the top edge of the tree base, then attach the middle and top sections in the same overlapping manner.
Conclusion
This DIY crochet Christmas tree wall hanging combines practical construction with colorful seasonal detail. The layered tree, star, stockings, and mittens create a decoration that can be displayed year after year, while the removable button-hung pieces add flexibility. For more seasonal inspiration, browse these free crochet Christmas tree patterns and choose your next festive project.