
Crochet toy patterns are a wonderful way to create colorful, soft playthings with plenty of personality. This Crochet Toy Patterns: Car, Plane, and Truck project includes three cheerful vehicles, each built from simple crocheted shapes, embroidered details, stuffing, and sewn assembly. They make thoughtful handmade gifts, nursery decorations, or imaginative toys for supervised play. For another small handmade gift idea, you might also enjoy this crochet floral bouquet keychain.
Why You’ll Love This Crochet Project
This pattern is especially appealing because it combines three different vehicle designs in one coordinated set.
- Make a complete vehicle collection: Crochet a car, plane, and truck with matching Christmas-colored yarn and black details.
- Practice shaping: The pattern uses increases and decreases to create rounded bodies, tapered ends, roofs, wings, tires, and trailer pieces.
- Build sewing confidence: Each vehicle is assembled from separate components, making it useful practice for neat whipstitching and surface attachment.
- Add expressive details: Embroidered eyes and curved smiles give the toys a friendly character.
- Create a versatile handmade gift: The finished vehicles can be displayed together on a shelf or given individually as soft, imaginative toys.
My Crochet Flower Tip: Keep every component labeled as you finish it. Small pieces such as tire halves, windows, and headlights can look similar while you are assembling several vehicles.
Before You Start Crocheting
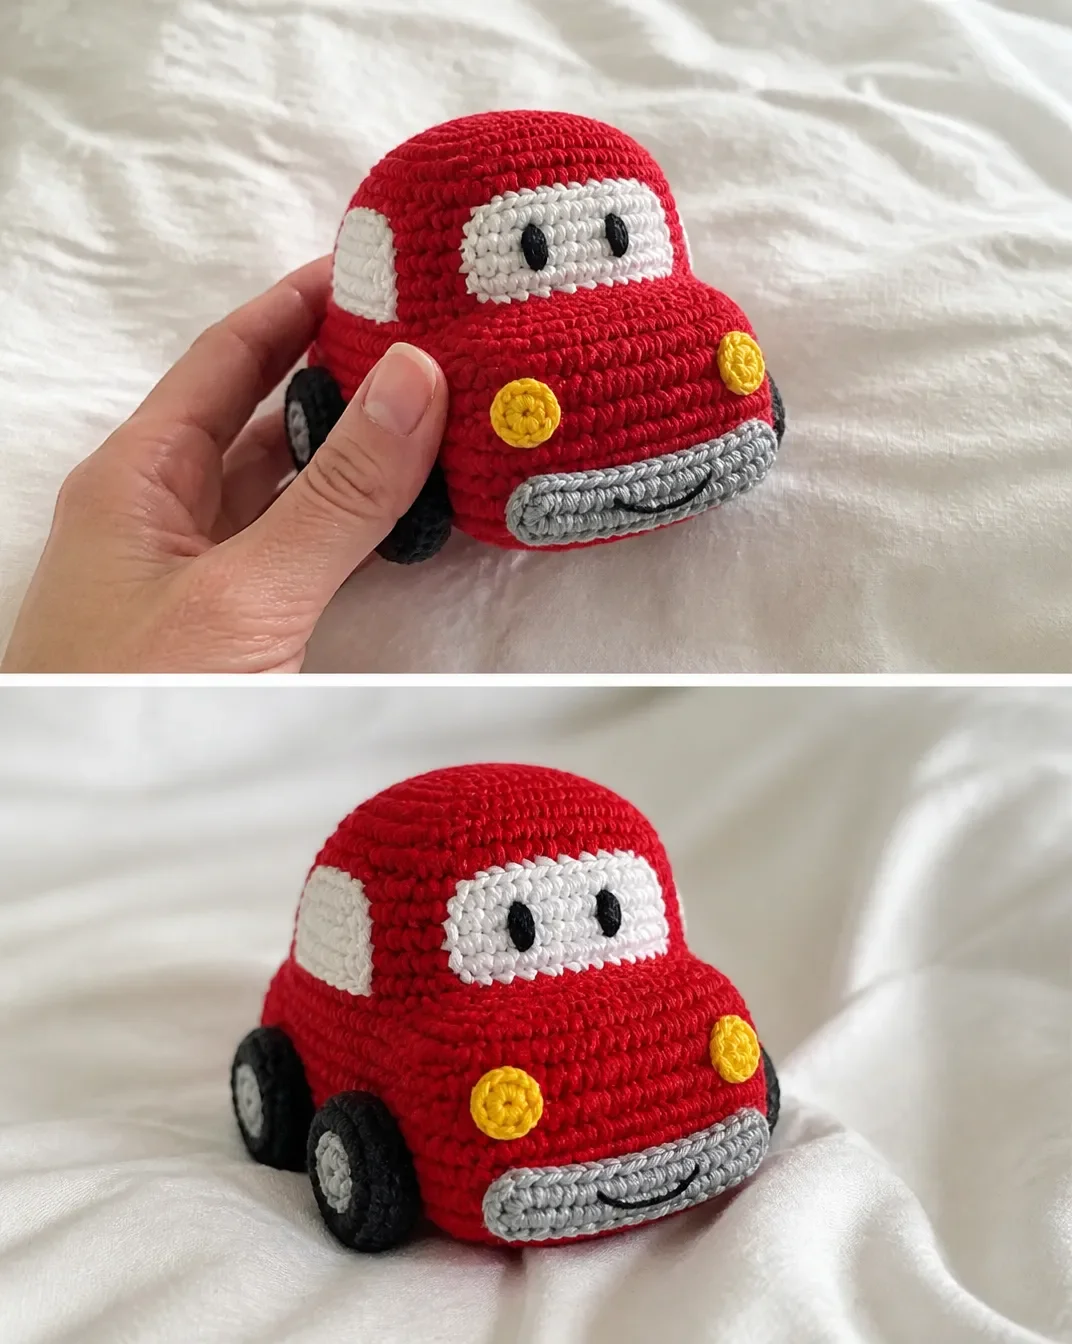
The project includes one car, one plane, and one truck. The car is made from a rounded body, stuffed roof, windows, bumpers, headlights, and four tires. The plane includes a tapered nose and body, front and rear wings, windshield, and tires. The truck has a crocheted cab body, cab top and bottom, bumper, grill, headlights, windows, trailer box pieces, back end, and six tires.
The construction sequence is:
- Crochet each main body or structural piece.
- Make windows, wings, bumpers, lights, grills, and tire halves.
- Add embroidered facial details where specified.
- Sew matching tire halves together.
- Stuff and assemble each vehicle in the order given.
The pattern uses US crochet terminology. Helpful abbreviations include:
- ch: chain
- sc: single crochet
- dc: double crochet
- sc2tog: single crochet two together
- sc3tog: single crochet three together
- dcbp: double crochet back post
- dcfp: double crochet front post
- RS: right side
- WS: wrong sides
- rem: remaining
- rep: repeat
Materials You’ll Need
- Red Heart® Super Saver® O’Go™ (5 oz/141 g; 236 yds/215 m)
- Contrast A, B, C, D, and E: Christmas (7196) 1 O’Go
- Contrast F Black (7120) 1 O’Go
- Size U.S. 7 (4.5 mm) crochet hook or size needed to obtain gauge
- Yarn needle
- Stuffing
The contrast colors are assigned throughout the pattern. Contrast B is used for the car body and roof, while A creates windows, C adds lights and wings, D is used for bumpers, tires, and several truck parts, E forms the plane body and truck sections, and F provides black tire details and embroidery.
Complete Crochet Tutorial
Work the car, plane, and truck in the order below. Leave long yarn ends whenever the instructions specify them so you have enough yarn for sewing.
Car
Car Body
Starting: Beg at front of Car, with B, ch 8.
Rnd 1: 3 sc in 2nd ch from hook. 1 sc in each of next 5 ch. 3 sc in last ch. Working into opposite side of foundation ch, 1 sc in each of next 5 ch. Join. 16 sc
Rnd 2: Ch 1. 2 sc in each of first 3 sc. 1 sc in each of next 5 sc. 2 sc in each of next 3 sc. 1 sc in each sc to end of rnd. Join. 22 sc
Rnds 3 to 16: Ch 1. 1 sc in each sc around. Join. 22 sc implied for these rounds.
Rnd 17: Ch 1. 1 sc in each of first 3 sc. Sc2tog 3 times. 1 sc in each of next 5 sc. Sc2tog 3 times. 1 sc in each of last 2 sc. Join. 16 sc
Rnd 18: Ch 1. 1 sc in each of first 3 sc. Sc3tog. 1 sc in each of next 5 sc. Sc3tog. 1 sc in each of last 2 sc. Join.
Fasten off, leaving a long end. Draw end tightly through rem sts.
Car Roof
With B, ch 2.
Rnd 1: 6 sc in 2nd ch from hook. Join. 6 sc
Rnd 2: Ch 1. 2 sc in each sc around. Join. 12 sc
Rnd 3: Ch 1. *1 sc in next sc. 2 sc in next sc. Rep from * around. Join. 18 sc
Rnd 4: Ch 1. *1 sc in each of next 2 sc. 2 sc in next sc. Rep from * around. Join. 24 sc
Rnds 5 and 6: Ch 1. 1 sc in each sc around. Join.
Fasten off, leaving a long end for sewing. Stuff firmly and sew Roof over 8th to 15th rnds of Body.
Car Front and Rear Windows
Make 2 alike with A.
Ch 7.
1st row (RS): 1 sc in 2nd ch from hook. 1 sc in each ch to end of ch. Turn. 6 sc
2nd row: Ch 1. 1 sc in each sc to end of row. Fasten off, leaving a long end for sewing.
With F and using straight st, embroider eyes over 3rd st in from each edge of 1st row of Front Window. Sew Front Window over 5th and 6th rnds of front side of Roof. Sew Rear Window over 5th and 6th rnds of back side of Roof.
Car Side Windows
Make 2 alike with A.
Ch 2.
1st row (RS): 3 sc in 2nd ch from hook. Turn. 3 sc
2nd row: Ch 1. 2 sc in each sc to end of row. 6 sc
Fasten off, leaving a long tail for sewing. Sew Side Windows over 5th and 6th rnds of each side of Roof.
Car Bumpers
Make 2 alike with D.
Ch 15.
1st row (RS): 1 sc in 2nd ch from hook. 1 sc in each ch to end of ch. 14 sc
Fasten off, leaving a long tail for sewing.
Car Headlights
Make 2 alike with C.
Ch 2.
1st rnd: 5 sc in 2nd ch from hook. Join. 5 sc
Fasten off, leaving a long tail for sewing.
Car Tires
Make 8 Tire Halves with D.
Ch 2.
1st rnd: 6 sc in 2nd ch from hook. Break D. Join with F. 6 sc
2nd rnd: With F, ch 1. 2 sc in each sc around. Join. 12 sc
Fasten off, leaving a long tail for sewing.
To form each Tire, hold WS tog and sew 2 Tire Halves together around outer edges. Make 4.
Car Assembly
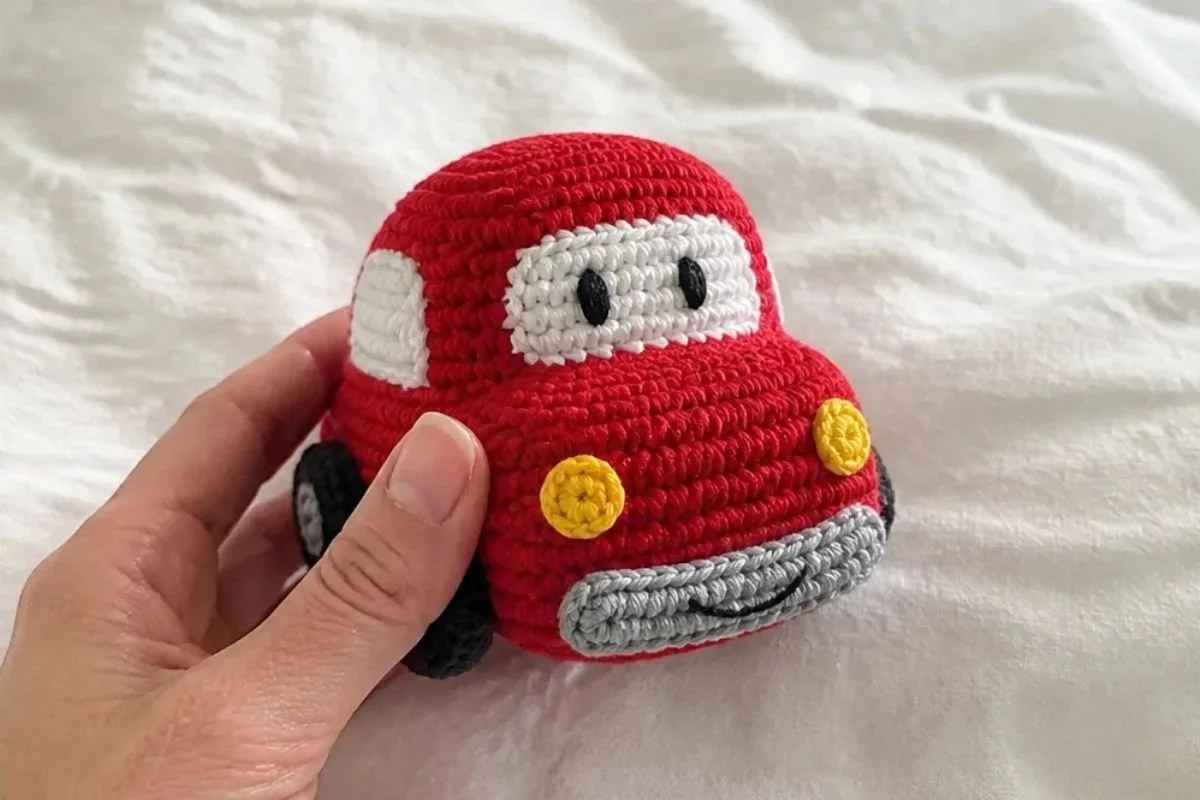
Sew Bumpers over lower front and back of Body, ensuring that each bumper is centered and wrapped slightly around each side. With F and using backstitch, embroider curved mouth on Front Bumper, as shown in photo. Sew Headlights above ends of Front Bumper as shown in photo. Allow half of each Tire to hang below Body and sew in place on lower sides between edges of Bumpers.
Plane
Plane Nose and Body
Begin at Nose with D, ch 2.
1st rnd: 6 sc in 2nd ch from hook. Join. 6 sc
2nd rnd: Ch 1. 2 sc in each sc around. Join. 12 sc
3rd rnd: Ch 1. 1 sc in each sc around. Join.
4th rnd: Ch 1. *1 sc in next sc. 2 sc in next sc. Rep from * around. Join. 18 sc
5th rnd: Ch 1. 1 sc in each sc around. Join.
6th rnd: Ch 1. 1 sc in each sc around. Break D. Join with E.
7th rnd: With E, ch 1. *1 sc in each of next 2 sc. 2 sc in next sc. Rep from * around. Join. 24 sc
8th rnd: Ch 1. *1 sc in each of next 3 sc. 2 sc in next sc. Rep from * around. Join. 30 sc
9th rnd: Ch 1. 1 sc in each sc around. Join.
10th rnd: Ch 1. *1 sc in each of next 3 sc. Sc2tog. Rep from * around. Join. 24 sc
11th to 19th rnds: Ch 1. 1 sc in each sc around. Join.
20th rnd: Ch 1. *1 sc in each of next 2 sc. Sc2tog. Rep from * around. Join. 18 sc
21st to 26th rnds: Ch 1. 1 sc in each sc around. Join.
27th rnd: Ch 1. *1 sc in next sc. Sc2tog. Rep from * around. Join. 12 sc
28th to 31st rnds: Ch 1. 1 sc in each sc around. Join.
32nd rnd: Ch 1. Sc2tog around. Join. 6 sc
33rd rnd: Ch 1. 1 sc in each sc around. Join.
Fasten off, leaving a long tail for sewing. Draw end tightly through rem sts. With E and using backstitch, embroider curved mouth on underside of Nose between 3rd and 4th rnds as shown in photo.
Plane Front Wings
Make 2 alike with C.
Ch 8.
1st row (RS): 1 sc in 2nd ch from hook. 1 sc in each ch to end of ch. Turn. 7 sc
2nd row: Ch 1. 1 sc in each sc to end of row. Turn.
3rd row: Ch 1. 1 sc in each of first 3 sc. 3 sc in next sc. 1 sc in each sc to end of row. Turn. 9 sc
4th row: Ch 1. 1 sc in each sc to end of row. Turn.
5th row: Ch 1. 1 sc in each of first 4 sc. 3 sc in next sc. 1 sc in each sc to end of row. Turn. 11 sc
6th to 13th rows: Rep 4th and 5th rows 4 times. 19 sc
14th row: Ch 1. 1 sc in each sc to end of row.
Fasten off, leaving a long tail for sewing. Fold Wing in half lengthwise and sew outer edges tog.
Plane Rear Wings
Make 3 alike with C.
Ch 6.
1st row: 1 sc in 2nd ch from hook. 1 sc in each ch to end of ch. Turn. 5 sc
2nd row: Ch 1. 1 sc in each sc to end of row. Turn.
3rd row: Ch 1. 1 sc in each of first 2 sc. 3 sc in next sc. 1 sc in each sc to end of row. Turn. 7 sc
4th row: Ch 1. 1 sc in each sc to end of row. Turn.
5th row: Ch 1. 1 sc in each of first 3 sc. 3 sc in next sc. 1 sc in each sc to end of row. Turn. 9 sc
6th row: Ch 1. 1 sc in each sc to end of row. Turn.
Fasten off, leaving a long tail for sewing. Fold Wing in half lengthwise and sew outer edges tog.
Plane Windshield
With A, ch 7.
1st row (RS): 1 sc in 2nd ch from hook. 1 sc in each ch to end of ch. Turn. 6 sc
2nd row: Ch 1. 2 sc in each sc to end of row. 12 sc
Fasten off, leaving a long end for sewing. With F and using straight st, embroider eyes 1 st apart in center of 1st row of Windshield. Sew Windshield over 7th and 8th rnds of Body.
Plane Tires
For Front Tire Halves, make 4 alike with D.
Ch 2.
1st rnd: 6 sc in 2nd ch from hook. Break D. Join with F. 6 sc
2nd rnd: With F, ch 1. 2 sc in each sc around. Join. 12 sc
Fasten off, leaving a long tail for sewing. Hold WS tog and sew 2 Tire Halves together around outer edges. Make 2.
For the Rear Tire Half, make 2 alike with F.
Ch 2.
1st rnd: 6 sc in 2nd ch from hook. Join.
Fasten off, leaving a long tail for sewing. Hold WS tog and sew 2 Tire Halves together around outer edges.
Plane Assembly
Sew Front Wings on sides of Body over 14th to 20th rnds and 2 Rear Wings over 30th to 33rd rnds. Sew rem Rear Wing over top of Body over 30th to 33rd rnds, all as shown in photo. Sew Front Tires to underside of Body slightly forward of Front Wings as shown in photo. Sew Rear Tire to underside of Body centered between Rear Wings as shown in photo.
Truck
Truck Cab Body
With E, ch 34.
1st row (RS): 1 sc in 4th ch from hook (beg ch-3 counts as dc here and throughout). 1 dc in each ch to end of ch. Turn. 32 dc
2nd row: Ch 3. 1 dc in each of next 3 dc. (1 dcbp around next dc. 1 dc in each of next 7 dc) 3 times. 1 dcbp around next dc. 1 dc in each of last 3 dc. Turn.
3rd row: Ch 3. 1 dc in each of next 2 dc. (1 dcfp around next dc. 1 dc in each of next 7 dc) 3 times. 1 dcfp around next dc. 1 dc in each of last 4 dc. Turn.
Rep 2nd and 3rd rows once more and then 2nd row once more.
Fasten off, leaving a long tail for sewing.
Truck Cab Top and Bottom
Make 2 alike with E.
Ch 2.
1st rnd: 8 sc in 2nd ch from hook. Join. 8 sc
2nd rnd: Ch 1. (1 sc. Ch 2. 1 sc) all in first sc. 1 sc in next sc. *(1 sc. Ch 2. 1 sc) all in next sc. 1 sc in next sc. Rep from * 3 times. Join.
3rd rnd: Ch 1. 1 sc in first sc. *(1 sc. Ch 2. 1 sc) all in next ch-2 sp. 1 sc in each of next 3 sc. Rep from * twice. (1 sc. Ch 2. 1 sc) in next ch-2 sp. 1 sc in each of last 2 sc. Join.
4th rnd: Ch 1. 1 sc in each of first 2 sc. *(1 sc. Ch 2. 1 sc) all in next ch-2 sp. 1 sc in each of next 5 sc. Rep from * twice. (1 sc. Ch 2. 1 sc) all in next ch-2 sp. 1 sc in each of last 3 sc. Join.
Fasten off, leaving a long tail for sewing.
Truck Front Bumper
With D, ch 15.
1st row (RS): 1 sc in 2nd ch from hook. 1 sc in each ch to end of ch. 14 sc
Fasten off, leaving a long tail for sewing.
Truck Grill
With D, ch 5.
1st row (RS): 1 sc in 2nd ch from hook. 1 sc in each ch to end of ch. Turn. 4 sc
2nd and 3rd rows: Ch 1. 1 sc in each sc to end of row. Turn.
Fasten off, leaving a long tail for sewing.
Truck Headlights
Make 2 alike with C.
Ch 2.
1st rnd: 6 sc in 2nd ch from hook. Join.
Fasten off, leaving a long tail for sewing.
Truck Front Windshield
With A, ch 7.
1st row (RS): 1 sc in 2nd ch from hook. 1 sc in each ch to end of ch. Turn. 6 sc
2nd row: Ch 1. 1 sc in each sc.
Fasten off, leaving a long tail for sewing. With F, embroider straight st eyes 1 st apart from center of 1st row of Front Windshield.
Truck Side Windows
Make 2 alike with A.
Ch 5.
1st row (RS): 1 sc in 2nd ch from hook. 1 sc in each ch to end of ch. Turn. 4 sc
2nd row: Ch 1. 1 sc in each sc to end of row.
Fasten off, leaving a long tail for sewing.
Truck Trailer Box Top and Bottom
Make 2 alike with D.
Ch 19.
1st row (RS): 1 sc in 2nd ch from hook. 1 sc in each ch to end of ch. Turn. 18 sc
2nd to 8th rows: Ch 1. 1 sc in each sc to end of row. Turn.
Fasten off, leaving a long tail for sewing.
Truck Trailer Box Sides
Make 2 alike.
With D, ch 19.
1st row (RS): 1 sc in 2nd ch from hook. 1 sc in each ch to end of ch. Turn. 18 sc
2nd row: Ch 1. 1 sc in each sc to end of row. Break D. Join C. Turn.
3rd row: With C, ch 1. 1 sc in each sc to end of row. Turn.
4th row: Ch 1. 1 sc in each sc to end of row. Break C. Join B. Turn.
5th row: With B, ch 1. 1 sc in each sc to end of row. Turn.
6th row: Ch 1. 1 sc in each sc to end of row. Break B. Join D.
7th and 8th rows: With D, ch 1. 1 sc in each sc to end of row. Turn.
Fasten off.
Truck Trailer Back End
With D, work same as Cab Top.
Truck Tires
Make 12 Tire Halves with D.
Ch 2.
1st rnd: 6 sc in 2nd ch from hook. Join. 6 sc
2nd rnd: Ch 1. 2 sc in each sc around. Break D. Join with F. 12 sc
3rd rnd: With F, ch 1. *1 sc in next sc. 2 sc in next sc. Rep from * around. Join. 18 sc
Fasten off, leaving a long tail on 6 of the Tire Halves.
To form Tires, hold WS tog and sew 2 Tire Halves together around outer edges. Make 6.
Truck Assembly
Cab: With RS of Cab Body facing, gently fold Cab Body so post sts form outer corners; working across ends of rows, sew edges tog to form back of Cab Body.
Sew Cab Top and Bottom to Body and stuff Body before closing edges. Center Bumper over lower front of Cab Body, wrapping slightly and evenly around each side and sew in place. Using photograph as a guide, with F, embroider curved smile with back stitches on bumper. Center Grill over Bumper and sew in place. Sew Headlights on each side of Grill. Align 1st row of Front Windshield over 5th row of Cab Body front and sew piece in place. Align 1st row of each Side Windshield over 5th row of Cab Body sides and sew in place.
Trailer: Sew Trailer Box top to top edges of Box Sides and Box Bottom to bottom edges. Sew Back End to back of Trailer Box. Stuff Trailer Box, then whipstitch to back of Cab Body. Using photograph as a guide, sew Tires to lower sides of Truck, allowing half of each tire to hang below Cab Body and Trailer Box.
Stitch finish definitions: Straight stitch and back stitch are used for the embroidered facial details.
Finished Project Inspiration
- Display the car, plane, and truck together on a nursery shelf or playroom bookcase.
- Give one vehicle at a time as a handmade birthday or holiday gift.
- Arrange the three toys in a themed transportation basket for supervised imaginative play.
- Use the truck and plane as decorative accents in a child’s room, with the car placed in front as a playful focal point.
- Make coordinated sets in different color palettes for siblings or cousins.
- Pair the vehicles with a handmade storage bin so the toys can be gathered neatly after play.
Caring for Your Crochet Project
Keep the finished vehicles away from excessive heat, which can distort the yarn, stuffing, and sewn shapes. Dust them gently with a soft brush or clean, dry cloth.
For small marks, use careful spot cleaning rather than soaking the toys. Avoid scrubbing over embroidered eyes, smiles, windows, wings, and tire seams. Allow any cleaned area to dry completely before storage.
Store the vehicles in a dry place with enough room that the wings, roofs, and trailer do not become crushed. If a component shifts, gently reshape it by hand and check the sewing before returning it to display or play.
Tips for Better Results
- Count every increase and decrease. The car and plane bodies rely on precise shaping, so verify stitch counts at the end of rounds whenever a count is provided.
- Use stitch markers if needed. Mark the first stitch of joined rounds to help maintain consistent placement.
- Keep tension firm but flexible. Tight stitches help prevent stuffing from showing, while overly tight stitches can make shaping and sewing difficult.
- Leave generous sewing tails. Windows, wings, bumpers, and tires need secure attachment, so do not trim the tails before assembly.
- Stuff gradually. Add stuffing in small amounts and shape the body as you go, especially for the car roof, plane body, truck cab, and trailer.
- Check orientation before sewing. Place each window, wing, bumper, and tire temporarily before stitching it permanently.
- Match tire halves carefully. Hold the wrong sides together and sew around the outer edges evenly to create balanced tires.
- Keep facial details centered. Use the specified stitch locations for the embroidered eyes and place the curved smiles only after the bumpers or nose are secured.
The colorful construction also makes a useful starting point for related handmade projects, such as this zinnia crochet pattern when you want to explore a different type of crocheted design.
Creative Ways to Customize Your Project
These variations are optional and should be made only after considering how changes may affect the approved pattern.
- Use different shades for Contrasts A through E while keeping F Black for tires and embroidery.
- Create a coordinated birthday set by choosing three bright colors for the windows, wings, headlights, and truck details.
- Make a softer nursery palette with muted versions of the same color sections.
- Add small embroidered accents to the truck trailer or plane wings, provided they are securely stitched.
- Use a contrasting yarn for the truck’s striped Trailer Box Sides to make the color changes more noticeable.
- If substituting yarn, choose a similar yarn thickness and remember that a different yarn or hook size can change stitch size, stuffing requirements, and finished proportions.
Frequently Asked Questions
Is this crochet toy pattern suitable for beginners?
The individual techniques are approachable, including single crochet, double crochet, increases, decreases, embroidery, stuffing, and sewing. Because the project contains several components and detailed assembly, beginners may prefer to complete one vehicle at a time.
What yarn is recommended?
The pattern specifies Red Heart® Super Saver® O’Go™, with Contrasts A, B, C, D, and E in Christmas (7196), one O’Go, and Contrast F Black (7120), one O’Go.
What crochet hook should I use?
Use a size U.S. 7 (4.5 mm) crochet hook or the size needed to obtain gauge.
How many vehicles does the pattern include?
The pattern includes one car, one plane, and one truck. Each vehicle is assembled from multiple crocheted components.
Can I change the colors?
Yes. Color changes are an optional customization. Keep track of each contrast assignment so the windows, tires, wings, bumpers, and body sections remain easy to identify during assembly.
How are the toys assembled?
Each vehicle is assembled by sewing its crocheted components together. The car and truck use stuffed sections, while the plane body and wings are shaped and attached according to the assembly instructions.
How should I attach the tires?
For each tire style, hold two Tire Halves with wrong sides together and sew around their outer edges. During assembly, position the tires so half of each tire hangs below the vehicle body where specified.
Can I use a different yarn?
A substitute may be used, but yarn thickness and fiber characteristics can affect gauge, proportions, texture, stuffing density, and yarn requirements. Use the hook size needed to obtain the intended gauge.
How should I store the finished toys?
Store them in a dry area away from direct heat and heavy pressure. Give the wings, roofs, windows, and trailer enough room so they do not become flattened or distorted.
Conclusion
These car, plane, and truck crochet toys combine colorful yarn, simple shaping, expressive embroidery, and hands-on assembly into a charming handmade set. Make all three for a coordinated display or gift them separately. For the original free pattern source and project reference, see the Red Heart Happy Little Car, Plane, & Truck crochet pattern.