
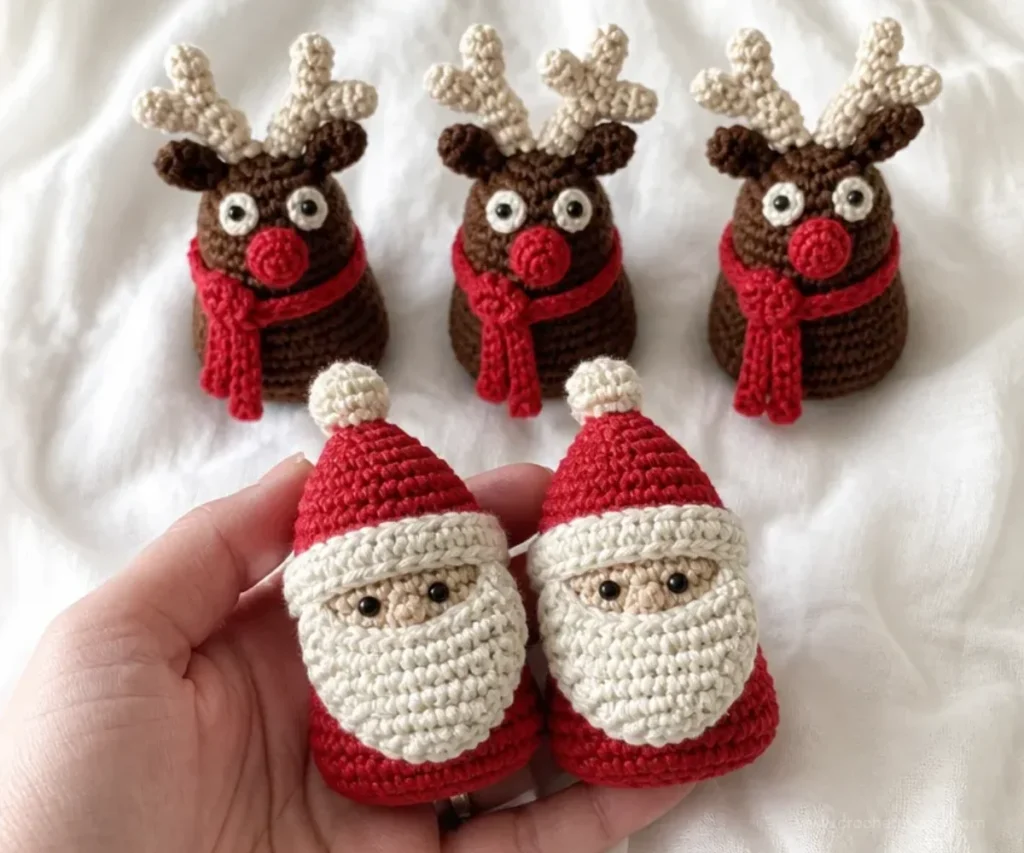
A crochet bottle topper turns an ordinary bottle into a festive handmade decoration. This Crochet Bottle Toppers Pattern includes two seasonal designs: a Santa with a fluffy beard and pom-pom hat, or a reindeer with antlers, a bobble nose, eyes, and scarf. They are enjoyable projects for practicing simple rounds, shaping, color changes, and small sewn details. Finished toppers can dress up holiday bottles, decorate a seasonal table, or become thoughtful handmade gifts.
Why You’ll Love This Crochet Project

- Two festive designs: Make Santa, reindeer, or both for a coordinated holiday display.
- Useful crochet practice: The pattern includes single crochet, half double crochet, increases, decreases, bobble shaping, and joined rounds.
- A creative handmade accent: A bottle topper adds personality to a bottle used as table décor or a gift.
- Easy to personalize: The basic shapes can be highlighted with different festive color combinations while keeping the approved construction intact.
- Small decorative components: The beard, pom-pom, antlers, eyes, nose, and scarf create recognizable details without requiring a large project.
Crochet Mimi Tip: Keep the Santa and reindeer pieces together in separate labeled bags while crocheting so small components such as antlers, eyes, and pom-poms do not get misplaced.
Before You Start Crocheting
This pattern provides two versions, each worked as one bottle topper:
- Santa: A cylindrical body made in joined rounds, a beard, and a pom-pom.
- Reindeer: A shaped body, bobble nose, two antlers, two eyes, and a scarf.
The Santa body begins with a chain ring and is worked in single crochet rounds. Color A creates the contrasting section, while the final rounds shape the top. The beard is worked separately in rows and attached during finishing.
The reindeer body uses the Santa body instructions with changes. It omits the Santa color changes, adds shaping rounds, forms a bobble nose, and continues for five additional rounds before the top is sewn closed. The antlers, eyes, and scarf are made separately and attached afterward.
The pattern uses US crochet terminology. Useful abbreviations include:
- ch: chain
- sc: single crochet
- sl st: slip stitch
- sc2tog: single crochet two together
- hdc: half double crochet
- RS: right side
- rem: remaining
- yoh: yarn over hook
Materials You’ll Need
Santa Version
- Bernat® Super Value™ (7 oz/197 g; 440 yds/402 m)
- Main Color (MC): Cherry Red (53436) 1 ball
- Contrast A: Oatmeal (53010) 1 ball
- Contrast B: Natural (07414) 1 ball
- Black embroidery floss
- Yarn needle
- Larger hook
- Smaller hook
Reindeer Version
- Bernat® Super Value™ (7 oz/197 g; 440 yds/402 m)
- Main Color (MC): Chocolate (53013) 1 ball
- Contrast A: Cherry Red (53436) 1 ball
- Contrast B: Oatmeal (53010) 1 ball
- Contrast C: Natural (07414) 1 ball
- Black embroidery floss
- Yarn needle
- Larger hook
- Smaller hook
The larger hook is used for the Santa body, beard, and reindeer body. The smaller hook is used for the reindeer antlers, eyes, and scarf. The yarn needle is needed for sewing pieces together, closing the reindeer, and weaving in ends.
Complete Crochet Instructions
The two versions are written separately below. Follow the Santa instructions for the Santa topper and use the reindeer changes for the reindeer topper.
Santa Version: Body
Work in rounds; start with ring.
With MC and larger hook, ch 18.
Join with sl st to first ch to make a ring.
1st rnd: Ch 1. 1 sc in each ch around. Join with sl st to first sc.
2nd rnd: Ch 1. 1 sc in each sc around. Join with sl st to first sc.
Rep last rnd 4 times more, joining A at end of last rnd.
With A, rep 2nd rnd 3 times more.
Join MC at end of last rnd.
Next rnd: With MC, ch 1.
1 sc in first sc. Sc2tog.
1 sc in next sc. Sc2tog.
Rep from * around. Join with sl st to first sc. 12 sts rem.
Next 2 rnds: Ch 1. 1 sc in each st around. Join with sl st to first sc.
Next rnd: Ch 1. *Sc2tog. Rep from * around. 3 sts rem. Fasten off.
Santa Version: Beard
With B and larger hook, ch 5.
1st row: (RS). 1 sc in 2nd ch from hook. 1 sc in each ch to end of ch. Turn. 4 sc.
2nd to 4th rows: Ch 1. 2 sc in first sc. 1 sc in each sc to last sc. 2 sc in last sc. Turn. 10 sc at end of 4th row.
5th row: Ch 1. 1 sc in each of next 2 sc. Turn. Leave rem sts unworked.
6th and 7th rows: Ch 1. 1 sc in each of next 2 sc. Turn. Fasten off at end of 7th row.
With RS facing, skip next 6 unworked sc. Join B with sl st in next sc.
Ch 1. 1 sc in same sp as sl st. 1 sc in last sc. Turn.
Next 2 rows: Ch 1. 1 sc in each of next 2 sc. Turn. Fasten off at end of last row.
Santa Version: Pompom
Wind B around 2 fingers approx 15 times. Remove from fingers and tie tightly in center. Cut through each side of loops. Trim to a smooth round shape. Attach pom-pom to top of Hat.
Santa Version: Finishing
Attach Beard to Body as shown in picture. With black embroidery floss, embroider eyes on face using French knots.
Reindeer Version: Body
Use the Santa body instructions with the following changes.
With MC and larger hook, work from the beginning to the shaping section as given for Santa, omitting reference to color change.
After Santa’s “rep/shape” section, work the following additional rounds:
Next rnd: Ch 1. (2 sc in next sc. 1 sc in each of next 8 sc) twice.
Join with sl st to first sc. 20 sc.
Next rnd: Ch 1. 1 sc in each sc to end of rnd. Join with sl st to first sc.
Next rnd: Ch 1. 1 sc in first sc. 2 sc in next sc. 1 sc in each of next 9 sc. 2 sc in next sc. 1 sc in each of next 8 sc. Join with sl st to first sc. 22 c. (as written)
Next rnd: Ch 1. 1 sc in each of first 6 sc.
With A, (Yoh and draw up a loop in next st. Yoh and draw through 2 loops on hook) 3 times.
Yoh and draw through 4 loops on hook – bobble nose made.
With MC, 1 sc in each sc to end of rnd. Join with sl st to first sc.
Next 5 rnds: Ch 1. 1 sc in each sc around. Join with sl st to first sc.
Fasten off at end of last rnd, leaving a long end.
Sew top of Reindeer closed.
Reindeer Version: Antlers
Make 2.
With B and smaller hook, ch 12.
1st row: 1 sc in 2nd ch from hook. 1 sc in each of next 2 ch.
*Ch 4. 1 sc in 2nd ch from hook. 1 sc in each of next 2 ch. 1 sc in each of next 4 ch of foundation ch. Rep from * once more.
1 sc in each ch to end of ch. Fasten off.
Reindeer Version: Eyes
Make 2.
With C and smaller hook, ch 2.
6 sc in 2nd ch from hook. Join with sl st to first sc. Fasten off.
Reindeer Version: Scarf
With A and smaller hook, ch 45.
1st row: 1 hdc in 3rd ch from hook. 1 hdc in each ch to end of ch. Fasten off.
Reindeer Version: Finishing
Attach Antlers to top of Reindeer head. Sew eyes to front of head. With black embroidery floss embroider eyes. Tie Scarf around neck.
Finished Project Inspiration
- Holiday table setting: Place a Santa or reindeer topper on a bottle at each end of a seasonal table.
- Festive bottle gift: Add a handmade topper to a bottle being given as a holiday present.
- Coordinated display: Make both versions and arrange them together for a playful Santa-and-reindeer pairing.
- Seasonal kitchen décor: Use a decorated bottle as part of a holiday countertop or dining area display.
- Hostess gift accent: Pair a finished topper with a bottle for a thoughtful handmade presentation.
Caring for Your Crochet Project
Keep the finished topper dry and protect its small sewn details. Dust it gently with a soft, dry cloth or a clean makeup brush, especially around the beard, antlers, and pom-pom.
For a small mark, spot-clean carefully with a barely damp cloth and avoid soaking the piece. Do not scrub the embroidered eyes or pull on attached components. Allow any cleaned area to dry fully before placing the topper back on a bottle.
Store the topper in a cool, dry place away from excessive heat and direct sunlight. Place the Santa pom-pom and reindeer antlers where they will not be crushed. If the pieces become slightly flattened, gently reshape them by hand rather than applying strong heat.
Tips for Better Results
- Count the starting chain carefully: The Santa body begins with ch 18, and the chain must be joined without twisting before working the first round.
- Join each round consistently: Every specified round ends with a slip stitch to the first stitch. Keep the joining point in the same position as you work.
- Watch the color changes: In the Santa body, join A at the end of the repeated single crochet rounds, work the three rounds with A, and join MC at the end of the last round.
- Track shaping counts: The Santa shaping round leaves 12 sts rem, and the following decrease round leaves 3 sts rem. These counts help confirm that the decreases are positioned correctly.
- Keep the beard symmetrical: The beard increases at both ends from the 2nd through 4th rows. Work the two short sections carefully after leaving the center stitches unworked.
- Make the pom-pom firm: Tie the center tightly before cutting the loops, then trim gradually so you do not remove too much yarn.
- Shape the reindeer nose carefully: The bobble is worked after the first six single crochet stitches of its round. Keep the loops even while drawing through them.
- Attach details securely: Sew the beard, antlers, eyes, and scarf firmly, then weave in or trim yarn ends neatly so they do not show through the finished topper.
Color and Styling Variations
The approved pattern uses traditional Christmas colors, but you can make optional color changes while keeping the construction unchanged.
- Use a deep green or icy blue in place of the Santa MC for a different holiday palette.
- Try cream, tan, or soft gray for the reindeer body if you want a lighter woodland look.
- Pair a red reindeer scarf with a green or cream body for a classic seasonal contrast.
- Use a coordinated color family for both toppers, such as burgundy, cream, and warm brown.
- Make several toppers in alternating Santa and reindeer colors for a mixed display.
These are optional styling choices rather than changes to the approved instructions. Substituting yarn or changing hook sizes may affect the topper’s tension, texture, proportions, and fit, so keep the original yarn and hooks when you want results closest to the pattern.
Frequently Asked Questions
What does this crochet bottle topper pattern make?
It includes two seasonal bottle topper designs: a Santa and a reindeer. The Santa has a beard and pom-pom, while the reindeer has antlers, eyes, a bobble nose, and scarf.
Can I make only the Santa version?
Yes. The Santa version is complete on its own and includes the body, beard, pom-pom, and finishing instructions.
Can I make only the reindeer version?
Yes. Follow the reindeer body changes and then make the two antlers, two eyes, and scarf before completing the finishing steps.
Which yarn is used for the pattern?
The pattern uses Bernat® Super Value™ listed as 7 oz/197 g; 440 yds/402 m. The required colors and quantities differ between the Santa and reindeer versions, so check the materials list for the version you plan to make.
Which hook is used for each component?
The larger hook is used for the Santa body and beard and the reindeer body. The smaller hook is used for the reindeer antlers, eyes, and scarf.
How is the Santa beard attached?
After crocheting the beard, attach it to the Body as shown in the picture. The eyes are embroidered on the face with black embroidery floss using French knots.
How is the reindeer body closed?
After the final five single crochet rounds, fasten off while leaving a long end. Sew the top of the Reindeer closed.
Can I change the colors?
Yes. Color changes are an optional styling choice. Keep in mind that different yarns or hook sizes can change the texture, tension, and proportions of the finished topper.
How should I store the finished topper?
Store it in a cool, dry place where the beard, pom-pom, antlers, and embroidered details will not be crushed. Gentle dusting and careful spot cleaning are preferable to soaking.
Conclusion
These crochet bottle toppers bring Santa and reindeer charm to holiday bottles, gift presentations, and seasonal displays. Make one design or create both as a matching set, then adjust the colors to suit your décor. For another festive bottle decoration idea, explore this gnome bottle topper crochet pattern.